
Working with melamine can be exciting and challenging for DIY enthusiasts and woodworkers. Its smooth finish and durability make it a popular choice for furniture and cabinetry projects.
However, cutting melamine requires precision and techniques to avoid chip-outs and rough edges. If you’re wondering how to cut melamine using a circular saw, you’re in the right place.
In this guide, we will explore the best practices and step-by-step instructions on How do you cut melamine circular saw?
Safety Precautions
Safety should always be a top priority when using power tools such as a circular saw, especially when working with materials like melamine. Melamine is a type of laminate commonly used in furniture and cabinetry, known for its smooth finish and durability.
However, cutting melamine requires caution and adherence to safety measures to prevent accidents and achieve clean and accurate cuts. This section will discuss essential safety precautions to follow when cutting melamine with a circular saw.
Personal Protective Equipment (PPE): Before operating a circular saw to cut melamine, it is important to wear appropriate PPE to minimize the risk of injury.
- Safety Glasses: Wear protective glasses to protect your eyes from flying debris, dust, or any potential chips or splinters during cutting.
- Hearing Protection: Operating a circular saw can generate significant noise levels, damaging your hearing over time. Use earplugs to protect your ears from prolonged exposure to loud noise.
- Respiratory Protection: Melamine cutting can release fine particles and dust, which can be harmful when inhaled. Use a properly fitted dust mask or a respirator with a particle filter to prevent inhalation of these particles.
- Gloves: Wearing gloves can provide better grip, reduce vibration, and protect your hands from sharp edges or accidental contact with the blade. Choose gloves that allow for agility while ensuring adequate protection.
Wearing personal protective equipment is crucial to ensure your safety when cutting melamine with a circular saw. Safety glasses, hearing protection, respiratory protection, and gloves are essential to protect yourself from potential hazards. Always inspect your PPE before use and replace any damaged or worn-out equipment.
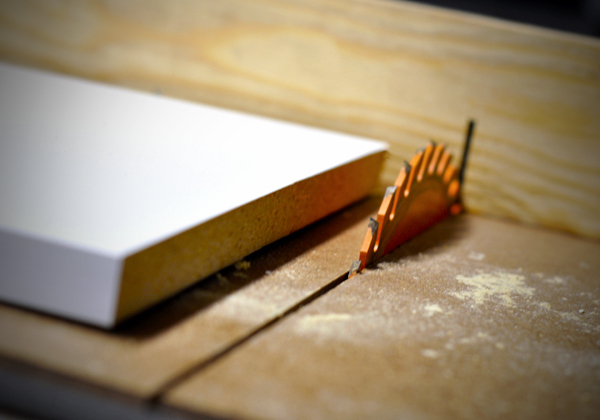
Choosing the Right Blade
Selecting the appropriate blade for your circular saw is vital to achieving clean, precise, and efficient cuts when working with melamine. The right blade will help minimize chipping, splintering, and tear-out, producing a professional-looking finish. This section will discuss factors to consider when choosing the right knife for cutting melamine with a circular saw.

Blade Type Answer the query: The type of blade you choose for cutting melamine can impact the quality of the cut and the overall performance of your circular saw.
- Fine-Toothed Blade: To cut melamine effectively, opt for a blade with a high tooth count, typically 80 to 100 teeth or more. These blades have closely spaced teeth that produce smoother cuts and minimize chipping and splintering.
- Carbide-Tipped Blade: Melamine is a hard and abrasive material, so using a blade with carbide-tipped teeth is essential. Carbide is known for its durability and ability to withstand the demands of cutting hard surfaces, providing longer blade life.
- Triple-Chip Grind (TCG) Blade: Consider using a triple-chip grind (TCG) configuration. TCG blades have alternating flat-top and beveled teeth, allowing them to cut melamine more effectively and reduce chipping.
Blade Size Answer the query: The size of the blade is another crucial consideration when cutting melamine with a circular saw.
- Diameter: Circular saw blades come in various diameters, typically 7 ¼ inches to 10 inches. The blade’s diameter should match the capacity of your circular saw.
- Thin Kerf Blade: When cutting melamine, choosing a thin kerf (thickness) is beneficial. A thinner blade creates less resistance, reducing the chances of chipping or splintering the material.
Blade Rotation Speed Answer the query: The blade’s rotation speed affects the cut’s quality and the blade’s performance.
- RPM (Revolutions Per Minute): Check the recommended RPM of the blade you choose and ensure it matches the RPM range of your circular saw. Running the blade at the correct speed provides efficient cutting and prolongs the blade’s lifespan.
Measuring and Marking
Accurate measurements and precise markings are crucial when cutting melamine with a circular saw. Proper measuring and marking ensure your cuts are straight, aligned, and meet your desired specifications. This section will discuss important considerations and techniques for measuring and marking melamine before cutting with a circular saw.
Measuring Tools Answer the query: Using the right measuring tools is essential to ensure accurate measurements when preparing to cut melamine.
- Tape Measure: A quality tape measure is indispensable for accurately measuring melamine panels’ length and width. Look for a tape measure with clear markings and a locking mechanism to secure the measurement.
- Combination Square: A combination square is a versatile tool with a ruler and an adjustable square head. It is ideal for checking and marking 90-degree angles and ensuring accurate cuts on the melamine.
Marking Techniques Answer the query: Proper marking techniques help guide the circular saw and ensure precise cuts on the melamine.
- Pencil Line: A sharp pencil marks the cutting line on the melamine surface. Make sure the line is visible
- Double-check Measurements: Measure twice and cut once. Before marking the melamine, verify your measurements to minimize errors and ensure accurate cuts.
- Use a Straight Edge: Place a straight edge along the marked cutting line, such as a ruler or a straight board. This provides a guide for your circular saw and helps ensure consecutive cuts.
- Avoid Tear-out: To reduce the chances of tear-out or chip along the cut line, apply a strip of masking tape over the marked line. The video helps prevent the melamine from splintering when the saw blade contacts the surface.
Accurate measuring and marking are crucial when cutting melamine with a circular saw. Use reliable measuring tools such as tape and combination squares to ensure precise measurements.

Employ proper marking techniques, including clear pencil lines, double-checking measurements, using a straight edge, and applying masking tape to prevent tear-out. These practices will help you achieve clean, accurate cuts and minimize the risk of errors when working with melamine.
Preparing the Circular Saw
Properly preparing your circular saw before cutting melamine is essential to ensure optimal performance, accuracy, and safety. Setting up and adjusting your saw will help achieve clean and precise cuts while minimizing the risk of accidents or damage to the material. This section will discuss important steps for preparing the circular saw before cutting melamine.
Blade Selection and Installation Answer the query: Choosing the right blade and correctly installing it in the circular saw is crucial for cutting melamine effectively.
- Select the Appropriate Blade: Refer to the earlier “Choosing the Right Blade for Cutting Melamine” section to select a blade with a high tooth count, carbide tips, and a triple-chip grind configuration.
- Blade Installation: Follow the manufacturer’s instructions for safely installing the blade in your circular saw. Ensure the blade is tightly secured and properly aligned to prevent wobbling or vibrations during operation.
Blade Height Adjustment Answer the query: Adjusting the blade height is necessary to ensure the correct cutting depth when working with melamine.
- Cutting Depth: Set the blade height to slightly deeper than the thickness of the melamine material. This will help prevent excessive tear-out and chipping while ensuring a clean cut.
- Test Cuts: Before making the final adjustments, perform a test cut on a scrap piece of melamine to confirm the blade height produces the desired results.
Fence and Guide Setup Answer the query: Setting up a fence and guides will enhance accuracy and stability during cutting.
- Rip Fence: If your circular saw includes a rip fence, align it parallel to the blade according to the desired width of the cut. This will help maintain consistent and straight cuts along the length of the melamine.
- Clamps and Guides: Consider using clamps or guides to secure the melamine and provide additional support during cutting. This minimizes movement and reduces the risk of inaccuracies or accidents.
Cutting Techniques
Proper cutting techniques are essential for achieving clean, precise cuts in melamine with a circular saw. Melamine is prone to chipping and splintering, so employing the right cutting techniques will help minimize these issues and ensure professional results. This section will discuss important cutting techniques to follow when working with melamine.
Start with a Scoring Cut Answer the query: Starting with a scoring cut helps reduce the chances of chipping and splintering along the cut line.
- Scoring Cut: Begin by making a shallow scoring cut along the intended cutting line. This initial pass helps create a groove, reducing the likelihood of tear-out and providing a guide for subsequent cuts.
- Shallow Depth: Set the circular saw’s cutting depth to a more external setting for the scoring cut. This prevents the blade from cutting too deeply into the melamine on the first pass.
Slow and Steady Cutting Speed Answer the query: Maintaining a slow and steady cutting speed is crucial for clean cuts in melamine.
- Controlled Speed: Slow down the cutting speed of the circular saw while maintaining a steady and calm motion. Rushing through the cut can increase the chances of chipping and inaccurate dents.
- Avoid Applying Excessive Pressure: Let the blade do the work. Avoid exerting excessive downward pressure on the saw, resulting in rougher cuts and potential damage to the melamine surface.
Support and Stabilization Answer the query: Providing proper support and stabilization during the cutting process enhances accuracy and reduces the risk of accidents.

- Workbench or Sawhorses: Place the melamine panel on a stable workbench or sawhorse to provide a solid and level surface for cutting.
- Clamping: If necessary, use clamps to secure the melamine in place and prevent movement during cutting. This ensures stability and reduces the risk of errors.
- Support for Offcuts: When cutting near the end of the melamine panel, support the offcut piece to prevent it from breaking off and causing damage or injury.
Following the right cutting techniques is crucial for achieving clean, accurate cuts in melamine with a circular saw. Start with a scoring cut to minimize chipping, maintain a slow and steady cutting speed to ensure precision, and provide proper support and stabilization for the melamine panel.
Preventing Chip-Out
Chip-out refers to the splintering or chipping along the cut line when working with melamine. It is crucial to employ techniques that minimize or prevent chip-out from achieving clean and professional-looking cuts. This section will discuss effective methods for avoiding chip-out when cutting melamine with a circular saw.
Blade Selection and Sharpness Answer the query: Using the right blade and ensuring its sharpness is important for reducing chip-out during cutting.
- Quality Blade: Choose a high-quality blade for cutting melamine, preferably with a high tooth count, carbide tips, and a triple-chip grind configuration. A sharp and properly maintained blade is less likely to cause chip-out.
- Blade Maintenance: Regularly inspect and sharpen the blade to maintain its cutting efficiency. Dull knives are more prone to causing chip-out and splintering.
Masking Tape Method Answer the query: Applying masking tape to the cut line can help minimize chip-out and protect the melamine surface.
- Masking Tape Application: Before marking the cut line, apply a strip of masking tape directly over the marked line on the melamine panel. Press it down firmly to ensure good adhesion.
- Cut Through the Tape: Use the circular saw to cut through the masking tape and the melamine. The video acts as a protective barrier, reducing the likelihood of chip-out and splintering.
Cutting Technique Answer the query: Adopting the right cutting technique can significantly reduce chip-out when working with melamine.
- Scoring Cut: As mentioned earlier, start with a shallow scoring cut along the cut line. This helps create a groove and minimizes chip-out during subsequent cuts.
- Approach the Cut Line: Gradually approach the cut line, allowing the blade to engage with the material smoothly. Avoid forcing the saw into the melamine abruptly, as it can increase the risk of chip-out.
- Support the Melamine: Ensure the melamine panel is adequately supported throughout the cutting process. This helps minimize vibrations and movement, reducing the chance of chip-out.
Preventing chip-out is essential for achieving clean and professional cuts when working with melamine. Selecting the right blade and maintaining its sharpness, applying masking tape along the cut line, and employing proper cutting techniques are effective methods to minimize chip-out.
By implementing these techniques, you can achieve precise and splinter-free cuts in melamine with a circular saw.
Finishing Touches
After cutting, applying finishing touches to the melamine can enhance the overall appearance and ensure a professional finish.
These final steps help smooth out rough edges, clean the surface, and prepare the material for its intended use. This section will discuss important finishing touches to consider when cutting melamine with a circular saw.
Sanding the Edges Answer the query: Sanding the edges of the cut melamine helps achieve a smooth and clean finish.
- Sandpaper Grit: Start with medium-grit sandpaper, such as 120 or 150, to remove rough edges or splinters along the cut edges. For a smoother finish, follow up with finer-grit sandpaper, such as 220.
- Sanding Block or Power Sander: Use a sanding block or a power sander to ensure even sanding across the edges. Sand in a controlled motion, applying even pressure to achieve consistent results.
Removing Sawdust Answer the query: Clearing away sawdust and debris is important for a clean and professional finish.
- Compressed Air or Brush: Use compressed air or a brush to remove sawdust from the surface and crevices of the melamine. Pay attention to the cut edges and other areas where sawdust may have accumulated.
- Damp Cloth or Vacuum Cleaner: Wipe the surface of the melamine with a slightly wet cloth. Ensure the melamine is completely clean before proceeding to the next step.
Applying Edge Banding (Optional) Answer the query: Edge banding can be applied to the cut edges of the melamine for a polished and finished look.
- Edge Banding Material: Edge banding is a thin strip of veneer or plastic that is adhered to the cut edges of the melamine to conceal them and provide a clean finish. Choose a matching or contrasting edge banding material based on your desired aesthetic.
- Adhesive Application: Follow the manufacturer’s instructions for applying the edge banding adhesive to the melamine edges. Use a roller or a firm pressure to ensure proper adhesion.
- Trimming and Finishing: Trim off any excess edge banding material using a utility knife or a technological edge banding trimmer. After cutting, use a file or sandpaper to smooth the edges and blend seamlessly with the melamine surface.
Applying finishing touches to the cut melamine enhances the final appearance and ensures a professional finish. Sanding the edges to remove roughness, clearing away sawdust and debris, and considering the application of edge banding are essential steps.
Following these finishing touches, you can achieve a smooth and polished result when cutting melamine with a circular saw.