
Are you interested in learning how to cut plywood with a circular saw? Whether you’re a DIY enthusiast or a professional carpenter, making clean and accurate cuts in plywood is a fundamental skill.
Plywood is a versatile and commonly used material in woodworking projects, but it can be challenging to cut without the right techniques. A circular saw is a powerful tool that, when used correctly, can make precise cuts in plywood sheets of various thicknesses.
This comprehensive guide will take you through the step-by-step process of cutting plywood with a circular saw, providing you with the knowledge and confidence to tackle your woodworking projects successfully. So, let’s dive into the world of plywood cutting and discover how to cut plywood with a circular saw.
Gather the Necessary Materials and Tools
Before cutting plywood with a circular saw, gathering all the necessary materials and tools is important. This step ensures you have everything you need to complete the task safely and effectively.
- Circular Saw: A circular saw is the primary tool for cutting plywood. Ensure it is in good working condition, with a sharp blade and a properly functioning guard.
- Plywood: Select the plywood sheets according to your project requirements. Before starting, measure and mark the dimensions you need to cut on the plywood.
- Measuring Tools: Gather a measuring tape or a ruler to mark the plywood’s dimensions accurately.
- Pencil or Marker: Use a pencil or marker to make clear and visible marks on the plywood. This will guide your cutting lines.
- Safety Gear: Ensure you have appropriate safety gear to protect yourself during cutting. This should include safety glasses, goggles, and work gloves to safeguard your hands.
- Clamps or Sawhorses: Depending on your workspace, you may need clamps or sawhorses to secure the plywood sheet. This will help provide stability and prevent the wood from moving while cutting.
- Work Surface: Set up a suitable work surface, such as a workbench or a pair of sturdy sawhorses, to support the plywood while cutting. Make sure the surface is clean and free from any obstacles.

Having the right equipment, including a properly functioning circular saw, measuring instruments, safety gear, clamps or sawhorses, and a suitable work surface, ensures that you can proceed with the cutting process smoothly and safely. Gathering these items beforehand will help you achieve accurate and efficient cuts in your plywood projects.
Prepare the Workspace
To cut plywood with a circular saw, it is important to prepare your workspace properly. A well-organized and safe workspace will facilitate a smooth and successful cutting process.
- Clear the Area: Start by clearing where you will cut the plywood. Remove any clutter, debris, or obstacles that could interfere with your movement or cause accidents.
- Adequate Lighting: Ensure the workspace is well-lit to provide clear visibility of the cutting area. Use natural light sources or set up additional lighting if needed.
- Ventilation: If you work indoors, ensure proper ventilation to disperse sawdust or fumes. Open windows or use fans to maintain a comfortable and breathable environment.
- Secure the Plywood: Place the plywood sheet on a stable work surface such as a workbench or sawhorse. Ensure that it is well-supported and won’t wobble or shift during cutting. Use clamps if necessary to secure the plywood in place.
- Consider Support for Offcuts: If you anticipate cutting off small sections or thin strips from the plywood, have secondary support or sawhorse to rest those pieces to prevent them from binding the blade or causing hazards.
- Safety Zone: Establish a clear safety zone around your workspace. Ensure there is ample space for you to move freely and safely operate the circular saw without any obstruction.
- Fire Safety: Plywood dust is highly flammable, so keeping the workspace free from any potential ignition sources is crucial. Avoid working near open flames or sparks; have a fire extinguisher readily accessible.
- Protective Surfaces: Place a sacrificial piece of scrap wood or a cutting mat underneath the plywood to prevent damage to the underlying work surface. This will protect your work surface and provide cleaner cuts.
Preparing your workspace before cutting plywood with a circular saw is essential for safety and efficiency. Clearing the area, ensuring adequate lighting and ventilation, securing the plywood, establishing a safety zone, considering support for offcuts, practicing fire safety, and using protective surfaces will contribute to a well-organized and controlled environment. These steps will help you maintain focus, prevent accidents, and achieve precise and clean cuts in your plywood projects.
Measure and Mark the Plywood
Before cutting plywood with a circular saw, measuring and marking the plywood’s dimensions accurately is crucial. Proper measurements and clear markings ensure precise cuts and help you achieve the desired outcome.
- Determine the Measurements: Identify the dimensions you need for your project. Use a ruler to calculate the length and width of the plywood sheet, and mark those measurements down.
- Marking Tools: Choose a marking tool easily visible on the plywood surface. A pencil or marker works well for this purpose. Ensure the marking tool is sharp and produces clear, legible lines.
- Reference Edge: Select a straight edge on the plywood sheet as a reference for making your measurements and markings. The reference edge should be free from any imperfections or damage.
- Marking Guidelines: Start by measuring and marking the longer dimensions on the plywood sheet. Use the measuring tool to keep at the appropriate distance from the reference edge precisely.

- Straight Cuts: Use a straightedge or a long, straight piece of wood to connect the marked points for straight cuts. Align the straightedge with the marks and draw a line along its edge, extending the entire length of the plywood.
- Curved or Irregular Cuts: If you need to make curved or irregular cuts, use a flexible measuring tape or a bendable material to outline the desired shape. Mark the points along the curve or uneven line and connect them using a freehand technique.
- Double-Check Measurements: Double-check the accuracy of your measurements and markings after marking the dimensions. Ensure they align with your project requirements before proceeding to cut.
- Labeling: If you are working with multiple pieces of plywood or have specific sections that need to be cut differently, consider labeling each marked area. This will help you stay organized during the cutting process.
Measuring and marking the plywood accurately is critical before cutting it with a circular saw. Take precise measurements, use a suitable marking tool, establish a reference edge, and create clear and visible guidelines for straight or curved cuts.
Double-check your measurements and markings to ensure they align with your project requirements. By paying attention to this step, you set yourself up for a successful cutting process and achieve the desired results in your plywood project.
Set up the Circular Saw
Properly setting up the circular saw is essential before cutting plywood. This ensures the saw is in optimal working condition and ready to make accurate cuts.
- Check the Saw Blade: Inspect the circular saw blade to ensure it is sharp, clean, and in good condition. Replace the blade if it is dull, damaged, or unsuitable for cutting plywood.
- Adjust the Cutting Depth: Set the circular saw’s cutting depth according to the plywood’s thickness. Most circular saws have a depth adjustment lever or knob that allows you to control the depth of the blade. Align the blade depth so that it slightly exceeds the thickness of the plywood.
- Adjust the Bevel Angle (if needed): If you require beveled cuts, adjust the bevel angle of the circular saw. Loosen the bevel adjustment lever or knob.
- Install the Blade Guard: Ensure that the blade guard of the circular saw is properly installed and functioning. The blade guard protects your hands and prevents debris from being thrown back toward you during cutting.
- Set the Rip Fence (if applicable): If you need to make long, straight cuts, use a rip fence as a guide. Attach the rip fence to the circular saw’s base and adjust it to the desired distance from the cutting line. The rip fence helps maintain consistent parallel cuts.

- Secure the Workpiece: Before turning on the circular saw, ensure the plywood sheet is securely positioned on the work surface. Use clamps or other suitable methods to prevent the plywood from shifting or moving during cutting.
- Power Source: Ensure the circular saw is connected to a suitable power source. If using a corded saw, plug it into a grounded electrical outlet. If using a cordless saw, ensure the battery is fully charged.
- Personal Protective Equipment (PPE): Wear appropriate personal protective equipment, including safety glasses or goggles, ear protection, and work gloves, to safeguard yourself during the cutting process.
Setting up the circular saw correctly ensures safe and accurate cuts when working with plywood. Check the condition of the blade, adjust the cutting depth and bevel angle if necessary, install the blade guard, and attach a rip fence for straight cuts.
Always secure the workpiece before turning on the saw, and ensure a reliable power source is connected. Lastly, remember to wear the appropriate personal protective equipment for added safety. By following these steps, you’ll be well-prepared to use the circular saw effectively in cutting plywood.
Secure the Plywood
Securing the plywood properly is essential for safe and precise cutting with a circular saw. Securely stabilizing the plywood minimizes the risk of accidents and ensures accurate cuts.
- Choose a Stable Work Surface: Place the plywood on a stable work surface, such as a workbench or sawhorse. The work surface should be sturdy and capable of supporting the entire length and width of the plywood sheet.
- Clear the Area: Remove any objects or debris from the immediate vicinity of the plywood. Ensure no obstacles could interfere with the cutting process or cause the plywood to shift unexpectedly.
- Position the Plywood: Align the plywood on the work surface, ensuring it is flush with the edges of the character. Double-check that the plywood is positioned in the correct orientation based on your measurements and markings.
- Use Clamps: If necessary, use clamps to secure the plywood to the work surface. Place the clamps strategically along the edges of the plywood to prevent it from moving during the cutting process. Ensure the clamps are tight enough to hold the plywood firmly but not so tight that they cause damage.
- Consider Sacrificial Supports: If you are cutting through the entire plywood thickness, placing sacrificial supports underneath is helpful. These can be strips of scrap wood or a sacrificial backing board that will prevent tear-out and support the plywood fibers during the cut.
- Check Stability: Before starting the saw, apply gentle pressure to different plywood parts to check their stability. Make sure it does not wobble or shift when pressure is applied. Adjust the clamps if needed to achieve a secure and stable setup.
- Double-Check Measurements and Markings: Once the plywood is securely in place, double-check your measurements and markings to ensure they are accurate and aligned with your desired cuts. Make any necessary adjustments before proceeding with the saw.
Properly securing the plywood is vital for safe and accurate cutting with a circular saw. Choose a stable work surface, clear the area around the plywood, and position it correctly. Use clamps strategically to hold the plywood firmly in place, and consider adding sacrificial supports if needed.
Verify the stability of the plywood before starting the saw, and double-check your measurements and markings. By ensuring a secure setup, you can confidently proceed with cutting the plywood and achieve precise results in your project.
Cutting Techniques
When cutting plywood with a circular saw, employing the appropriate cutting techniques is essential for achieving clean and accurate cuts. Understanding and implementing these techniques will help you navigate the plywood smoothly and achieve the desired results.
- Positioning and Stance: Stand in a balanced and comfortable position with your feet shoulder-width apart. Position yourself to have a clear view of the cutting line and maintain control of the circular saw throughout the cut.
- Start with a Test Cut: Before making the final cuts on your plywood, it is advisable to make a test cut on a scrap piece. This allows you to verify that the saw blade is properly aligned and the cutting depth is correct.
- Line up the Blade: Align the circular saw’s blade with the cutting line you marked on the plywood. Ensure that the edge is slight to the waste side of the line to account for the width of the blade itself.
- Start Slowly and Gradually: Cut by gently lowering the spinning blade onto the plywood. Start at a slower speed, and once the edge makes contact with the plywood, gradually increase the speed while maintaining control.
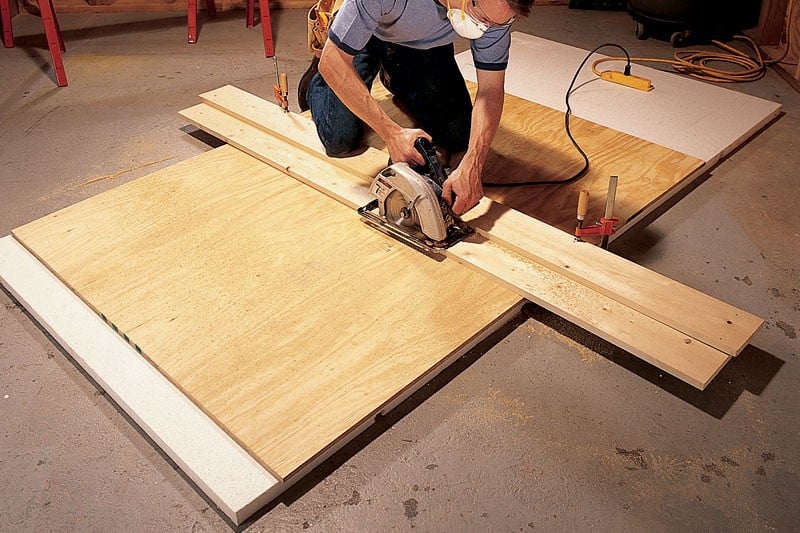
- Use a Guide: You can use a straightedge or a guide rail for long, straight cuts as a reference. Place the guide on the marked line and run the circular saw alongside it, allowing the focus to keep the amount straight and accurate.
- Support Offcuts: When nearing the end of a cut, and a small section of plywood is about to be separated from the main sheet (offcut), support it to prevent it from binding the blade or causing kickback. Use a scrap piece of wood or another suitable support to stabilize the offcut.
- Maintain a Steady Pace: Keep a steady and consistent pace while moving the circular saw along the cutting line. Avoid pushing or forcing the saw too quickly, leading to inaccurate cuts and plywood splintering.
- Mind the Blade Exit: Be aware of the blade’s path as it exits the plywood. Ensure a clear space for the edge to go safely without encountering any obstacles or potentially causing damage.
- Use Clamps as a Guide: You can use clamps to cut shapes or curves. Secure a scrap piece of wood along the cutting line, and use the wood’s edge to guide the circular saw.
Implementing proper cutting techniques when using a circular saw on plywood is crucial for achieving clean and accurate cuts. Maintain a balanced stance and position, start with a test cut, align the blade with the cutting line, and gradually increase speed.
Use guides or straightedges for straight cuts, support offcuts, and maintain a steady pace throughout the amount. Stay mindful of the blade exit and utilize clamps as guides for curved cuts. These techniques will enhance your cutting precision and achieve the desired results in your plywood projects.
Finishing Touches
After cutting plywood with a circular saw, applying finishing touches to the cut edges is important to achieve a polished and professional appearance. These finishing touches help refine the edges, remove any roughness or splinters, and enhance the overall quality of the cut plywood.
Inspect the Cut Edges: After completing the cuts, carefully examine the plywood edges to identify any rough or uneven areas, splinters, or imperfections that need attention.
Sanding: Sanding is a common method to smooth the cut edges of plywood. Use sandpaper or a sanding block with medium to fine grit to gently sand along the cut edges. Move the sandpaper back and forth, applying even pressure to achieve a smooth surface.
Chamfering or Beveling: If desired, chamfer or bevel the plywood edges to give them a more finished look. This involves sanding or using a router to create a slightly angled or rounded edge. Be mindful of the desired effect and apply consistent pressure to create uniform chamfers or bevels.
Remove Splinters: Use a utility knife or sandpaper to carefully remove any splinters or rough spots along the cut edges. Gently scrape or sand the affected area until it is smooth and free from splinters.
Dust Removal: After sanding, clean the cut edges of the plywood to remove any sawdust or debris. Use a brush, compressed air, or a damp cloth to clean the surface thoroughly.
Optional Finishes: You may apply a finish or sealer to the cut edges depending on your project requirements. This can be a clear varnish, paint, or trim banding tape to provide a polished appearance and protect the plywood from moisture or wear.
Double-Check Measurements: Once the finishing touches are complete, double-check the measurements of the cut plywood to ensure they are accurate and align with your project requirements.
Applying finishing touches to the cut edges of plywood helps refine the appearance and ensure a professional finish. Inspect the cut edges for roughness or imperfections, and use sanding techniques to smooth the surfaces. Consider chamfering or beveling the edges for added aesthetics. Remove any splinters or rough spots and thoroughly clean the surfaces to remove dust and debris.
If desired, apply optional finishes or edge banding for additional protection and a polished look. Double-check the measurements to ensure accuracy. By implementing these finishing touches, you can elevate the overall quality of your plywood project and achieve a refined result.
Safety Precautions
When working with a circular saw to cut plywood, it is crucial to prioritize safety. You can minimize risks and protect yourself during the cutting process by following essential safety precautions.
Personal Protective Equipment (PPE): Always wear the appropriate personal protective equipment to safeguard yourself. This includes goggles to protect your eyes from flying debris, ear protection to reduce the noise generated by the saw, and work gloves to provide a better grip and protect your hands.
Read the Manual: Familiarize yourself with the circular saw’s user manual and follow the manufacturer’s instructions for safe operation. Understand your particular saw model’s specific safety features, operating procedures, and maintenance guidelines.
Workspace Safety: Maintain a clean and well-organized workspace. Clear the area of clutter, debris, and any potential tripping hazards. Ensure adequate lighting to have a clear view of the cutting area.
Secure the Plywood: As mentioned earlier, securely stabilize the plywood before cutting to prevent movement or shifting. Use clamps or other appropriate methods to secure the plywood to the work surface, ensuring it remains stable throughout the cutting operation.
Blade Guard: Ensure that the blade guard of the circular saw is functioning correctly and in place.
Avoid Loose Clothing and Jewelry: Wear fitted clothing and avoid loose items that could get caught in the saw or other moving parts. Remove jewelry or secure it safely to minimize the risk of entanglement.
Positioning and Grip: Maintain a stable and balanced stance while operating the circular saw. Hold the saw firmly, ensuring your hands are positioned away from the cutting area and clear of the blade’s path.
Use Both Hands: Use both hands to control the circular saw throughout the cutting process. Keep one hand on the handle and the other on the auxiliary handle, if available, for enhanced control and stability.
Mind the Cord: If using a corded circular saw, take precautions to prevent tripping over the cord. Keep the line away from the cutting area and use cord management techniques to secure and route the cable safely.
Power Disconnect: Before any blade adjustments or maintenance tasks, ensure the circular saw is disconnected from the power source. Unplug corded saws or remove batteries from cordless saws to prevent accidental activation.
Avoid Overreaching: Maintain a proper cutting position and avoid overreaching. Position yourself comfortably and adjust the workpiece or body position to maintain control and stability.
Stay Focused and Alert: Concentrate on the task and avoid distractions. Do not operate the circular saw.
Safety should be the top priority when using a circular saw to cut plywood. Wear the appropriate personal protective equipment, familiarize yourself with the user manual, and maintain a clean and organized workspace. Secure the plywood, ensure the blade guard is in place, and avoid loose clothing or jewelry that could pose a risk.
Maintain a stable stance, use both hands to control the saw, and be mindful of the cord’s location. Disconnect the power before making adjustments or performing maintenance tasks, and avoid overreaching or distractions. By following these safety precautions, you can create a safe working environment and minimize the risk of accidents when using a circular saw to cut plywood.