
With its versatility and durability, Plywood stands as one of the most commonly used materials in woodworking and DIY projects. Whether you’re crafting furniture, building cabinets, or tackling home improvement tasks, there often comes a time when you need to shape plywood sheets to fit your project’s precise specifications.
This is where the jigsaw, a versatile and indispensable power tool, comes into play. Unveiling the techniques, tips, and tricks necessary to master: how to cut Plywood with a jigsaw.
The jigsaw, a handheld saw with a reciprocating blade, has earned its place in the toolbox of both professional craftsmen and enthusiastic hobbyists for its ability to make intricate and curved cuts through various materials.
However, achieving clean and precise cuts can be more challenging when working with Plywood, a material known for its layered structure and potential to splinter.
Whether you’re a seasoned woodworker looking to refine your technique or a novice eager to learn the ropes, this guide will walk you through the entire process step by step, offering valuable insights.
Getting Started
Before you embark on your plywood-cutting journey with a jigsaw, it’s crucial to familiarize yourself with the tool, its components, and the variety of blades available.
Adjust the jigsaw’s settings for optimal performance and confidently tackle different cutting scenarios. Moreover, we will explore essential safety measures to ensure your woodworking experience remains injury-free.
So, whether you’re planning to create custom cabinetry, construct a bookshelf, or tackle any plywood-based project, the following pages will provide you with the know-how to cut Plywood with a jigsaw-like a seasoned craftsman. Let’s dive in and uncover the secrets of achieving precision, efficiency, and finesse in plywood cutting, one jigsaw stroke at a time.
Importance of Cutting Plywood with a Jigsaw
The importance of cutting Plywood with a jigsaw in woodworking and DIY projects cannot be overstated. This versatile power tool offers numerous advantages, making it an indispensable asset for anyone working with Plywood. Here are some key reasons why cutting Plywood with a jigsaw is crucial:
Precision Cutting
- Plywood often requires precise and intricate cuts, especially when creating curves, angles, or complex shapes.
- Jigsaws excel at making these cuts with ease and accuracy, allowing you to achieve the desired results without needing specialized, expensive machinery.
Versatility
- Jigsaws are incredibly versatile and can handle various cutting tasks beyond Plywood, including cutting plastic, metal, and various wood types.
- This versatility makes them a valuable addition to any workshop or DIY toolkit.
Maneuverability
- Jigsaws are lightweight and easy to maneuver, which is particularly beneficial when working on projects that require handheld cutting.
- Their compact size and ergonomic design suit tight spaces and intricate work.
Reduced Tear-Out
- Plywood tends to splinter and tear out when cut with other tools like circular saws or reciprocating saws.
- Jigsaws with the right blade can significantly reduce tear-out, resulting in cleaner, more polished cuts.
Curved Cuts
- Creating curved cuts in Plywood can be challenging without the appropriate tool.
- Jigsaws are designed for precisely this purpose, allowing you to follow curved lines and intricate patterns effortlessly.
Accessibility
- A jigsaw can be used almost anywhere, unlike table or band saws, which may require larger workspaces and specific setups.
- This accessibility makes it ideal for on-site jobs and DIY projects in various locations.
User-Friendly
- Jigsaws are generally easy to use, making them accessible to both experienced woodworkers and beginners.
- With some practice and knowledge, anyone can quickly become proficient in using a jigsaw to cut Plywood effectively.
Cost-Effective
- While there are specialized machines for cutting Plywood, such as panel saws or CNC routers, they can be expensive and may not be practical for occasional DIYers or small workshops.
- Jigsaws provide an affordable alternative that still delivers high-quality results.
Tools and Materials
When cutting Plywood with a jigsaw, it’s essential to have the right tools and materials to ensure a safe, efficient, and accurate cutting process. Here’s a list of the tools and materials you’ll need:
Tools
- Jigsaw: The central tool for the job. Choose a jigsaw with a good motor, adjustable speed settings, and the ability to accept various blades.
- Jigsaw Blades: Select the appropriate jigsaw blades for cutting Plywood. T-shank blades are standard and easy to install. Ensure the sharp blade is suitable for plywood cutting to minimize tear-out and achieve clean cuts.
- Safety Gear: Hearing protection is also advisable, as jigsaws can be noisy. Consider a dust mask to prevent inhalation of dust particles.
- Clamps: Use clamps to secure the plywood sheet firmly to a workbench or sawhorse. This prevents the material from moving during cutting and ensures greater accuracy.
- Measuring and Marking Tools: A tape measure, pencil, and a straightedge or square for accurately measuring and marking cut lines.
- Workbench or Sawhorses: A stable work surface is crucial for supporting the Plywood while you cut it. Sawhorses or a sturdy workbench are ideal options.
Materials
- Plywood: The plywood sheet(s) you intend to cut to your desired dimensions for your project.
- Layout and Cutting Guide: Depending on your project, you may need a template or cutting guide to trace or guide the jigsaw along curved or complex cutting lines.
- Sandpaper or Sanding Block: After cutting, you may need to sand the Plywood edges to smooth any rough spots or edges for a finished look.
Optional but Recommended
- Router and Router Bit: If you want to finish the edges of the Plywood, a router with an appropriate bit can give it a polished and professional appearance.
- Workshop Vacuum or Dust Collection System: To minimize sawdust buildup and maintain a clean workspace, consider using a vacuum or dust collection system.
- Cordless Drill and Screws: If your project involves attaching the cut plywood pieces, a cordless drill and appropriate screws will be helpful.
- Painter’s Tape or Masking Tape: Applying tape along the cut line can help reduce splintering and tear-out on the surface of the Plywood.
- Wood Glue and Clamps: If you plan to join multiple pieces of Plywood together, wood glue and clamps can be handy for creating solid and secure bonds.
Before cutting Plywood with a jigsaw, ensure you have all the necessary tools and materials. This preparation will help streamline the cutting process and ensure you can work safely and efficiently, achieving precise results in your woodworking or DIY project.
Cutting Techniques
Cutting Plywood with a jigsaw requires specific techniques to achieve clean and accurate results. Here are several cutting techniques you can use when working with a jigsaw:
Straight Cuts:
- Mark Your Cut Line: Measure and mark the cut line on the Plywood using a pencil and a straightedge or square. Ensure the line is clear and visible.
- Select the Right Blade: Choose a fine-toothed jigsaw blade suitable for cutting Plywood. The blade should have enough teeth to minimize tear-out and provide a smooth cut.
- Secure the Plywood: Clamp the Plywood to a stable work surface, such as a workbench or sawhorse, to prevent it from moving during the cut.
- Start the Cut: Position the jigsaw blade just to the waste side of your cut line. Start the jigsaw and gently guide it along the marked line, keeping the blade on the waste side of the line.
- Maintain a Steady Pace: Maintain a consistent cutting speed and avoid pushing or forcing the jigsaw. Let the blade work, and guide the tool steadily along the cut line.
- Control Tear-Out: To minimize tear-out on the Plywood’s surface, you can apply painter’s or masking tape along the cut line before starting the cut. This can help support the wood fibers and reduce splintering.
- End the Cut: When you approach the end of the cut, be cautious to prevent tear-out. You can use a backup piece of scrap plywood under the workpiece to minimize splintering as you complete the cut.
Curved Cuts:
- Trace the Curve: If cutting a curved shape or pattern, trace the design onto the Plywood using a template or layout guide. Ensure your marks are accurate and clear.
- Choose the Right Blade: Select a jigsaw blade appropriate for curved cuts. Blades with more teeth per inch provide better control for intricate curves.
- Secure the Plywood: Clamp the Plywood to the work surface, ensuring it won’t move during the cut.
- Pilot Hole: For tight curves, consider drilling a pilot hole through the waste area to allow for blade insertion. This hole will give you a starting point for the jigsaw blade.
- Start the Cut: Insert the jigsaw blade into the pilot hole or a drilled access point, start the tool, and carefully follow the traced curve. Keep the blade on the waste side of the line.
- Control the Jigsaw: When making curved cuts, it’s essential to pivot the jigsaw gently, following the curve of the design. Take your time and make gradual turns to avoid oversteering.
Interior Cutouts:
- Drill Starter Holes: When cutting out an interior shape within the Plywood, drill a starter hole near the area’s interior to be removed.
- Insert the Blade: Insert the jigsaw blade into the drilled hole and start the tool.
- Cut Outward: Carefully follow the marked line, cutting outward toward the edge of the Plywood. Be mindful of the curve and direction of the cut.
- Control the Jigsaw: Keep the jigsaw under control, making precise turns as needed. You may need to reposition the Plywood to access different areas of the interior cutout.
- Finish the Cut: Once you have cut out the interior shape, continue to follow the marked line until you reach the outer edge of the Plywood.
By mastering these cutting techniques with a jigsaw, you can achieve professional-looking results when working with Plywood in various woodworking and DIY projects. Practice and patience are vital to proficiently using a jigsaw for straight and curved cuts, allowing you to bring your creative ideas to life with precision and confidence.
Troubleshooting
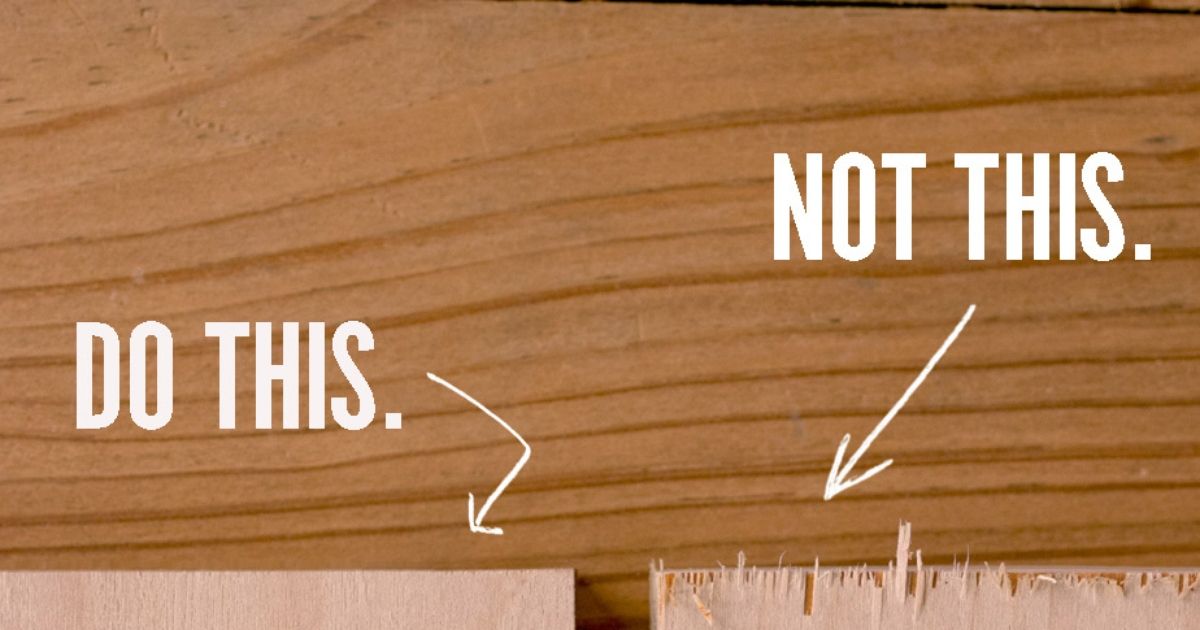
Splintering and Tear-Out:
Issue: Plywood often splinters or tears along the cut line, resulting in a rough finish.
Troubleshooting:
- Use a sharp, fine-toothed jigsaw blade designed for Plywood.
- Apply painter’s or masking tape along the cut line to support the wood fibers and reduce splintering.
- Cut slowly and steadily, allowing the blade to do the work.
- Use a backup piece of scrap plywood underneath the workpiece to minimize tear-out as you finish the cut.
- Consider using higher-quality Plywood with fewer voids, as lower-quality Plywood is more prone to splintering.
Wandering or Off-Course Cuts:
Issue: Your jigsaw blade seems to veer off-course, leading to inaccurate cuts.
Troubleshooting:
- Ensure that the baseplate of the jigsaw is flat and firmly against the plywood surface.
- Maintain a firm grip on the jigsaw and guide it steadily along the cut line.
- Make sure the blade is perpendicular to the surface of the Plywood.
- Avoid pushing or forcing the jigsaw; let the blade follow its natural cutting path.
- For long cuts, use a straightedge or a guide to help maintain a straight line.
Blade Overheating or Dulling Quickly:
Issue: The jigsaw blade heats up rapidly or becomes dull after a short period of use.
Troubleshooting:
- Choose the correct type of jigsaw blade for plywood cutting, and ensure it is sharp.
- Adjust the jigsaw’s speed settings to match the thickness of the Plywood; slower speeds are generally better for thicker materials.
- Take breaks during extended cutting sessions to allow the blade to cool down.
- Lubricate the blade with a lubricant or cutting wax to reduce heat and friction.
Binding or Stalling:
Issue: The jigsaw blade gets stuck or stalls during the cut.
Troubleshooting:
- Make sure the blade is installed correctly and tightened in the jigsaw.
- Reduce cutting speed and apply gentle pressure to avoid overloading the jigsaw.
- Consider using a more giant or powerful jigsaw for thicker or denser Plywood.
Rough Edges and Sanding:
Issue: The cut edges of the Plywood are rough and require extensive sanding.
Troubleshooting:
- Use a high-quality jigsaw blade with more teeth per inch to achieve smoother cuts.
- Sand the edges of the Plywood immediately after cutting to remove any roughness or splinters.
- Consider using a router with a trimming or flush-cutting bit to achieve smooth edges.
Inaccurate Curved Cuts:
Issue: The jigsaw doesn’t follow the desired path accurately when cutting curves.
Troubleshooting:
- Practice cutting curves on scrap plywood to improve your control and accuracy.
- Use a smaller, finer-toothed blade for better control on tight curves.
- Make gradual, deliberate turns and avoid abrupt changes in direction.
- Secure the Plywood firmly to prevent it from moving during curved cuts
Safety Precautions
Wear Personal Protective Equipment (PPE):
- Hearing Protection: Jigsaws can be noisy, so wear earplugs or earmuffs to prevent hearing damage.
- Dust Mask or Respirator: Plywood dust can be harmful when inhaled, so wear a dust mask to minimize exposure.
- Work Gloves: Use gloves with an excellent grip to enhance control and protect your hands from splinters.
Read the Manufacturer’s Manual:
- Pay close attention to recommended operating procedures, maintenance, and safety precautions.
Inspect the Jigsaw:
- Before starting any cutting operation, inspect the jigsaw for loose or damaged parts, frayed cords, or any signs of wear and tear. Ensure that all safety features and guards are in place and functioning correctly.
Choose the Right Blade:
- Select the appropriate jigsaw blade for cutting Plywood. Ensure the blade is sharp, in good condition, and suitable for the thickness and type of Plywood you’re working with.
Secure the Workpiece:
- Clamp the Plywood securely to a stable work surface, such as a workbench or sawhorse. This prevents the Plywood from moving or vibrating during the cut, reducing the risk of accidents.
Maintain Proper Body Position:
- Stand to the side of the jigsaw, not directly behind it, to avoid injury in case of kickback or wood splintering.
- Keep your body positioned in a way that maintains balance and stability, preventing accidental slips or falls.
Keep Hands Clear:
- Never place your hands or fingers in the path of the jigsaw blade. Always maintain a safe distance between your hands and the cutting area.
Start the Jigsaw Safely:
- Ensure the jigsaw is switched off before connecting it to the power source.
- Start the jigsaw with the blade clear of the workpiece to prevent accidental contact.
Control the Jigsaw:
- Avoid pushing or forcing the jigsaw; let the blade do the cutting, and guide the tool along the cut line.
- Make gradual and controlled turns when cutting curves to maintain accuracy.
Work in a Well-Ventilated Area:
- Plywood dust can be harmful when inhaled, so work in a space with good ventilation or use a dust collection system and wear a dust mask.
Disconnect Power When Not in Use:
- Whenever you need to make adjustments to the jigsaw or change the blade, disconnect it from the power source to prevent accidental start.
Conclusion
Cutting Plywood with a jigsaw involves several key steps that should be followed meticulously. Moreover, practice makes perfect for mastering the art of cutting Plywood with a jigsaw. Regularly honing your skills will improve your cutting accuracy and efficiency. Don’t hesitate to experiment with different materials and cut types to expand your expertise.