
Welcome to a beginner’s guide on how to sharpen a drill bit! You’re in the right place if you’ve ever struggled with a dull drill bit that can’t seem to cut through materials efficiently. This step-by-step tutorial will walk you through restoring your drill bits to their sharp and efficient glory.
Whether you’re a DIY enthusiast or a professional tradesperson, knowing how to sharpen a drill bit can save you time and money, ensuring your projects are completed precisely and efficiently. So, let’s dive in and discover the secrets of revitalizing your drill bits for optimal performance!
Understanding Drill Bit Anatomy
A. Basic Components of a Drill Bit
To comprehend drill bits entirely, it’s essential to recognize their fundamental components, which include:
- Shank: The shank is the non-cutting part of the drill bit, typically located opposite the drilling end. It usually has a cylindrical shape and is designed to securely fit into the chuck of a drill. The shank’s diameter varies depending on the drill bit size and type, and it plays a crucial role in ensuring stability and accurate drilling.
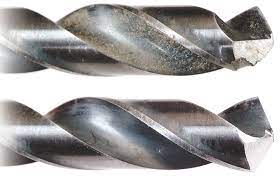
- Flutes: The flutes are the spiral grooves or channels that run along the length of the drill bit. They serve several purposes, such as carrying away debris and chips generated during drilling, providing a path for lubrication, and aiding in cooling the drill bit. The number and shape of flutes can vary depending on the type and size of the drill bit.
- Point: The point, also known as the drill bit’s cutting edge or tip, is the portion responsible for creating the hole in the material. Drill bits come with different point designs, each suited for specific materials and drilling tasks. Common point types include twist, brad, spade, and center points, each optimized for different applications.
B. Importance of a Sharp Point for Drilling Efficiency
A sharp point on a drill bit is critical for drilling efficiency and effectiveness. Here’s why it matters:
- A sharp point allows the drill bit to engage with the material more efficiently, reducing the initial resistance when starting a hole. This means less effort is required to initiate the drilling process, especially when working with complex or dense materials.
- A sharp point enhances precision and accuracy during drilling. It helps maintain a centered position, preventing the bit from wandering or creating off-center holes. This is crucial for tasks that require precise hole placement.
- A sharp point generates cleaner and smoother holes with fewer burrs or rough edges. It minimizes material tear-out, resulting in neater and more professional-looking work.
- A dull or blunted point can increase friction and heat during drilling, which can prematurely wear out the bit and reduce its lifespan. In contrast, a sharp point reduces heat generation and extends the bit’s longevity.
Signs of a Dull Drill Bit
A. Common Indications that a Drill Bit Needs Sharpening
Recognizing when a drill bit has become dull is crucial for maintaining efficient and safe drilling operations. Here are common indications that a drill bit needs sharpening:
- Reduced Cutting Performance: One of the most apparent signs of a dull drill bit is a significant reduction in cutting performance. When a bit becomes worn, it struggles to penetrate materials effectively, resulting in slower drilling progress and increased effort required from the operator.
- Increased Heat During Drilling: Dull drill bits generate more heat while drilling due to increased friction. If you notice that the material, you’re preparing becomes excessively hot or starts to smoke, it indicates that the bit needs sharpening.
- Wandering or Drifting While Drilling: A dull drill bit may cause the drill to wander or drift off the desired path. This can result in off-center holes and imprecise work, compromising project quality.
B. Emphasis on the Safety Aspect of Using Sharp Drill Bits
Safety is a paramount concern when working with power tools, including drills. Using sharp drill bits contributes significantly to safety in several ways:
- Reduced Strain: Sharp drill bits require less force to penetrate materials, reducing the strain on the operator’s muscles and joints. This minimizes the risk of overexertion and related injuries.
- Steady Control: Sharp bits allow for better control over the drilling process. Dull bits are more likely to catch or bind, potentially causing sudden jerks or loss of control over the drill, which can lead to accidents.
- Less Heat Generation: Dull bits generate more heat due to increased friction, damaging the bit and posing a fire hazard. Using sharp bits helps maintain lower heat levels, reducing the risk of burns and material damage.
- Improved Hole Quality: Sharp bits create cleaner, more precise holes, reducing the chances of sharp edges or burrs that can cause cuts or injuries during handling.
- Reduced Kickback: Dull bits are more prone to kickback, a sudden and dangerous reversal of the drill’s direction. This can catch the operator off guard and lead to accidents or injuries.
Tools and Materials Needed
A. List of Tools and Materials Required for Sharpening
To sharpen a drill bit effectively, you’ll need the following tools and materials:
- Bench Grinder: A bench grinder is the primary tool for sharpening drill bits. It consists of abrasive grinding wheels that can be changed to accomplish the ideal point and sharpness for the bit.
- Safety Goggles: Security goggles safeguard your eyes from sparks, metal fragments, and abrasive particles produced during sharpening. Always wear them to prevent eye injuries.
- Drill Bit Sharpening Jig (Optional): While not mandatory, a drill bit sharpening jig can be a helpful accessory. It assists in maintaining consistent angles and bevels during sharpening, ensuring uniform results. This tool is particularly beneficial for those less experienced in hand-sharpening drill bits.
- Lubricating Oil: Lubricating oil, such as honing or light machine oil, is used to cool and lubricate the grinding wheel and drill bit during sharpening. It helps prevent overheating and maintains the quality of the grinding wheel.
B. Purpose of Each Tool and Safety Gear
- Bench Grinder: The bench grinder is the central tool for sharpening drill bits. It features abrasive wheels that grind away dull material from the bit’s cutting edges, restoring its sharpness and geometry. The grinder allows you to adjust angles and slopes to match the original bit specifications.
- Safety Goggles: Safety goggles are crucial for eye protection using the bench grinder. During sharpening, metal particles and sparks can be emitted, posing a risk to your eyes. Wearing safety goggles ensures that your eyes are shielded from potential hazards.
- Drill Bit Sharpening Jig (Optional): A sharpening jig is an optional tool that helps maintain consistent angles and slopes during the sharpening process. It is beneficial for individuals needing more hand-sharpening drill bits experience. While not essential, it can enhance precision and uniformity in the sharpening results.
- Lubricating Oil: Lubricating oil serves two critical purposes. First, it cools the grinding wheel and the drill bit during sharpening, preventing overheating that could damage the metal. Second, it lubricates the grinding process, allowing smoother and more controlled sharpening.
Using these tools and safety gear correctly ensures a successful and safe drill bit sharpening process. Always follow the manufacturer’s instructions for the bench grinder and any optional sharpening jig, and prioritize safety by wearing the necessary eye protection.
Step-by-Step Guide to Sharpening a Drill Bit
A. Preparation Steps
Before embarking on the drill bit sharpening process, it’s crucial to prioritize safety. Begin by wearing safety goggles to shield your eyes from sparks and metal fragments generated during sharpening. Ensure your bench grinder is securely mounted to a stable surface and the wheels are in good condition and properly adjusted. Safety should always be your top concern.
Once safety measures are in place, secure the drill bit you intend to sharpen. If you have a drill bit sharpening jig, use it to hold the bit securely. Alternatively, if you’re sharpening by hand, maintain a firm grip on the bit throughout the process to prevent accidents and ensure stability.
B. Sharpening Process
Begin the sharpening process by setting up your bench grinder. Power it on and allow it to reach its full speed. Position yourself to the grinder’s side, avoiding standing directly before it to minimize exposure to debris thrown during sharpening.
Now, proceed with grinding the flutes of the drill bit. Hold the bit against the grinding wheel at a slight angle, aligning it with the original flute angle of the bit. Glide the bit across the wheel sweepingly, maintaining even contact with the wheel. Continuous movement is essential to prevent overheating, which could compromise the metal’s temper.
Transition to sharpening the point of the drill bit. Hold the bit horizontally and align it with the wheel at the correct point angle, typically around 118 degrees for general-purpose drill bits.
Slowly rotate the bit while applying even pressure against the grinding wheel. Ensure both cutting edges are uniformly sharpened to create a centered and sharp point.
C. Importance of Maintaining an Even Angle
Consistency in maintaining the correct angle during sharpening cannot be overstated. Deviating from the original angles can lead to uneven or misaligned cutting edges, reducing drilling efficiency and accuracy.
D. Tips for Achieving the Desired Sharpness
To achieve the desired sharpness effectively, use light and even pressure while grinding to avoid removing excessive material or causing overheating. Periodically dip the drill bit in lubricating oil or cool water to prevent overheating and preserve the metal’s temper.
Rotate the drill bit during sharpening to ensure both cutting edges are sharpened evenly. Regularly inspect the bit’s cutting edges to gauge progress, and cease sharpening once you achieve the desired sharpness and symmetry.
Testing the Sharpness
A. How to Check if the Drill Bit is Properly Sharpened?
After sharpening a drill bit, verifying if it has been adequately pointed and is ready for use is essential. Here’s how you can check for sharpness:
- Visual Inspection: Examine the drill bit closely, looking at the cutting edges and the point. Sharp cutting edges should appear clean, crisp, and free from burrs or irregularities. The point should be centered and well-defined.
- Edge Reflection: Hold the drill bit under a bright light source. If the cutting edges are sharp, you will see a distinct and uniform reflection of light along both edges. Dull or unevenly sharpened edges may exhibit irregular thoughts.
- Paper Test: Perform a simple paper test by attempting to penetrate an opening in a piece of paper. A properly sharpened drill bit should easily cut through the paper with minimal effort, leaving a clean hole.
- Visual Comparison: If you can access a new or professionally sharpened drill bit of the same size and type, compare the sharpened bit to the new one. They should closely resemble each other regarding angles, sharpness, and symmetry.
B. Making Adjustments if Necessary
You may need further adjustments if the drill bit fails the sharpness test or doesn’t meet your standards. Here are steps to consider:
- Regrinding: Return to the bench grinder and carefully regrind the cutting edges and points to maintain the correct angles and symmetry. Pay close attention to any areas that appear uneven or dull.
- Honing: If the cutting edges are slightly dull, refine them with a honing or sharpening stone. This step involves gently rubbing the cutting edges against the stone to remove any remaining burrs or irregularities.
- Final Inspection: After regrinding or honing, repeat the visual inspection, edge reflection, and paper test to confirm that the drill bit is correctly sharpened. Make any additional adjustments as needed until you achieve the desired sharpness.
- Practice: Sharpening drill bits is a skill that improves with practice. If you are still looking for the results, consider practicing on old or damaged bits before working on valuable ones.
Remember that achieving the correct sharpness may require several sharpening attempts, especially if you are new to the process. Patience and persistence are vital to mastering the art of drill bit sharpening.
Maintaining Sharp Drill Bits
A. Extending the Life of Sharpened Drill Bits
Proper care is essential to preserve the sharpness and longevity of sharpened drill bits. After pointing:
- Store your drill bits appropriately to shield them from damage and maintain their edge.
- Consider investing in a drill bit storage case or organizer to keep them well-organized and protected.
- Guarantee they are put away in a dry climate to prevent rust and corrosion, which can dull the cutting edges over time.
Additionally, cleaning your drill bits after each use is crucial. Use a wire brush or a dedicated drill bit cleaning tool to remove accumulated debris, metal shavings, and residue. Regular cleaning prevents buildup that can hinder cutting performance.
B. Knowing When to Replace a Drill Bit
Despite your efforts to maintain and sharpen drill bits, there will come a time when replacement becomes necessary. Several indicators suggest that it’s time to retire a drill bit:
- Excessive wear, resulting in a significantly reduced diameter, renders it unsuitable for its intended purpose and should prompt replacement.
- Similarly, drill bits with damaged or chipped cutting edges should be replaced as they can compromise drilling precision and safety.
- Loss of hardness, often caused by overheating or repeated sharpening, diminishes a bit’s ability to hold an edge effectively, making replacement necessary.
- It should be retired if a drill bit consistently fails to perform efficiently or produces subpar results despite sharpening.
- Lastly, consider acquiring specific drill bits designed for those applications for specialized tasks, as a one-size-fits-all approach may lead to suboptimal outcomes.
Regularly inspect your drill bits for signs of wear and damage, and be proactive in replacing them when they no longer meet your quality and performance standards.
Troubleshooting Common Issues
A. Common Problems Encountered During the Sharpening Process
While sharpening drill bits, several common issues can arise, affecting the sharpening quality. Here are some typical problems:
- Overheating: Overheating occurs when excessive friction generates heat during sharpening, potentially damaging the temper of the drill bit’s metal and compromising its hardness.
- Uneven Grinding: Uneven grinding can lead to irregular cutting edges, making the drill less effective and precise.
- Excessive Material Removal: Removing too much material during sharpening can alter the drill bit’s dimensions, rendering it unsuitable for its intended purpose.
B. Solutions to These Issues
To address these common problems during the sharpening process, consider the following solutions:
Overheating:
- Use Lubricating Oil: Apply lubricating oil to the grinding wheel and the drill bit periodically during sharpening. This helps dissipate heat and prevents overheating.
- Avoid Prolonged Grinding: Do not spend excessive time on one drill bit section while sharpening. Keep the bit moving across the grinding wheel to distribute heat evenly.
Uneven Grinding:
- Maintain Consistent Pressure: Apply even and consistent pressure against the grinding wheel to ensure uniform grinding on both cutting edges. Uneven pressure can result in asymmetrical edges.
- Use a Sharpening Jig: Consider using a drill bit sharpening jig, especially if you are less experienced. It helps maintain consistent angles and slopes, reducing the chances of uneven grinding.
Excessive Material Removal:
- Light Touch: When grinding, use a soft touch and avoid excessive force. Start with minimal material removal and adjust as needed.
- Frequent Inspections: Regularly inspect the drill bit during sharpening to gauge progress. This helps prevent the accidental removal of too much material.
Implementing these solutions can mitigate common issues while sharpening drill bits.
Conclusion
Knowing how to sharpen a drill bit is invaluable for any DIY enthusiast or professional tradesperson. A sharp drill bit makes your work more efficient and produces cleaner and more precise holes.
By following the means illustrated in this aide, you can undoubtedly maintain and extend the lifespan of your drill bits, saving you both time and money in the long run.
Safety is paramount when sharpening drill bits, so always wear appropriate protective gear and work in a well-ventilated area. Investing in a good-quality sharpening tool or jig can make the process more straightforward and effective.