
Are you interested in discovering how to sharpen band saw blades effectively? If you frequently use a band saw, you may have encountered the frustration of dull blades resulting in inefficient cuts.
Sharpening your band saw blades enhances their cutting performance and extends their lifespan, saving you money in the long term. So, let’s delve into the techniques necessary to keep your band saw blades sharp and prepared for any cutting task.
Step-by-Step Process to Sharpen the Band Saw Blade
Step 1: Safety first, before sharpening your band saw blade, prioritize safety. Ensure that the band saw machine is turned off and unplugged to prevent accidental activation during the sharpening process.
Step 2: Remove the Blade. Detach the band saw blade from the saw machine. Follow the manufacturer’s instructions or consult the user manual to remove the blade safely. This step allows you to work on the blade more conveniently and reduces the risk of injury.
Step 3: Clean the Blade Using a wire brush or a soft cloth, clean the band saw blade to remove any debris, sawdust, or residue that may have accumulated on its surface. This step ensures optimal sharpening and prevents material buildup that could interfere with the sharpening process.
Step 4: Secure the Blade Securely clamp the band saw blade in a bench vise or a specialized blade clamp. Ensure the blade is firmly in place to prevent any movement during sharpening, which could lead to inaccurate results.
Step 5: Determine the Tooth Geometry Identify the tooth geometry of your band saw blade before sharpening. There are different tooth patterns, such as regular, skip, or hook, and understanding the specific tooth design will help you maintain its original shape and angle during sharpening.
Step 6: Sharpening Options Various methods are available for sharpening band saw blades. Two common approaches are using a band saw blade sharpener or hand filing.
Band Saw Blade Sharpener
If you opt for a band saw blade sharpener, carefully follow the manufacturer’s instructions to set up and operate the machine. These sharpeners are designed to automate the sharpening process, ensuring accuracy and consistency.
Hand Filing
Use a flat mill file or a specialized band saw file. Position the file at the same angle as the tooth’s bevel and apply smooth, even strokes in a forward motion. Maintain a consistent filing angle and pressure as you work on each tooth. Remember to file only in one direction and avoid applying excessive pressure, which may alter the tooth’s shape.
Step 8: Maintain Tooth Shape and Angle Maintaining the original tooth shape and angle is crucial. This ensures proper cutting performance and prevents uneven cutting or blade wandering.
Step 9: Lubricate the Blade. After sharpening, apply a small amount of lubricant or blade oil to the band saw blade. This helps reduce friction during operation and prevents rust or corrosion from developing on the blade surface. Follow the manufacturer’s recommendations for the appropriate lubricant to use.
Step 10: Reinstall the Blade. Once the sharpening process is complete and the blade is lubricated, reinstall it onto the band saw machine. Make sure it is appropriately tense.
Benefits of sharpening for improved cutting performance and longevity

Sharpening cutting tools, including band saw blades, offers several benefits for improved cutting performance and extended longevity. This section will explore the advantages of sharpening band saw blades in detail.
1. Enhanced Cutting Efficiency
Sharpening a band saw blade restores its sharpness and cutting ability. Dull blades produce rough, imprecise cuts and require more effort to make a clean cut. When you sharpen the blade, it regains its sharp edge, allowing for smoother and more precise cuts. This improved cutting efficiency saves time and effort, especially when working on intricate or detailed projects.
2. Reduced Material Waste
The dull band saw blades tend to tear or crush the cut material, resulting in more waste and a lower-quality finish. Sharpening the blade ensures clean, accurate cuts, minimizing material waste.
3. Extended Blade Lifespan
Regularly sharpening a band saw blade helps to extend its lifespan. Dull blades put additional strain on the motor and other components of the band saw, leading to faster wear and potential damage. Keeping the blade sharp reduces the strain on the saw and promotes longevity. This means fewer blade replacements, which can save money in the long run.
4. Consistent Cutting Performance
The sharp band saw blades provide consistent cutting performance throughout their lifespan. As blades become dull, they tend to produce inconsistent cuts, varying depth, and smoothness. This can be particularly problematic when working on large projects requiring precise measurements. By sharpening the blade, you maintain consistent cutting performance, ensuring uniformity in your work.
5. Versatility and Adaptability
The sharpened band saw blades offer greater versatility and adaptability in various cutting applications. Whether cutting through wood, metal, or other materials, a sharp blade allows for cleaner and more efficient cuts across different materials. This versatility expands your range of projects and improves the overall flexibility of your band saw.
6. Cost Savings
Sharpening band saw blades can lead to significant cost savings. Instead of frequently replacing dull blades, sharpening allows you to rejuvenate the blade’s cutting ability at a fraction of the cost. This is particularly beneficial for professionals or individuals who work with band saws regularly, as the expense of continually purchasing new blades can add up over time.
Sharpening band saw blades offer several benefits, including enhanced cutting efficiency, reduced material waste, and extended blade lifespan, consistent cutting performance, increased versatility, and cost savings. Regular sharpening ensures clean and precise cuts, improves the band saws overall performance, and extends the blade’s life.
Understanding Band Saw Blades
The band saw blades are essential tools in woodworking and metalworking. A clear understanding of band saw blades helps users make informed decisions about their selection and usage.
Band Saw Blade Construction
The band saw blades consist of a continuous loop of material with teeth along one edge. Understanding the different components of a band saw blade can help users choose the right blade for their specific needs.
a) Blade Material
The band saw blades are commonly made from high-carbon steel or bimetallic materials. High-carbon steel blades are affordable and suitable for general-purpose cutting, while bimetallic blades offer enhanced durability and performance.
b) Blade Width and Thickness
The blade width determines the minimum radius of curvature the blade can handle, while the thickness influences the blade’s overall strength and stability.
c) Tooth Configuration
The band saw blades have different tooth configurations, including regular, skip, and hook. Regular-tooth blades are ideal for general-purpose cutting, skip-tooth blades are suitable for softer materials, and hook-tooth blades excel at cutting thick or rigid materials.
Tooth Set and TPI (Teeth per Inch)
Tooth set refers to the pattern in which the teeth are bent or set alternately to either side of the blade. This set creates a more comprehensive kerf than the blade, reducing friction and preventing binding.
The TPI (teeth per inch) measurement indicates the number of teeth on the blade in one inch of its length. Choosing the appropriate tooth set and TPI depends on the cut material and the desired cutting speed.
Blade Pitch
Blade pitch refers to the distance between two consecutive teeth on a band saw blade. It influences the blade’s ability to clear sawdust and chips during cutting. A coarser blade pitch is suitable for faster cutting in thicker materials, while a finer blade pitch is better for smoother cuts in thinner materials.
Choosing the Right Blade
Selecting the right band saw blade depends on various factors, including the type of material, desired cut quality, and cutting speed. Different blade characteristics, such as tooth configuration, TPI, and blade width, should be considered to ensure optimal performance for the specific application.

The understanding of band saw blades involves grasping their construction, including the materials used, blade width and thickness, tooth configuration, tooth set, TPI, and blade pitch. This knowledge is crucial in selecting the appropriate blade for different cutting tasks, ensuring efficient and precise results.
Signs of Dull Band Saw Blades
Identifying signs of a dull band saw blade is crucial for optimal cutting performance. This section will explore common indicators that can help you determine when it’s time to sharpen or replace your band saw blade.
The Decline in Cutting Performance
A clear sign of a dull band saw blade is a decline in cutting performance. If you notice the blade struggling to make smooth, clean cuts or requiring excessive force to cut through the material, it’s likely time to sharpen or replace the blade. Dull blades often produce rough, uneven cuts and may cause the material to burn or splinter.
Burn Marks on the Material
The dull band saw blades generate more heat due to increased friction during the cutting process. This can significantly result in burn marks on the material when cutting wood or plastics. Consistently observing burn marks or discoloration on the edges of the material indicates that the blade needs sharpening or replacement.
Increased Vibration and Noise
Compared to a sharp blade, a dull band saw blade creates more vibration and produces louder noises. As the teeth lose their sharpness, they struggle to make clean contact with the material, resulting in increased vibration and noise during cutting. If you notice a significant rise in vibrations or unusual noise levels, it’s likely due to a dull blade.
Difficulty in Feed Rate
A sharp band saw blade effortlessly cuts through the material with a smooth feed rate. However, you may need help to maintain a consistent feed rate when the blade becomes dull. The blade may grab or hesitate while cutting, requiring more effort to push the material through. If you notice a change in the feed rate or increased resistance, it may be time to sharpen or replace the blade.
Excessive Sawdust or Chip Buildup
Dull blades tend to generate more sawdust or chips compared to sharp blades. This is because dull teeth are less efficient at clearing the material during cutting. Suppose you observe a significant increase in sawdust or chip buildup around the cutting area. In that case, the blade no longer effectively removes the material and requires sharpening or replacement.
Visible Wear on Teeth
Inspecting the teeth of the band saw blade can provide valuable insights into its condition. Dull blades may show signs of wear, such as rounded or chipped teeth, missing or broken teeth, or uneven tooth height. If you notice any visible damage or deterioration on the teeth, it indicates that the blade needs attention.
Recognizing the signs of a dull band saw blade is essential for optimal cutting performance. A decline in cutting performance, burn marks on the material, increased vibration and noise, difficulty in feed rate, excessive sawdust or chip buildup, and visible wear on teeth are common indicators that a blade needs sharpening or replacement.
Preparation for Sharpening
Effective and safe sharpening of band saw blades requires a proper preparation. This section will discuss the necessary steps and precautions before sharpening your band saw blades.

Gather the Required Tools and Materials
Before you begin sharpening your band and saw blades, ensure you have all the necessary tools and materials. These may include a bench vise or blade clamp to secure the blade, a suitable file or sharpening stone for band saw blades, a wire brush or cleaning solvent to remove debris, safety goggles, and protective gloves. Having all the required items readily available will make the sharpening process more efficient.
Ensure Work Area Safety
Create a safe work area by setting up your workspace in a well-ventilated space with good lighting. Clear the area of any clutter or obstructions to minimize accidents.
Secure the Blade
To safely sharpen the band saw blade, securely fasten it in a bench vise or use a specialized blade clamp designed for this purpose. Ensure that the blade is firmly held in place, allowing easy access to the teeth for sharpening. This step is crucial for stability and safety during the sharpening process.
Clean the Blade
Before sharpening, thoroughly clean the blade to remove any dirt, debris, or rust that may have accumulated. Use a wire brush or cleaning solvent to clean the blade’s surface.
Inspect the Blade
Carefully examine the band saw blade for any visible damage or signs of wear. Look for missing or broken teeth, cracks, or irregularities. If you notice any significant damage or issues, such as excessive wear or tooth breakage, it may be necessary to replace the blade instead of sharpening it.
Follow Manufacturer Guidelines
Refer to the manufacturer’s guidelines or instructions for sharpening the specific type of band saw blade you are working with. Different blades may have specific sharpening angles or techniques recommended by the manufacturer. Adhering to these guidelines ensures optimal sharpening results and helps maintain the blade’s performance and longevity.
By gathering the required tools, ensuring a safe work area, securely fastening the blade, cleaning it, inspecting for damage, and following manufacturer guidelines, you can effectively sharpen your band saw blades while maintaining their cutting performance. These necessary precautions promote a safer and more efficient sharpening experience.
Manual Method for Sharpening Band Saw Blades
Manual sharpening is a popular technique to restore band saw blades’ cutting efficiency. This section will provide a step-by-step process for manually sharpening your band saw blades.
Secure the Blade
Begin by securely clamping the band saw blade in a bench vise or using a specialized clamp designed for this purpose. Ensure the blade is firmly in place, allowing easy access to the teeth for sharpening. This step is essential for stability and safety during the sharpening process.
Determine the Teeth per Inch (TPI)
Before starting the sharpening process, identify your band saw blade’s teeth per inch (TPI). This information helps determine the appropriate sharpening angle. Refer to the manufacturer’s guidelines or check the blade’s packaging for the TPI value.
Select an Appropriate Sharpening Tool
Choose a suitable sharpening tool based on the TPI of your blade. A flat or mill file is commonly used for low TPI blades. A triangular or specialized band saw blade file is recommended for higher TPI blades. Ensure that the file matches the tooth shape and size for accurate sharpening.
Establish the Sharpening Angle
Determine the sharpening angle based on the manufacturer’s recommendations or the existing angle of the blade. The band saw blades’ most common sharpening angles range from 8 to 12 degrees. Use a protractor or angle guide to maintain consistency while sharpening.
Sharpen the Teeth
Position the file at the determined sharpening angle and gently file each tooth downward. Follow the natural contour of the tooth, filing away from the blade body. Apply consistent pressure and maintain the same number of strokes for each tooth to ensure even sharpening.
Maintain Tooth Geometry
While sharpening, pay attention to maintaining the original tooth geometry. Avoid excessive filing that can alter the tooth shape or result in uneven tooth heights. Consistent tooth height across the blade ensures optimal cutting performance.
Check for Burrs
After sharpening all the teeth, inspect the blade for any burrs or rough edges. Use a deburring tool or fine file to remove any burrs or sharp edges that may have formed during the sharpening process. Smoothing out the edges helps prevent premature wear and ensures smooth cutting.
Lubricate the Blade
To reduce friction and prolong the blade’s lifespan, apply a thin coat of blade lubricant or cut oil to the teeth and to cut edges. This helps minimize heat buildup and reduces the risk of rust or corrosion.
Manual sharpening is a reliable method to enhance the cutting performance of band saw blades. By following the step-by-step process, including securely clamping the blade, determining the TPI, selecting the right sharpening tool, establishing the sharpening angle, filing the teeth, maintaining tooth geometry, checking for burrs, and lubricating the blade, you can effectively sharpen your band saw blades.
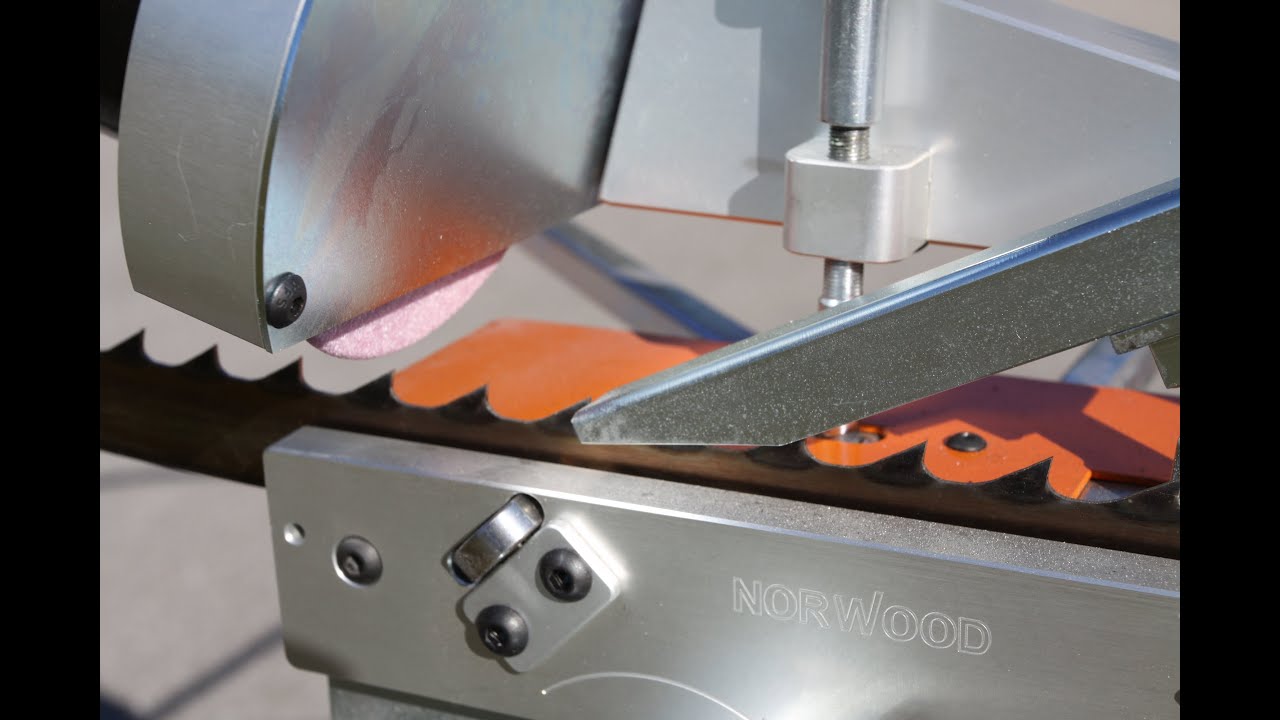
Automatic Method for Sharpening Band Saw Blades
The automatic method of sharpening band saw blades offers a convenient and efficient approach to blade maintenance. This section will explore the process and advantages of using an automatic sharpening machine for band saw blades.
Select an Automatic Sharpening Machine
Choose a suitable automatic sharpening machine to automate the sharpening process for band saw blades. These machines are specifically designed to sharpen band saw blades and deliver precise and consistent results. With various models available, select one that aligns with your specific needs and requirements.
Prepare the Machine
Before utilizing the automatic sharpening machine, ensure it is appropriately set up and calibrated by the manufacturer’s instructions. This may involve adjusting the blade guides, tensioning mechanisms, and sharpening settings. Adhering to the manufacturer’s guidelines optimizes the sharpening process and ensures accurate outcomes.
Secure the Blade
Securely fasten the band saw blade onto the automatic sharpening machine, following the instructions. Most machines have clamping mechanisms or blade holders that firmly hold the blade in place during sharpening. Ensuring proper blade security is essential for safe and effective sharpening.
Configure the Sharpening Parameters
Configure the desired sharpening parameters on the automatic sharpening machine. This includes setting the sharpening angle, tooth spacing, and depth of cut based on the specific requirements of your band saw blade. The machine’s controls and settings allow for precise adjustments, enabling you to achieve the desired sharpening results.
Initiate the Sharpening Process
Once the machine is properly set up and the parameters are adjusted, begin sharpening. The automatic sharpening machine will begin sharpening the band saw blade per the pre-defined settings. The machine will move the blade across a sharpening wheel or abrasive belt, effectively sharpening each tooth.
Monitor the Sharpening Progress
While the machine is sharpening the blade, closely monitor the progress. Ensure that the sharpening process runs smoothly and that the blade is uniformly sharpened. If any issues or irregularities are detected, pause the machine and make the necessary adjustments before proceeding.
Inspect and Test the Blade
After the automatic sharpening process is complete, carefully inspect the sharpened blade. Check for any remaining dull spots, uneven sharpening, or imperfections. Additionally, conduct a test cut to evaluate the blade’s cutting performance. Make further adjustments or touch-ups to achieve the desired cutting effectiveness if required.
Maintenance and Blade Care
Proper maintenance and care of the band saw blade are crucial for sustained sharpness and longevity. Clean the blade after sharpening to remove any debris or residue. Regularly inspect and clean the automatic sharpening machine to ensure optimal performance.
The automatic method of sharpening band saw blades involves using specialized machines for efficient sharpening. It includes selecting a suitable machine, preparing and calibrating it, securing the blade, configuring the sharpening parameters, initiating the sharpening process, monitoring the progress, inspecting and testing the blade, and maintaining both the blade and the machine.
Tips for Maintaining and Caring for Band Saw Blades
Regularly Clean the Blades
After each use, please make it a habit of cleaning your band thoroughly saw blades. Use a brush or cloth to remove sawdust, resin, or debris from the teeth and gullets. Cleaning the blades prevents material buildup that can hinder cutting performance and increase the risk of corrosion.
Conduct Regular Inspections
Periodically inspect your band saw blades for any signs of damage, such as broken teeth, cracks, or excessive wear. If you notice any issues, replace the damaged blades immediately. Using damaged blades can lead to poor cutting results, unsafe operation, and potential damage to the saw.
Store Blades Properly
Store your band saw blades correctly to prevent damage and maintain their sharpness when not in use. Using blade protectors or covers can provide additional protection against accidental damage.
Maintain Proper Blade Tension
Ensure that your band saw blades have the appropriate tension as the saw manufacturer recommends. Incorrect tension can result in poor cutting performance, excessive blade wear, and potential safety hazards. Follow the manufacturer’s guidelines for adjusting and maintaining the correct blade tension for optimal results.
Select the Right Blade for the Job
Choose the appropriate blade for the specific cutting task at hand. Different blades are designed for various materials and cutting applications. Using the correct blade ensures efficient cutting performance and reduces the risk of blade damage. Refer to the manufacturer’s recommendations or seek professional advice to select the right blade.
Keep Blades Sharp
Regularly sharpen your band saw blades to maintain their cutting effectiveness. Dull blades compromise cutting quality, put more strain on the motor, and reduce overall productivity. Follow the recommended sharpening intervals and techniques for your specific blade type and material.
Lubricate Blades
Apply a suitable blade lubricant or cutting oil to the teeth and cutting edges of your band saw blades. Lubrication reduces friction, heat buildup, and the risk of blade rust or corrosion. Please consult the manufacturer’s recommendations for the appropriate lubricant and apply it according to the suggested frequency.
Follow Safety Practices
Always prioritize safety when working with band saw blades. Adhere to safety guidelines and recommendations provided by the saw and blade manufacturers. Safe handling and operation contribute to the longevity and performance of the blades.