
Have you ever found yourself with a dull drill bit, eager to tackle a project but needing more tools or time to visit a professional sharpening service? Fret not because this guide will tell you the best way to hone bores manually.
Whether you’re a seasoned DIY enthusiast or a beginner looking to learn a valuable skill, this step-by-step tutorial will walk you through revitalizing your dull drill bits, allowing you to save time and money while ensuring your projects are a cut above the rest. So, let’s dive in and discover How to Sharpen Drill Bits by Hand?
Tools and Materials Required to Sharpen Drill Bits by Hand
A. Essential Tools and Materials
When sharpening drill bits by hand, you’ll need the following tools and materials:
- Bench Grinder: A seat processor is a fixed machine with abrasive wheels for sharpening drill bits. It provides a stable platform for accurate sharpening.
- Safety Goggles: Security goggles shield your eyes from sparks and metal particles generated during sharpening, ensuring your safety.
- Drill Bit Sharpening Jig (Optional): While not mandatory, a drill bit sharpening jig can assist in maintaining consistent angles and bevels during sharpening. It enhances precision, especially for those less experienced in hand-sharpening.
- Lubricating Oil: Lubricating oil, such as honing or light machine oil, is applied to the grinding wheel and drill bit during sharpening. It cools and lubricates the process, preventing overheating and preserving the metal’s temper.
B. Purpose of Each Tool
- Bench Grinder: The bench grinder is the primary tool for sharpening drill bits. It features abrasive grinding wheels that remove material from the bit’s cutting edges, restoring sharpness and geometry.
- Safety Goggles: Security goggles safeguard your eyes from hazards like sparks, metal fragments, and abrasive particles generated during sharpening. Wearing them is crucial to prevent eye injuries.
- Drill Bit Sharpening Jig (Optional): A drill bit sharpening jig is an optional tool that helps maintain consistent angles and bevels during sharpening. It ensures uniform results, particularly for those less experienced in hand-sharpening.
- Lubricating Oil: Lubricating oil plays a dual role. It cools the grinding wheel and the drill bit during sharpening, preventing overheating and potential damage to the metal. Additionally, it lubricates the grinding process, facilitating smoother and more controlled sharpening.
These tools and materials are essential for the hand-sharpening process, ensuring that you can effectively restore the sharpness of your drill bits with precision and safety.
Safety Precautions
A. Importance of Safety
When sharpening drill bits, safety should be a paramount concern. Sharpening involves machinery and metal particles, posing risks if not handled carefully. Here’s why safety is crucial:
- Protects Against Eye Injuries: The sharpening process generates sparks, metal fragments, and abrasive particles. These can fly off and potentially harm your eyes. Safety goggles are essential to shield your eyes from such hazards.
- Prevents Burns: The friction between the drill bit and the grinding wheel generates heat. Excessive heat can cause burns. Wearing gloves can protect your hands from accidental contact with hot metal.
- Ensures Safe Ventilation: Proper ventilation is essential to avoid inhaling dust and particles when working with machinery. Ensure you work in a well-ventilated area or use a dust collection system.
B. Use of Safety Goggles, Gloves, and a Well-Ventilated Area
- Safety Goggles: Safety goggles are a fundamental safety precaution. They provide a protective barrier for your eyes, shielding them from sparks, metal fragments, and abrasive particles. Always wear safety goggles when sharpening drill bits to prevent eye injuries.
- Gloves: While gloves are not mandatory, they can help prevent burns caused by accidental contact with the hot drill bit or other heated components. Heat-resistant gloves designed for this purpose are recommended.
- Well-Ventilated Area: Work in a well-ventilated space to ensure proper air circulation. This helps disperse any airborne particles and dust produced during the sharpening process. Use a dust collection system to improve air quality further.
Adhering to these safety precautions and wearing the appropriate safety gear can significantly reduce the risks of sharpening drill bits and ensure a safer working environment. Safety should always be a top priority when using power tools and machinery.
Inspection and Identification
A. Inspecting the Drill Bit for Damage or Wear
Before proceeding with sharpening, it’s essential to inspect the drill bit to assess its condition thoroughly. Here’s how to check the drill bit for damage or wear:
- Visual Examination: Start by visually inspecting the entire drill bit. Look for any signs of damage, such as chips, cracks, or deformities, along the body and cutting edges. Additionally, check for excessive wear, manifesting as a reduction in diameter or uneven edges.
- Feel for Irregularities: Run your fingers along the drill bit’s flutes (the spiral grooves). Pay attention to any rough spots or irregularities indicating damage or wear.
- Check the Cutting Edges: Examine the drill bit’s cutting edges closely. They should appear sharp, clean, and free from burrs or nicks. Any bluntness or irregularities in the cutting edges should be noted.
- Measure the Diameter: Use a caliper or a drill bit gauge to measure the bit’s diameter. Compare the measurement to the original size specifications. Significant diameter reduction may indicate wear beyond the point of effective sharpening.
B. Identifying the Type of Drill Bit
Identifying the type of drill bit is crucial because different bits are designed for specific materials and applications. Here’s how to remember the kind of drill bit:
- Visual Features: Examine the drill bit’s optical characteristics. Twist drill bits typically have spiral flutes, while masonry bits often have a carbide or tungsten carbide tip for drilling into concrete or masonry. Spade bits are flat and paddle-shaped, designed for fast drilling in wood.
- Markings and Labeling: Look for any markings or labeling on the shank of the drill bit. Manufacturers often imprint information about the type and size of the bit. These markings can provide valuable clues about the bit’s intended use.
- Reference Guides: Consult reference guides or drill bit charts from manufacturers or online resources. These guides often include images and descriptions of various drill bit types, making identification easier.
- Ask the Manufacturer: If you are unsure about the type of drill bit, you can contact the manufacturer or supplier for clarification. They can provide specific information based on the bit’s design or part number.
Setup and Preparation
A. Securely Holding the Drill Bit for Sharpening
Properly securing the drill bit during sharpening is crucial for precision and safety. If you have a drill bit sharpening jig, it can significantly aid in holding the bit securely. These jigs are designed to maintain consistent angles and bevels during sharpening, ensuring uniform results.
Using the hand-holding method, firmly grasp the bit’s shank below the flutes with your non-dominant hand. This grip provides stability and control, allowing you to manage the angle and pressure applied during sharpening.
Regardless of the method, apply steady and even pressure against the grinding wheel, avoiding excessive force that may lead to uneven sharpening or overheating.
Maintaining the correct sharpening angle is essential, typically around 118 degrees for most general-purpose drill bits. Refer to manufacturer specifications or a reference guide for your specific bit type to determine the recommended grade.
B. The Need for a Stable Work Surface
A stable work surface is fundamental for safe and effective drill bit sharpening. It serves several critical purposes:
- It upgrades security by diminishing the gamble of accidents and injuries during the sharpening process. A stable surface prevents wobbling or movement that could compromise the handling of the drill bit or grinder.
- Stability ensures precision. The dull tool stays in a decent position relative to the grinding wheel, guaranteeing consistent and uniform results.
- Control over the sharpening process is maintained, especially when making fine adjustments to the bit’s cutting edges.
Place your bench grinder on a sturdy, level workbench or table to establish a stable work surface. Ensure the hero is securely mounted to prevent any wobbling or movement. Position yourself in a comfortable and durable posture to maintain complete control throughout the sharpening process. These measures ensure that your sharpening process is effective but also safe and precise.
Sharpening Process
A. Step-by-step instructions on how to sharpen the drill bit by hand
Sharpening a drill bit by hand requires careful attention to detail and precision. Here’s a step-by-step guide on how to sharpen a drill bit manually:
Initial Positioning:
- Ensure your bench grinder is securely mounted on a stable work surface. Make sure you’re wearing safety goggles and gloves for protection.
- Hold the drill bit securely with your non-dominant hand. Position it against the grinding wheel, aligning the cutting edge with the wheel at the desired angle. For most general-purpose drill bits, this angle is typically around 118 degrees.
- Maintain a firm but controlled grip on the bit, ensuring it remains steady during sharpening.
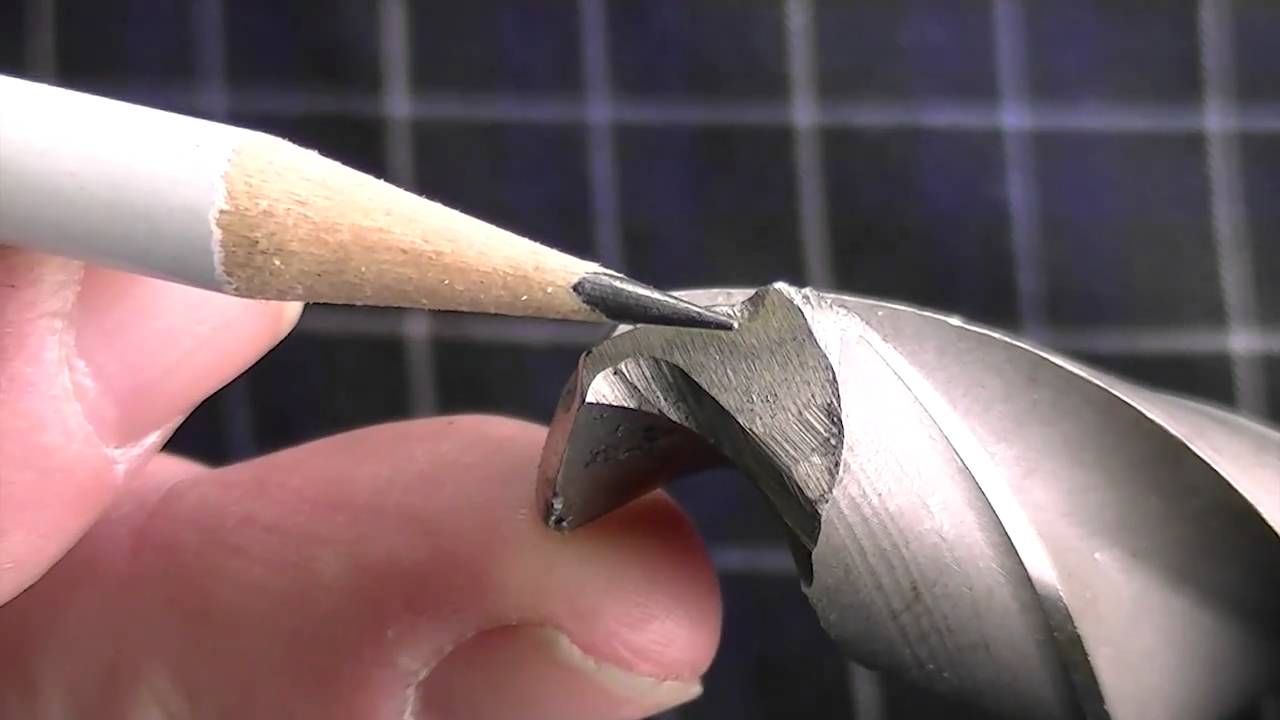
Sharpening the Cutting Edge:
- Turn on the bench grinder and wait for it to reach full speed.
- Gently touch the cutting edge of the drill bit to the grinding wheel. Apply light and even pressure while maintaining the angle. Ensure that the entire cutting edge comes into contact with the wheel.
- Move the piece across the crushing wheel to maintain the desired angle. This motion helps evenly remove material from the cutting edge.
- Continue sharpening until you see a clean, sharp edge forming. Avoid overheating by periodically dipping the bit in lubricating oil to cool it down.
Maintaining the Correct Angle:
- Consistently holding the correct angle is crucial for uniform sharpening. Please pay close attention to the bit’s tip as you move it across the grinding wheel.
- To maintain the angle, use a reference guide or mark the bit with a visible line to ensure you’re sharpening at the desired angle.
Removing Burrs:
- After sharpening, carefully inspect the cutting edges for any burrs or irregularities. Use a fine file or honing stone to remove any burrs and refine the edges gently.
- Be cautious not to over-file, as this can alter the bit’s geometry. A few light strokes should suffice.
B. Tips for Achieving the Best Results
- Consistency is Key: Maintain a steady hand and consistent pressure throughout the sharpening process. Even stress and controlled movements lead to uniform results.
- Regular Checks: Periodically inspect the bit’s progress to avoid over-sharpening. Check the edges’ angle and sharpness to ensure they meet your requirements.
- Cooling and Lubrication: Regularly dip the bit in lubricating oil or water while sharpening to prevent overheating. This helps keep the metal cool and prevents damage to the temper.
- Practice and Patience: Hand-sharpening drill bits can be a skill that improves with practice. Keep going even if your first attempts could be better. With time, you’ll refine your technique and achieve better results.
Testing the Sharpness
A. How to check if the Drill Bit is Sharp Enough?
You can perform a progression of checks to ensure your drill bit is sufficiently sharp for your tasks. Begin with a visual inspection of the cutting edges. A properly sharpened drill bit should exhibit clean and sharp edges, free from visible nicks, chips, or irregularities. These edges should appear symmetrical and well-defined.
Additionally, employ the fingernail test by lightly running your fingernail along the cutting edge. A sharp bit will catch your nail without sliding smoothly, indicating its sharpness.
Conduct a scratch test on a scrap piece of material similar to what you intend to drill for a practical evaluation. A properly sharpened drill bit will effortlessly create clean and precise holes, while a dull one may struggle, leaving rough edges.
B. Signs of a Properly Sharpened Drill Bit
Several vital characteristics define an adequately sharpened drill bit. Firstly, it should possess sharp cutting edges that facilitate effortless material penetration. Secondly, uniform geometry is crucial, with consistent point angles and slopes on both cutting edges.
Irregularities or asymmetry are indicative of poor sharpening. An adequately sharpened bit should yield clean and smooth holes with minimal resistance, avoiding jagged edges.
Maintenance and Storage
A. Keeping Drill Bits Sharp Over Time
Maintaining the sharpness of your drill bits over time is essential for optimal performance and extended lifespan. Here’s some advice on how to keep your drill bits sharp:
- Regular Inspections: Periodically inspect your drill bits for signs of wear or damage. This includes checking the cutting edges for nicks, chips, or dullness. Address any issues promptly to prevent further deterioration.
- Immediate Resharpening: When you notice a bit becoming dull, resharpen it promptly. Avoid flat bits, resulting in inefficient drilling, overheating, and reduced tool life.
- Use Appropriate Speed and Pressure: When drilling, use the appropriate speed and apply consistent but not excessive pressure. Overloading the bit can cause it to become dull more quickly.
- Proper Lubrication: Use lubricating oil or cutting fluid when drilling through more complex materials like metal or hardwood. This helps reduce friction and heat buildup, preserving the bit’s sharpness.
- Avoid Hard Materials: If possible, avoid drilling into rigid materials that can wear down the bit prematurely. Use the appropriate type of bit for the material you’re working with.
B. Proper Storage to Prevent Damage
Legitimate capacity is significant to forestall harm to your drill bits and maintain their sharpness. Here’s how to store drill bits effectively:
- Dedicated Storage: Invest in a drill bit storage case or container to hold and protect your bits. These often have individual slots to prevent bits from touching each other.
- Labeling: Label or mark the storage container with the bit sizes and types, making it easy to find the right bit for your tasks.
- Keep Clean: Ensure the drill bits are clean and debris-free before storing them. Dirty bits can cause friction and wear during storage.
- Avoid Clutter: Store your drill bits organized, avoiding overcrowded containers or bins. This prevents bits from rubbing against each other and potentially becoming damaged.
- Dry Environment: Store your bits in a dry environment to prevent rust and corrosion. Consider adding moisture-absorbing packets to the storage container if necessary.
- Protection During Transport: If you need to transport your drill bits, use protective cases or sleeves to prevent damage while on the move.
Troubleshooting
A. Addressing Common Issues Encountered While Sharpening Drill Bits
Sharpening drill bits can sometimes pose challenges. Here are common issues that may arise during the process:
- Uneven Sharpening: If you notice that one cutting edge is sharper than the other, it’s likely due to inconsistent pressure or angle during sharpening.
- Overheating can lead to losing temper in the drill bit, rendering it ineffective. This issue usually arises from excessive pressure or prolonged contact with the grinding wheel.
- Changing Geometry: Altering the original geometry of the drill bit, such as the point angle or slope, can result from incorrect grinding techniques.
B. Solutions to Common Sharpening Problems
Uneven Sharpening:
Solution: To address uneven sharpening, carefully reposition the drill bit on the grinding wheel. Pay close attention to maintaining an even pressure on both sides. You can also mark the bit with a reference line to ensure symmetrical sharpening.
Overheating:
Solution: To prevent overheating, use a gentle touch when applying pressure against the grinding wheel. Additionally, frequently dip the drill bit in lubricating oil or water to cool it down during sharpening. Avoid prolonged grinding, as it generates excessive heat.
Changing Geometry:
Solution: To maintain the original geometry of the drill bit, use a reference guide or mark the bit to ensure consistent angles. Be mindful of the sharpening angle, and avoid grinding too aggressively. If the geometry is significantly altered, restoring the bit to its original state may be challenging.
Remember that practice and patience are crucial to improving your drill bit sharpening skills. If you encounter persistent issues, consider seeking guidance from experienced individuals or using a drill bit sharpening jig, which helps maintain consistent angles and results.
Conclusion
Mastering the art of sharpening drill bits by hand is a valuable skill for any DIY enthusiast or professional tradesperson. While achieving the perfect edge may take some practice, the advantages are worth the work.
Sharpening drill bits by hand saves money on replacements and ensures that your tools perform at their best, resulting in cleaner and more precise holes.
Remember to follow the proper steps and safety precautions outlined in this guide, and with patience and practice, you’ll be able to maintain sharp and efficient drill bits for all your drilling needs.
So, go ahead and sharpen those dull bits, and empower yourself with the knowledge and skills to tackle any drilling task with confidence and precision.