
If you’ve ever wondered how to measure a drill bit, you’re in the right place. Whether you’re a seasoned craftsman or just starting your journey into the world of tools, understanding the dimensions of your drill bit is essential for successful projects.
This guide will take you through the critical steps to accurately measure a drill bit. So, let’s dive right in and demystify determining the size of your drill bit, ensuring your drilling endeavors are spot-on every time.
Types of Drill Bits
Drill bits come in various types, each designed for specific materials and purposes. Here’s an overview of common types of drill bits:
- Twist Drill Bits: These are the most widely recognized and versatile drill bits used for drilling openings in wood, metal, plastic, and different materials. They have a spiral shape that helps remove material as they cut.
- Masonry Drill Bits: Designed for drilling into hard materials like concrete, brick, stone, and masonry. They have a carbide or tungsten carbide tip for added durability.
- Spade Bits: Also known as paddle bits, spade pieces are utilized for boring enormous openings in wood. They have a level, spade-like shape with a center point and two cutting edges.
- Forstner Bits: Forstner bits are ideal for drilling flat-bottomed holes in wood. They produce clean, precise holes and are commonly used for making holes for cabinet hinges and dowels.
- Hole Saw Bits: These are used for cutting large-diameter holes in wood, plastic, and thin metal. They consist of a circular saw blade with teeth and a pilot bit in the center.
- Auger Bits: Auger bits are intended for penetrating profound openings in wood. They have a spiral shape and are often used for boring holes in large wooden beams.
- Brad Point Bits: Brad-point bits have a sharp point and two cutting edges. They are excellent for drilling precise, clean holes in wood, making them popular for woodworking applications.
- Countersink Bits: These bits are used to create a conical depression in the surface of wood, allowing screws to sit flush with or below the surface.
- Step Bits: Step bits, also known as step drills, are used for drilling holes of various diameters in sheet metal and thin materials. They have multiple stepped cutting edges.
- Tile Bits: Tile pieces are intended for penetrating ceramic and porcelain tiles. They have a carbide tip for cutting through hard tile surfaces.
- Glass Bits: Glass bits are used for drilling holes in glass and mirrors. They have a carbide or diamond-coated tip to prevent chipping and cracking.
- Core Drill Bits: Core bits create large-diameter holes in concrete, stone, and asphalt. They have a hollow center to remove the core material.
- Diamond Drill Bits: These bits have a diamond-coated tip and are used for drilling into rigid materials, including glass, tile, and stone.
- HSS (High-Speed Steel) Bits: HSS bits are designed for drilling into metal. They are made of high-speed steel and are suitable for drilling steel, aluminum, and other metals.
- Wood Auger Bits: Wood auger bits have a screw-like tip and are designed for fast drilling in wood. They are commonly used in construction and carpentry.
- Installer Bits: Installer bits have a long, flexible shaft designed for drilling holes through walls and tight spaces, making them popular for cable and wire installations.
- Pilot Point Bits: Pilot point bits have a self-centering tip that eliminates the need for a center punch when starting a hole. They are commonly used in metalworking.
Tools for Measuring Drill Bits
Measuring drill bits accurately is essential for selecting the right bit for your drilling needs. Several tools can help you measure drill bits effectively:
- Calipers: Digital or vernier calipers are precise tools for measuring drill bit diameters. Open the calipers, place the bit between the jaws, and read the measurement on the scale or digital display.
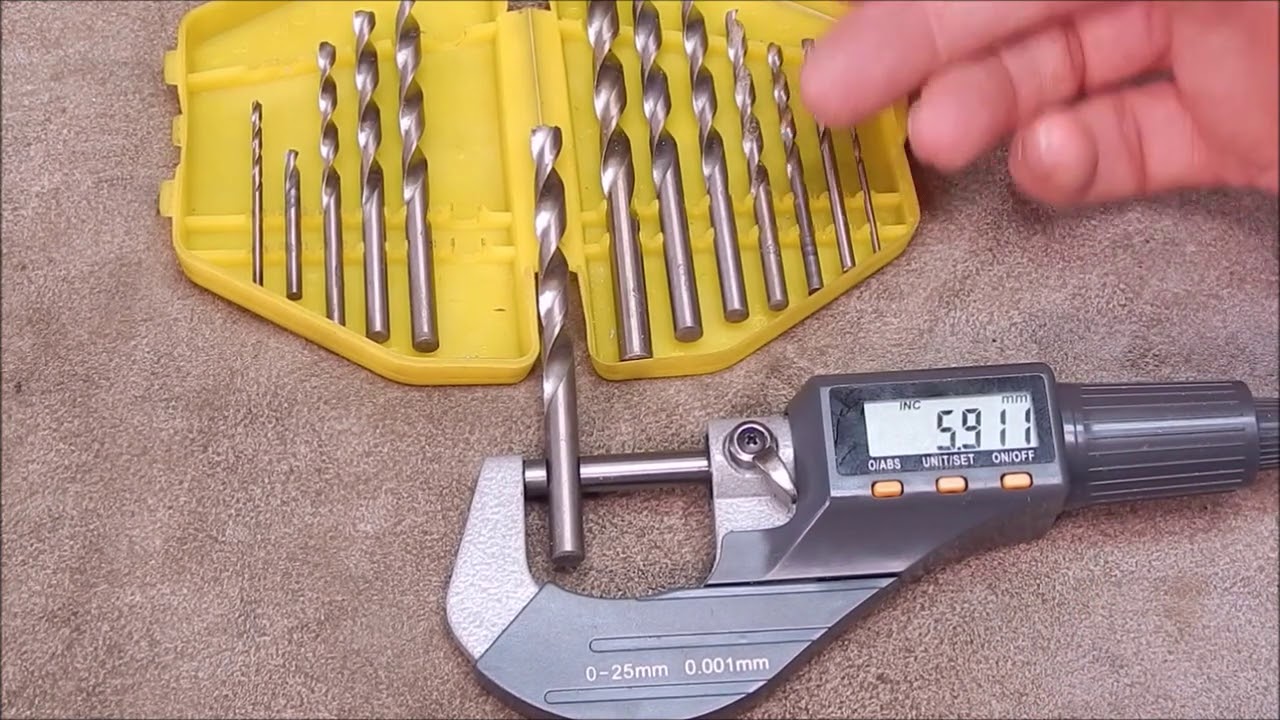
- Micrometer: A micrometer is another measuring tool that accurately measures drill bit diameters. It’s beneficial for measuring small drill bits with precision.
- Drill Bit Gauge: A drill bit gauge is a dedicated tool for measuring drill bit sizes. It typically features holes of varying sizes that you can insert the bit into to identify its diameter.
- Ruler or Tape Measure: While more precise than calipers or micrometers, a ruler or tape measure can give you a rough estimate of a drill bit’s size. Place the bit next to the ruler and read the measurement in inches or millimeters.
- Drill Bit Size Chart: Reference charts or tables that list standard drill bit sizes in both fractional inches and decimal millimeters can be handy for identifying drill bit sizes quickly.
- Threaded Bolt Gauge: A threaded bolt gauge can help determine the size of threaded drill bits, such as those used for tapping holes. It helps identify the thread size and pitch.
- Go/No-Go Gauges: These gauges check if a drill bit or threaded fastener meets specific size and tolerance requirements. They consist of two parts: the “go” side (for checking the minimum acceptable size) and the “no-go” side (for checking the maximum acceptable size)
Step-by-Step Guide: How to Measure a Drill Bit
Step 1: Gather Your Tools
Before you begin measuring a drill bit, gather the necessary tools. For precise measurements, you’ll need a caliper, micrometer, or drill bit gauge. Alternatively, a ruler or tape measure can work for rough estimates.
Step 2: Inspect the Drill Bit
Examine the drill bit to ensure it’s clean and free of debris. Any obstructions or damage on the bit’s cutting edges can affect the measurement accuracy.
Step 3: Prepare Your Measuring Tool
If you’re using a caliper or micrometer, set it to the desired unit of measurement (inches or millimeters) and ensure it’s calibrated correctly. Make sure a drill bit gauge is clean and ready to use.
Step 4: Measure the Diameter
For calipers or micrometers, gently open the tool’s jaws and place the drill bit between them. Close the jaws until they contact the bit’s cutting edges, ensuring a snug fit. Read the measurement on the caliper or micrometer’s scale or digital display.
Step 5: Record the Measurement
Note down the measured diameter. If using a ruler or tape measure, place the bit on a flat surface and align it with the ruler’s edge. Read the measurement where the edge of the bit lines up.
Step 6: Confirm the Measurement
Double-check your recorded measurement to ensure accuracy. If it’s critical for your project, consider measuring the bit in multiple places to account for any irregularities in its diameter.
Step 7: Identify the Size
Using the recorded measurement, identify the size of the drill bit. Drill bits are typically sized in fractional inches (e.g., 1/4 inch) or decimal millimeters (e.g., 6.35 mm). Refer to a drill bit size chart if needed to find the corresponding size in the unit of your choice.
Step 8: Store the Bit Properly
After measuring the drill bit, store it in an organized manner to prevent damage and maintain its accuracy for future use. A labeled bit holder or organizer can help keep your drill bits organized and easily accessible.
Common Mistakes to Avoid
When measuring a drill bit, it’s essential to avoid typical errors that can prompt erroneous measurements or damage to the bit. Here are some common mistakes to avoid:
- Using Inaccurate Tools: Using a ruler or tape measure that needs to be more precise for small measurements can lead to inaccurate results. Always use the appropriate measuring tool for precise measurements, such as calipers or a micrometer.
- Not Cleaning the Drill Bit: A dirty or debris-covered drill bit can lead to incorrect measurements. Before measuring, ensure the bit is clean and free from any obstructions on the cutting edges.
- Applying Excessive Pressure: Avoid using excessive pressure when measuring the drill bit’s diameter using calipers or a micrometer. Excessive force can compress the bit and provide inaccurate measurements.
- Ignoring Calibration: If you use a measuring tool with adjustable settings, like a caliper or micrometer, ensure it is properly calibrated. Please calibrate to ensure correct measurements.
- Measuring at the Wrong Point: Ensure you’re measuring the diameter at the bit’s cutting edges, where it matters most. Measuring at the right point on the bit can lead to accurate results.
- Failing to Double-Check: Always double-check your measurements to ensure accuracy. Measure the drill bit in multiple places to account for any irregularities in the diameter.
- Misinterpreting the Measurement: It’s crucial to correctly read and interpret the measurement provided by your measuring tool. Misinterpreting the measurement can lead to selecting the wrong size drill bit for your project.
- Not Referring to a Size Chart: If you’re unfamiliar with drill bit sizing conventions, not referring to a drill bit size chart can lead to confusion and mistakes. Ensure you identify the size correctly, whether in fractional inches or decimal millimeters.
- Using Worn or Damaged Tools: Using measuring tools that are worn out or damaged can result in inaccurate measurements. Regularly inspect and maintain your measuring instruments for reliable results.
- Storing Drill Bits Carelessly: After measuring a drill bit, store it improperly, leading to damage or loss. Store your drill bits in a dedicated organizer or holder to keep them organized and in good condition.
Interpreting Drill Bit Measurements
Drill bits sized in fractional inches are a common standard, especially in North America. These measurements consist of the numerator (top number) and the denominator (bottom number). The numerator represents the size of the drill bit in inches, while the denominator indicates the number of parts into which one inch is divided.
For example, when you encounter a measurement like 1/4 inch, the drill bit’s diameter is 1/4 of an inch or 0.25 inches. Understanding fractional inches is crucial when working with drill bits in regions that use this measurement system, as it allows you to select the appropriate bit size accurately for your drilling needs.
Interpreting Drill Bit Measurements: Decimal Millimeters
In many parts of the world, especially in metric countries, drill bits are measured in decimal millimeters. Unlike fractional inches, this system provides drill bit sizes as straightforward decimal numbers. For instance, a drill bit of 6.35 mm has a diameter of precisely 6.35 millimeters. Decimal millimeters offer a more precise and universally understood measurement system, making it easier to choose the right bit for various applications, especially in metric-based regions.
Conversion Between Fractional Inches and Decimal Millimeters
Conversion tables and calculators are available for those who need to convert between fractional inches and decimal millimeters. These tools help you seamlessly switch between measurement systems. For example, if you want to convert 1/4 inch to millimeters, you’ll find that it equals 6.35 mm.
Accurate conversions are essential for tasks that require precise measurements, ensuring you select the correct drill bit size for your woodworking, metalworking, or construction projects.
Maintaining and Storing Drill Bits
Proper maintenance and storage of drill bits are essential to ensure their longevity and performance. Here are some guidelines for maintaining and storing your drill bits:
Cleaning Drill Bits:
- Immediate Cleaning: After each use, cleaning your drill bits is essential. Remove debris, wood, metal shavings, or other materials that may have accumulated on the bit.
- Use a Wire Brush: A wire brush or a dedicated drill bit cleaning brush can be handy for removing stubborn residue. Gently brush the bit to clear away dirt and buildup.
- Solvent or Cleaner: For tougher buildup, you can soak the drill bit in a solvent or cleaning solution designed for cutting tools. Follow the manufacturer’s instructions for the specific cleaning product you’re using.
- Dry Thoroughly: After cleaning, ensure the drill bits are dehydrated before storing them to prevent corrosion.
Sharpening Drill Bits:
- Regular Inspection: Periodically inspect your drill bits for signs of dullness or damage. Dull bits are less effective and can cause overheating during drilling.
- Sharpening Tools: If you notice dullness, use a drill bit sharpener or a specialized tool designed for drill bits. Follow the sharpening tool’s instructions carefully.
- Professional Sharpening: For optimal results and if you need to be more comfortable sharpening bits yourself, consider having your drill bits professionally sharpened.
Proper Storage:
- Bit Organizer: Use a dedicated bit organizer or a drill bit index to store your drill bits. These organizers keep the bits organized, preventing them from banging into each other and getting damaged.
- Labeling: Label the storage slots or compartments with the bit sizes to make it easy to find the right one quickly.
- Protective Cases: Some drill bit sets come with protective cases or boxes. Ensure the bits are securely stored in these cases to prevent damage and maintain organization.
- Dry Environment: Store your drill bits in a dry, climate-controlled environment to prevent rust and corrosion.
- Avoid Mixing Materials: If you use different types of drill bits for various materials (e.g., wood, metal, masonry), keep them separated to avoid cross-contamination and potential damage.
- Hang Bits: Consider hanging them on pegboards or hooks for more significant bits or those without a designated organizer. Ensure they are secure and won’t fall and get damaged.
- Protect Cutting Edges: Be mindful of protecting the cutting edges of your drill bits during storage to prevent chipping or dulling.
Safety Considerations
When it comes to handling and measuring drill bits, safety should always be a top priority. These seemingly routine tasks can quickly turn hazardous if safety precautions are neglected. Accidents, injuries, and damage to tools or materials can result from overlooking safety measures. Therefore, it’s imperative to maintain a safety-first mindset throughout the interaction, beginning to end.
Safety Tips:
- Wear Appropriate Safety Gear: Safeguard your eyes with safety glasses or goggles when handling or measuring drill bits. Depending on the task, consider additional protective gear like a dust mask, hearing protection, and gloves to shield against potential hazards.
- Secure Your Workpiece: Ensure that your workpiece is securely clamped or anchored before measuring or preparing drill bits. This precaution helps maintain precision and reduces the risk of accidents due to workpiece movement.
- Avoid Excessive Force: Never apply excessive force when handling or measuring drill bits. Instead, use controlled, moderate pressure to prevent accidents like slips or injuries.
- Proper Storage: Store your drill bits in designated cases, organizers, or toolboxes to prevent injuries caused by loose bits scattered around your workspace.
- Sharp Bits: Be cautious when dealing with sharpened drill bits, as they can easily cause cuts or punctures. Handle them with care and avoid contact with their sharp cutting edges.
- Cleaning Precautions: If you need to clean drill bits, use appropriate cleaning methods and solvents. Follow the safety guidelines the cleaning product manufacturer provides, and ensure adequate ventilation when using chemicals.
- Handling Dull Bits: Even dull drill bits can be sharp enough to cause harm. Handle them with care to avoid accidental cuts or injuries. Consider disposing of worn-out bits safely.
- Storage Height: Store drill bits and sharp tools at a height that prevents them from falling or causing harm. Avoid placing them on unstable surfaces or shelves.
Conclusion
Understanding how to measure a drill bit is fundamental for anyone involved in DIY projects, woodworking, metalworking, or construction. Accurate measurements ensure that you select the right drill bit for your specific task, leading to precise holes, reduced material waste, and improved project outcomes.
Whether you opt for traditional measuring tools like calipers and rulers or more modern digital instruments, consistency and precision are critical.
By mastering this skill, you’ll be better equipped to handle various boring errands confidently and efficiently, ultimately enhancing your craftsmanship and the quality of your work. So, remember to measure twice, cut once, and let accuracy be your guiding principle when working with drill bits.