
Looking to master the art of maintaining your electric chainsaw like a pro? One crucial skill every chainsaw owner should possess is knowing how to tighten the chain on an electric chainsaw.
A well-tensioned chain ensures optimal performance, smooth operation, and, most importantly, safety during cutting tasks. Below you will know How to tighten the chain on an electric chainsaw?
Whether you’re a seasoned chainsaw enthusiast or a newbie to the world of power tools, our easy-to-follow instructions will empower you to keep your chainsaw in top-notch condition.
Loosen the Nuts on the Guide Bar
Proper maintenance of your electric chainsaw is essential for its optimal performance and longevity. One crucial aspect of maintenance is ensuring that the chain is properly tensioned.
Assuming you notice that the chain on your electric chainsaw is too loose, you must tighten it. We will guide you to loosen the nuts on your electric chainsaw’s guide bar side panel, allowing you to adjust the chain tension effectively.
Step 1: Preparation: Before beginning any maintenance task on your electric chainsaw, it’s important to prioritize your safety. Ensure that the chainsaw is powered off and disconnected from the power source.
Find a flat and stable surface to work on, preferably a workbench or a table, and gather the necessary tools: a wrench or socket wrench that fits the nuts on the guide bar side panel.
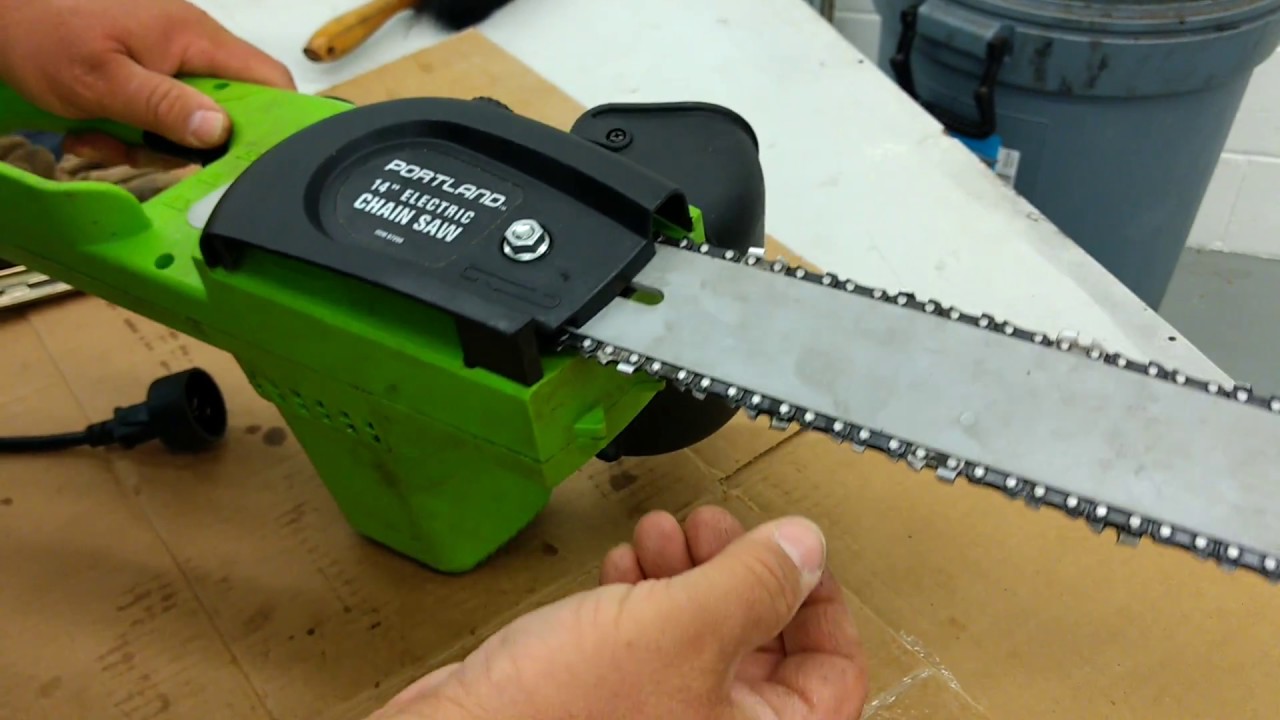
Step 2: Identify the Guide Bar Side Panel: The guide bar side panel is the protective cover located on the side of the chainsaw, covering the chain and guide bar. Look for the nuts securing the panel in place. Depending on the model, one or two nuts may need to be loosened.

Step 3: Loosening the Nuts: Using the appropriate wrench or socket wrench, place it securely over the nuts on the aide bar sideboard. Turn the wrench counterclockwise to loosen the nuts. Be cautious not to overtighten the nuts when loosening them.
Step 4: Adjusting the Chain Tension: Once the nuts are sufficiently loosened, you can adjust the chain tension using the appropriate tensioning mechanism. Different chainsaws have different mechanisms for adjusting chain tension, so consult your user manual to identify the specific method for your electric chainsaw.
Commonly, there will be a tensioning screw located near the guide bar side panel. Turn the tensioning screw clockwise to fix the chain or counterclockwise to loosen it. Gradually make small adjustments until the chain reaches the desired tension.
Step 5: Recheck and Secure the Nuts: After adjusting the chain tension, ensuring that the nuts on the guide bar side panel are securely tightened is crucial.
Turn your wrench or socket wrench clockwise to tighten the nuts snugly. Be mindful to avoid overtightening, as this could harm the threads or nuts.
Step 6: Final Checks: Once you’ve tightened the nuts, gently pull the chain to ensure it is properly tensioned.
The chain should be snug against the guide bar but still, be able to move smoothly without binding. If necessary, make further adjustments using the tensioning mechanism and recheck the chain tension.
Adjust the Tensioning Screw
Proper chain tension is vital for your electric chainsaw’s safe and efficient operation. If the chain on your electric chainsaw is too loose or tight, you may need to adjust the tensioning screw.
We will direct you through adjusting the tensioning screw, allowing you to achieve the correct chain tension and maintain optimal performance.
Step 1: Safety Precautions: Prioritize your safety before starting any maintenance task. Ensure that the chainsaw is turned off and disconnected from the power source.
Find a stable surface to work on, such as a workbench, and gather the necessary tools: a wrench or screwdriver that matches the size of the tensioning screw.
Step 2: Locate the Tensioning Screw: The tensioning screw is typically located near the guide bar on the side panel of the chainsaw. Refer to your chainsaw’s user manual to identify the precise location of the tensioning screw for your specific model.
Step 3: Loosen the Bar Nuts: Before adjusting the tensioning screw, loosen the bar nuts that secure the guide bar to the chainsaw body. Use an appropriate socket wrench to turn the bar nuts counterclockwise until they are loose enough to allow the guide bar to move.
Step 4: Adjusting the Chain Tension: Once the bar nuts are loosened, locate the tensioning screw. Depending on your chainsaw model, the tensioning screw may be a slotted screw or an Allen screw. Insert the appropriate screwdriver or Allen wrench into the screw head.
- To tighten the chain: Turn the tensioning screw clockwise. This action will move the guide bar away from the chainsaw body, increasing the tension in the chain. Make small adjustments and check the chain tension frequently to avoid overtightening.
- To loosen the chain: Turn the tensioning screw counterclockwise. This will move the guide bar closer to the chainsaw body, reducing the chain tension. Again, make gradual adjustments and check the tension as you go.
Step 5: Check the Chain Tension: After each adjustment, it’s crucial to check the chain tension. Use your fingers to pull the chain gently upward from the guide bar. The chain should have a tad of slack but not sag excessively. Ideally, it should fit snugly against the guide bar without binding.
Step 6: Secure the Bar Nuts: Once you have achieved the desired chain tension, tighten the bar nuts by turning them clockwise using your wrench or socket wrench. Ensure they are secure; however, be mindful not to overtighten them, as this can prompt damage or difficulties in future adjustments.
Step 7: Final Checks: After tightening the bar nuts, give the chain another gentle pull to verify its proper tension. Confirm it moves smoothly along the guide bar without binding or excessive looseness.
Tighten the Guide Bar Side Panel Nuts
Proper maintenance of your electric chainsaw is essential for optimal performance and safety. One important task is ensuring the guide bar side panel nuts are tightened correctly, and this article will guide you through tightening the guide bar side panel nuts.
Step 1: Preparation: Before you begin, ensure the chainsaw is turned off, and the power cord is unplugged. This ensures your safety and prevents accidental startup during the tightening process. Additionally, ensure that you have the necessary tools ready, such as a wrench or socket set that fits the size of the nuts on your chainsaw.
Step 2: Locate the Guide Bar Side Panel Nuts: The guide bar side panel nuts are typically on the side of the chainsaw, securing the guide bar and chain in place. These nuts hold the side panel and tension the chain, so it is important to keep them properly tightened.
Step 3: Inspect the Nuts: Before tightening, visually inspect the nuts for any signs of damage or wear. Suppose you notice any significant damage, replacing the nuts before proceeding is recommended. Damaged nuts may not provide the required tension, affecting the performance and safety of your chainsaw.
Step 4: Tighten the Nuts: Carefully tighten the guide bar side panel nuts with the chain at the desired tension. Ensure that they are tightened evenly and securely, but avoid over-tightening, as this can strain the chainsaw components excessively.
Step 5: Recheck Chain Tension After tightening the nuts: double-check the chain tension. You can do this by manually pulling the chain away from the guide bar in the middle. The chain should move freely but not sag or droop. If needed, make minor adjustments to achieve the proper tension.
Step 6: Final Inspection: Once satisfied with the chain tension, inspect the guide bar side panel nuts one last time to ensure they are securely tightened. Confirm that there is no excessive play or movement in the chain.