
In this article we are going to explain: how does a reciprocating saw work? The reciprocating saw is a true marvel in power tools, capable of slicing through materials with precision and speed.
But have you ever wondered how this versatile tool accomplishes such feats? Let’s delve into the inner workings of a reciprocating saw without the technical jargon, making it easy for everyone to understand.
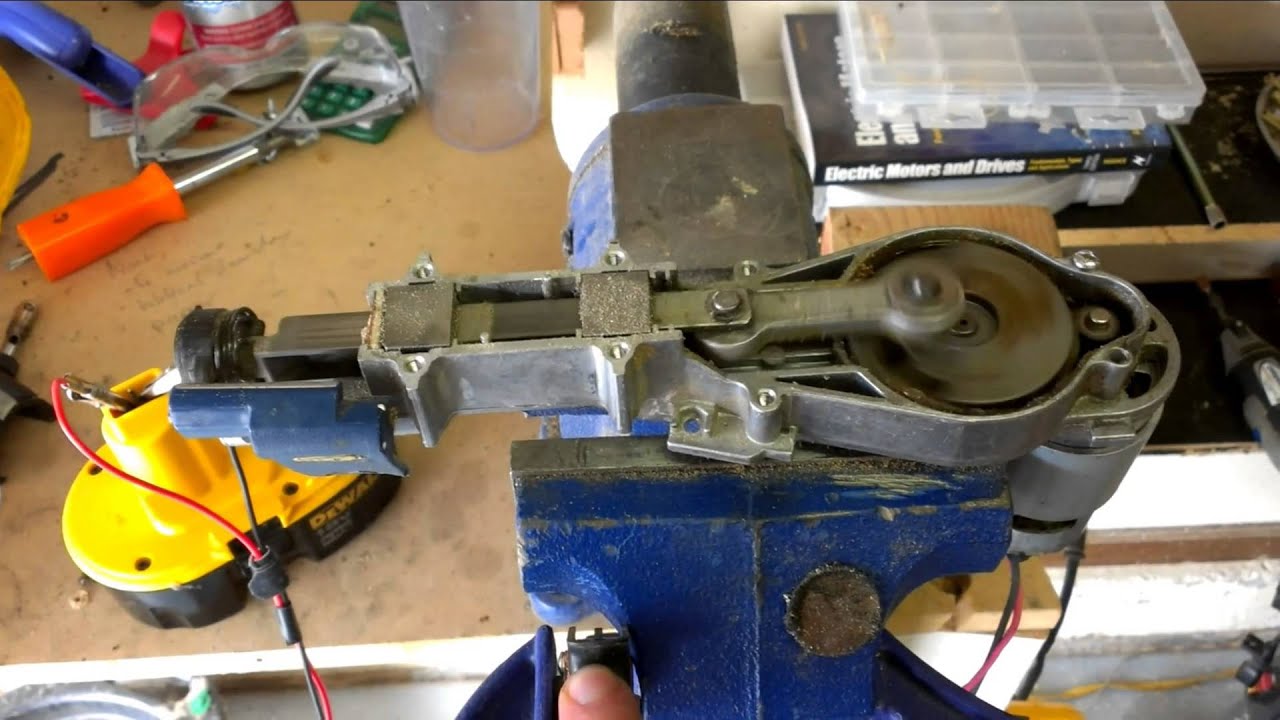
WHAT IS A RECIPROCATING SAW?
A reciprocating saw, often called a “recipe saw,” is a versatile handheld power. It operates by employing a back-and-forth, or reciprocating, blade motion, making it suitable for various tasks in construction, woodworking, and DIY projects. This tool is recognized for its ability to make quick and efficient cuts, making it a valuable addition to any toolkit.
The critical components of a reciprocating saw include a powerful motor, a replaceable blade, and a shoe or foot that provides stability and control while cutting. Some reciprocating saws also feature an orbital action setting, which allows the edge to move back and forth and in an elliptical pattern, enhancing cutting efficiency.
Reciprocating saws have various blade options, each designed for specific cutting tasks. This versatility makes them suitable for demolition, pruning, cutting pipes and plumbing fixtures, and slicing through metal. They are precious when precision and speed are required in cutting applications.
However, it’s essential to use reciprocating saws cautiously and follow safety guidelines, as they are powerful tools that can be potentially hazardous if not handled properly. Wearing appropriate safety gear, securing the workpiece, selecting the right blade, and maintaining control over the tool are all essential safety precautions when using a reciprocating saw.
WHAT DO YOU USE A RECIPROCATING SAW FOR?
A reciprocating saw is a versatile power tool used for various cutting tasks. Here are some common uses for a reciprocating saw:
Demolition: Reciprocating saws excel at demolishing structures. They can quickly cut through wood, drywall, and even metal, making them essential for tearing down walls, removing old fixtures, or deconstructing structures.
Pruning: In gardening and landscaping, reciprocating saws are valuable for pruning trees and shrubs. They allow for precise and controlled cutting of branches and overgrown vegetation.
Plumbing: When working with plumbing, reciprocating saws are handy for cutting through pipes and fixtures. They make clean and efficient cuts, which is crucial for proper installations and repairs.
Metal Cutting: With the right blade, reciprocating saws can effortlessly cut through metal pipes, rods, and sheets. This makes them useful for various metalworking projects.
Construction: In construction, reciprocating saws are used for tasks like cutting framing lumber, trimming door jambs, and making cutouts in walls or floors.
Renovations: Whether you’re renovating your home or a commercial space, reciprocating saws come in handy for cutting and removing materials like drywall, tiles, and subflooring.
Auto Body Work: In automotive repair and restoration, reciprocating saws cut through metal and plastic components, making them valuable for bodywork and customization.
Rescue Operations: Reciprocating saws are often used by first responders and firefighters to cut through materials like metal and wood during rescue operations, allowing them to access trapped individuals quickly.
DIY Projects: Homeowners and DIY enthusiasts find reciprocating saws indispensable for various projects, from building furniture to crafting intricate designs.
Artistic Creations: Some artists and artisans use reciprocating saws to create unique sculptures and creative pieces by cutting and shaping various materials.
How to select a reciprocating saw blade?
Selecting the right reciprocating saw blade is crucial for achieving efficient and precise cutting results. Whether you’re tackling demolition projects, plumbing work, or any other task that requires a reciprocating saw, here’s a step-by-step guide on how to choose the perfect blade for your needs:
1. Identify Your Cutting Material:
Begin by determining the type of material you’ll be cutting. Reciprocating saws are versatile tools for cutting various materials, including wood, metal, plastic, and masonry. Your choice of blade will largely depend on the fabric.
2. Consider the Tooth Configuration:
Reciprocating saw blades come with different tooth configurations, which affect cutting performance:
Wood Blades: These blades typically have large, widely spaced teeth designed for fast and aggressive cutting in wood.
Metal Blades: Blades with fine teeth or bi-metal construction are suitable for cutting metal, including pipes, nails, and sheet metal. Bi-metal blades are known for their durability.
Demolition Blades: If you’re tackling heavy-duty tasks involving wood with embedded nails or masonry, consider demolition blades. They have a rugged design to handle rigid materials.
3. Choose the Right Blade Length:
Blade length matters, as it determines the depth of the cut. Select a blade that is long enough to reach through the material comfortably. For precision cuts, a shorter blade may be preferable. In contrast, longer blades are suitable for deep cuts or cutting through thicker materials.
4. Assess Blade Thickness:
Blade thickness affects stability and durability. Thicker blades are more rigid and durable, making them suitable for heavy-duty cutting. Thinner blades offer more flexibility and are better suited for intricate or curved cuts.
5. Opt for Specialty Blades:
In some cases, you may require specialty blades for specific tasks:
- Carbide-Tipped Blades: These blades are ideal for cutting through abrasive materials like fiberglass or cement board.
- Diamond Grit Blades: Diamond grit blades offer exceptional cutting performance when dealing with rigid materials like tile or stone.
6. Consider Blade Compatibility:
Check the manufacturer’s recommendations for blade compatibility to avoid any compatibility issues.
7. Prioritize Safety:
Always prioritize Safety when selecting a reciprocating saw blade. Ensure that the edge is securely installed, wear appropriate safety gear, and follow proper cutting techniques to minimize the risk of accidents.
8. Seek Expert Advice:
If you need help deciding which blade to select for your specific project, consult with professionals or experts at your local hardware store.
HOW TO INSTALL A BLADE ON A RECIPROCATING SAW?
Installing a blade on a reciprocating saw is a straightforward process that allows you to change blades to suit your cutting needs quickly. Follow these step-by-step instructions to safely and effectively install an edge on your reciprocating saw:
Tools and Materials You’ll Need:
- Reciprocating saw
- Appropriate reciprocating saw blade
- Safety glasses and gloves (for Safety)
Step-by-Step Guide:
Safety First:
Before starting, wear safety glasses and gloves to protect your eyes and hands from debris or potential hazards during the blade installation.
Disconnect the Power:
If your reciprocating saw is corded, unplug it from the power source. If it’s cordless, remove the battery to ensure the tool is entirely powered off and cannot accidentally start.
Locate the Blade Clamp:
The blade clamp is the part of the reciprocating saw where the blade is inserted and secured. It’s usually located at the front of the saw near the cutting area.
Release the Blade Clamp:
Most reciprocating saws have a blade clamp release lever or button that you need to engage to open the blade clamp. This mechanism varies between saw models, so consult your saw’s user manual if you need help releasing it. Standard methods include pushing a lever, pulling a release button, or twisting a collar.
Insert the Blade:
Please take the appropriate reciprocating saw blade for your task and insert it into the open blade clamp. Ensure that the blade’s teeth are facing in the cutting direction. Most reciprocating saw blades have a clear indication of the correct orientation.
Secure the Blade:
Once the blade is inserted, release the blade clamp lever or button to secure the edge. Depending on your saw model, you may need to push or pull the lever. Make sure the blade is firmly held in position.
Double-Check Blade Securement:
Gently tug on the blade to confirm that it’s securely held in place. You should be able to pull it out slowly. If the edge feels loose, re-engage the blade clamp to secure it properly.
Reconnect Power (if applicable):
Suppose you disconnected the power source (unplugged a corded saw or removed a battery from a cordless saw). In that case, you can now reconnect or reinsert it.
Test the Blade:
Before starting your cutting task, briefly test the blade by turning on the reciprocating saw. Make sure the edge is running smoothly and not wobbling. Turn off the saw and recheck the blade installation if you notice any issues.
Proceed with Your Cutting Task:
With the blade securely installed, you can proceed with your cutting project, always adhering to safety guidelines and wearing appropriate protective gear.
HOW TO VARY YOUR SPEED WHEN USING A RECIPROCATING SAW?
Varying your speed when using a reciprocating saw is essential for achieving precise and efficient cuts across different materials and applications. Here’s a step-by-step guide on how to vary your speed effectively:
Tools and Materials You’ll Need:
- Reciprocating saw
- Appropriate reciprocating saw blade
- Safety glasses and gloves (for Safety)
Step-by-Step Guide:
Safety First:
Before you start using the reciprocating saw, always prioritize Safety.
Understand Variable Speed Settings:
Familiarize yourself with your reciprocating saw’s variable speed settings. The motivation is typically pressure-sensitive, allowing you to control the speed by squeezing it harder or softer.
Select the Appropriate Speed:
Here’s a general guideline:
Low Speed: Use low-speed settings for cutting through metal, thick pipes, and other rigid materials. Low speed provides more control and reduces the risk of overheating the blade.
Medium Speed: This setting is suitable for cutting wood and plastics. It offers a balance between control and cutting speed.
High Speed: Use high speed for tasks that require faster cutting, such as cutting through softwood or quickly removing material. High speed is ideal for demolition work.
Start at a Low Speed:
When you’re ready to begin cutting, start at a low-speed setting. This allows you to establish control and make an initial cut without aggressive speed.
Gradually Increase Speed:
As you become more comfortable with the cut and feel confident in your control over the saw, gradually increase the speed by squeezing the trigger more firmly. Adjust the speed according to the material’s resistance and desired cutting pace.
Maintain Control:
Throughout the cutting process, maintain a firm grip on the reciprocating saw and focus on keeping it steady. Avoid sudden or jerky movements, especially when transitioning from low to high speed.
Adjust as Needed:
Pay attention to how the blade is performing. If it starts to bind or the cut becomes uneven, you may need to adjust the speed accordingly. Slowing down can help you regain control and prevent blade damage.
Turn Off Safely:
When you’ve completed the cut or need to stop the saw, release the trigger to turn off the reciprocating saw. Ensure the blade has stopped entirely before setting the tool down or changing blades.
HOW TO USE A RECIPROCATING SAW SHOE?
Using a reciprocating saw shoe, also known as the saw’s Shoe or base, is an essential part of operating a reciprocating saw effectively and safely. The Shoe is a stabilizing and guiding component that helps you control the depth and angle of your cuts. Here’s a step-by-step guide on how to use a reciprocating saw shoe:
Tools and Materials You’ll Need:
- Reciprocating saw
- Appropriate reciprocating saw blade
- Safety glasses and gloves (for Safety)
- Workpiece or material to cut
Step-by-Step Guide:
Safety First:
Before starting any cutting operation with a reciprocating saw, wear appropriate safety gear and potential hazards.
Understand the Saw Shoe:
Familiarize yourself with the saw shoe on your reciprocating saw. The Shoe is a flat, metal, or plastic plate located at the front of the saw, just below the blade. It serves as a guide and stabilizer during cutting.
Adjust the Shoe (if necessary):
Some reciprocating saws allow you to adjust the Shoe’s position. This adjustment helps control the depth of the cut. To change the Shoe, loosen the shoe clamp or screw, slide the Shoe to the desired position, and then tighten it securely.
Position the Saw Shoe:
Place the saw shoe flat against the surface of the material you intend to cut. The Shoe should rest firmly on the material, providing stability and guiding the saw’s blade.
Angle the Shoe (if necessary):
Sometimes, you may need to angle the Shoe to achieve the desired cutting angle. Loosen the shoe clamp or screw, adjust the Shoe’s pitch, and tighten it securely.
Start the Saw:
Begin by starting the reciprocating saw according to the manufacturer’s instructions. Ensure the blade is not touching the material before starting the saw.
Initiate the Cut:
Gently press the Shoe against the material to initiate the cut. Apply steady and even pressure to guide the saw through the material. The Shoe helps maintain a consistent depth and angle during the amount.
Maintain Control:
Throughout the cutting process, maintain a firm grip on the reciprocating saw and focus on keeping it steady. Let the shoe rest on the material’s surface, using it as a guide to ensure accurate and controlled cuts.
Complete the Cut:
Continue cutting until you’ve completed the desired length or shape. Be mindful of the saw shoe’s position and maintain steady pressure to prevent the saw from jumping or vibrating excessively.
Turn Off the Saw:
Once you’ve finished cutting, release the trigger to turn off the reciprocating saw. Allow the blade to come to a complete stop before setting the tool down or changing blades.
HOW TO USE A RECIPROCATING SAW WITH ORBITAL MODE?
A reciprocating saw with an orbital mode allows for more efficient and aggressive cutting. The orbital method adds a unique elliptical motion to the standard back-and-forth reciprocating action, making it particularly useful for quickly cutting through various materials. Here’s a step-by-step guide on how to use a reciprocating saw with orbital mode:
Tools and Materials You’ll Need:
- Reciprocating saw with orbital mode
- Appropriate reciprocating saw blade
- Safety glasses and gloves (for Safety)
- Workpiece or material to cut
Step-by-Step Guide
Safety First:
Before using a reciprocating saw in any mode, prioritize Safety.
Understand the Orbital Mode:
Familiarize yourself with your reciprocating saw’s orbital mode setting. Most reciprocating saws have a switch or dial near the handle, allowing you to select between straight reciprocating motion (non-orbital) and orbital motion. An “O” symbol usually indicates the orbital mode.
Select the Orbital Mode:
Set your saw’s switch or dial to the “O” or orbital position to activate the orbital mode. If using a cordless reciprocating saw, ensure the battery is inserted correctly and charged.
Choose the Appropriate Blade:
Select the appropriate reciprocating saw blade for your cutting task. The choice of blade depends on the material you’re cutting (wood, metal, plastic, etc.) and the thickness of the material.
Position the Saw Shoe:
Place the saw shoe flat against the surface of the material you intend to cut. Ensure that the Shoe is in contact with the material to provide stability and guide the saw.
Start the Saw:
Begin by starting the reciprocating saw according to the manufacturer’s instructions. Ensure that the blade is not touching the material before starting the saw.
Initiate the Cut:
Gently press the saw shoe against the material to initiate the cut. The orbital motion will cause the blade to move in an elliptical pattern, which can cut more aggressively and quickly than the standard reciprocating motion.
Maintain Control:
Maintaining a firm grip on the reciprocating saw throughout the cutting process and keeping it steady. Let the shoe rest on the material’s surface, using it as a guide to ensure controlled and accurate cuts.
Complete the Cut:
Continue cutting until you’ve reached the desired length or shape. The orbital mode may produce a rougher cut than the standard mode but provides a faster cutting speed.
Turn Off the Saw:
Once you’ve finished cutting, release the trigger to turn off the reciprocating saw. Allow the blade to come to a complete stop before setting the tool down or changing blades.
Conclusion
Understanding how a reciprocating saw works is essential for anyone looking to harness the power of this versatile cutting tool. The reciprocating saw’s simple yet ingenious mechanism of back-and-forth blade movement, powered by a motor, allows it to excel in various applications, from demolition to precision cuts.
By converting rotary motion into a linear, oscillating motion, reciprocating saws provide the control and versatility needed for a wide range of tasks.