
This question might seem daunting to some, but it is an essential skill for anyone who uses this versatile power tool. Knowing the ins and outs of blade replacement is crucial whether you’re a seasoned professional or just starting your woodworking journey. Your DeWalt miter saw performance relies on a sharp blade.
Whether you want to enhance your woodworking capabilities or replace a worn blade, this step-by-step guide will walk you through the “how to change a DeWalt miter saw blade” process, ensuring your tool remains in top-notch condition for all your cutting needs. So, let’s dive in and master the art of seamless blade replacement.
How to Change a DeWalt Miter Saw Blade
Step by Step guide
Step 1: Safety First
- Before you begin, always prioritize safety. Protect yourself from potential hazards.
Step 2: Unplug the Saw
- Ensure your DeWalt miter saw is powered off and unplugged from the electrical outlet.
- This is a crucial safety step to prevent accidental activation while working on the blade.
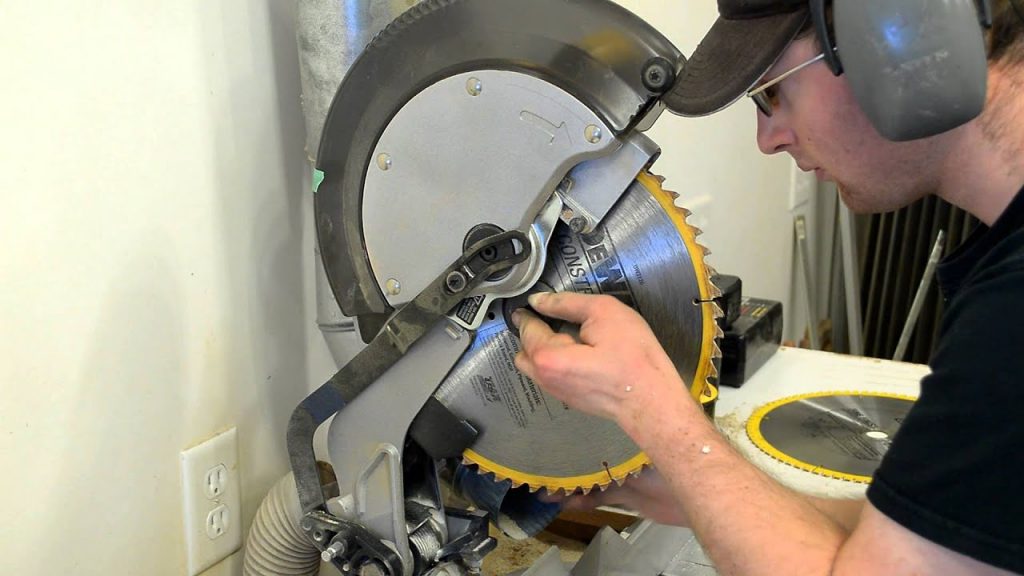
Step 3: Raise the Blade Guard
- Lift the blade guard to expose the blade thoroughly.
- Most DeWalt miter saws have a lever or knob for this purpose. Refer to your saw’s manual if you need help with this.
Step 4: Lock the Spindle
- You’ll need to lock the spindle to prevent the blade from rotating.
- This is typically done by pressing a spindle lock button while manually rotating the blade until it engages. This keeps the blade in place while you work on it.
Step 5: Remove the Blade Nut
- Using the wrench that came with your DeWalt miter saw or an appropriately sized wrench, loosen and remove the blade nut by turning it counterclockwise.
- Keep the nut and any washers you remove in a safe place.
Step 6: Carefully Remove the Old Blade
- Gently lift the old blade off the spindle and set it aside.
- Be cautious as you handle the blade, as it can still be sharp, even dull.
Step 7: Install the New Blade
- Place the new blade onto the spindle, ensuring it lines up with the mounting hole.
- Please ensure the teeth on the blade face the correct cutting direction, usually marked on the blade itself.
Step 8: Reattach the Blade Nut
- Carefully thread the blade nut back onto the spindle, turning it clockwise by hand until it’s snug.
- Then, use the wrench to tighten the nut securely. Follow your saw’s manual for the recommended torque level.
Step 9: Lower the Blade Guard
- Lower the blade guard back into its original position, ensuring it covers the blade entirely.
Step 10: Plug in and Test
- Finally, plug in your DeWalt miter saw and turn it on briefly to ensure the blade rotates smoothly without any wobbling or unusual noises.
Things You Should Be Aware Of
When changing the blade on your DeWalt miter saw, there are critical considerations to remember for a safe and efficient process. Prioritize safety by wearing protective gear and unplugging the saw.
Ensure the new blade is correctly oriented and securely tighten the blade nut following manufacturer guidelines and torque settings. Always consult your DeWalt miter saw’s manual for specific instructions, inspect the new blade for defects, and test the saw’s operation before use.
Safety Gear
- Always wear safety glasses and gloves to protect your eyes and hands from potential debris and sharp edges.
Correct Blade Orientation
- When installing the new blade, ensure that the teeth are facing in the correct cutting direction, which is usually marked on the blade itself.
Tighten the Blade Nut Securely
- Use the appropriate wrench to tighten the blade nut securely. A sufficiently tightened blade nut can lead to wobbling and unsafe operation.
Follow the Manufacturer’s Instructions
- Consult your DeWalt miter saw’s manual for specific instructions and torque settings, as these can vary between different models.
Inspect the Blade
- Before using the saw, visually inspect the new blade to ensure no defects, such as missing or damaged teeth, that could affect its performance or safety.
Test the Saw
- After changing the blade, briefly power the saw to ensure the blade rotates smoothly and without unusual noises. If you notice any issues, turn off the saw immediately and recheck your installation.
Blade Maintenance
- Regularly inspect and maintain your miter saw blades, keeping them clean and sharp for optimal performance.
Dispose of Old Blades Safely
- Properly dispose of the old blade following local regulations. Blades should be handled with care and not discarded in a way that could harm others.
Seek Professional Help if Necessary
- If you need clarification on any aspect of changing the blade or encounter unexpected difficulties, it’s advisable to seek assistance from a qualified technician or professional.
Essential Parts Involved in Blade Removal
To safely remove the blade from your DeWalt compound miter saw, it’s crucial to understand the essential parts involved in the process. Familiarizing yourself with these components will help ensure a smooth and secure blade replacement.
1. Blade Guard
- The blade guard is a protective covering that shields the saw blade when unused.
- To access the blade for removal, you’ll need to lift or open the blade guard.
- Many DeWalt miter saws have a lever or knob that allows you to do this.
- The blade guard is designed to prevent accidental contact with the sharp blade and should always be in the closed position when the saw is not in use.
2. Spindle Lock
- The spindle lock is a critical safety feature that prevents the blade from rotating while you’re working on it.
- It’s usually a button or lever located near the blade housing.
- To engage the spindle lock, you’ll typically need to press it down while manually rotating the blade until it locks into place.
- This ensures the blade remains stationary as you loosen and remove the blade nut.
3. Blade Nut
- The blade nut, also known as the arbor nut, is a threaded fastener that secures the blade to the saw’s spindle.
- It’s located at the blade’s center, which aims to hold the blade in place during operation.
- You’ll need to loosen and remove the blade nut to remove the blade.
- DeWalt miter saws often come with a wrench specifically designed for this purpose.
4. Blade Washer(s)
- Blade washers are thin, flat, metal or plastic discs on either side of the blade.
- They help distribute the pressure evenly when the blade nut is tightened, ensuring it is properly secured and aligned.
- Depending on your miter saw model, there may be one or two washers that need to be removed along with the blade.
5. Blade
- The blade itself is, of course, a crucial part of the process.
- It’s the cutting tool that you’ll be removing and replacing.
- Ensure that the new blade you intend to install is compatible with your DeWalt compound miter saw in size and type.
Blade Removal Process
- Spindle Lock: Engage the spindle lock to immobilize the blade.
- Loosen Blade Nut: Use the provided wrench to loosen and remove the blade nut by turning it counterclockwise. Keep the nut and any washers you remove in a safe place.
- Remove the Blade: Carefully lift the old blade off the spindle and set it aside.
- Inspect and Replace: Examine the new blade for any defects, ensure it’s oriented correctly, and proceed to install it.
- Secure the New Blade: Place the new blade onto the spindle, reattach any washers, and hand-tighten the blade nut. Finally, use the wrench to tighten the nut securely, following the manufacturer’s recommended torque settings.
Safety Precautions
Working with power tools like a DeWalt miter saw is common in many woodworking and construction projects. These tools can significantly enhance efficiency and precision but also have inherent risks. One of the critical tasks any user should be well-versed in is changing the saw blade.
A dull or damaged blade can not only compromise the quality of your work but also pose serious safety hazards. To ensure a smooth blade replacement process and maintain a safe work environment, adhering to a comprehensive set of safety precautions is essential.
1. Personal Protective Equipment (PPE)
- Gloves are essential to shield your hands from sharp edges and potential cuts during the blade replacement.
- Ensure your safety glasses are ANSI-approved and your gloves are sturdy and fit properly.
2. Power Off and Unplug
- Before changing the blade, ensure the miter saw is completely powered off and unplugged from the electrical outlet.
- This non-negotiable step ensures that the saw cannot accidentally start while you’re working on it.
3. Blade Guard and Spindle Lock
- Most miter saws, including DeWalt models, are guard that covers the blade when it’s unused.
- Always make sure the blade guard is in place and functioning correctly.
- To immobilize the blade during the replacement process, engage the spindle lock.
- This prevents the blade from rotating while loosening or tightening the blade nut.
4. Proper Blade Orientation
- When installing the new blade, please take a moment to ensure it’s oriented correctly.
- Blades usually have directional arrows or labels indicating the correct cutting direction.
- Align these markings with the arrow on the blade guard or the direction of rotation.
- Using the blade in the right direction can lead to safe and efficient cutting.
5. Securely Tighten the Blade Nut
- After placing the new blade on the spindle, hand-tighten the blade nut as much as possible before using a wrench.
- Using the appropriate wrench, tighten the nut securely following the manufacturer’s recommended torque settings.
- An inadequately tightened blade nut can cause the blade to wobble during operation, leading to imprecise cuts and potential kickbacks.
6. Manufacturer’s Instructions
- Every miter saw model may have unique features or requirements for blade replacement.
- To ensure you’re following the correct procedure, always refer to the manufacturer’s instructions in the user manual.
- This includes specific guidelines for blade changing, maintenance, and safety precautions tailored to your saw model.
7. Inspect the New Blade
- Before turning on the saw, visually inspect the new blade.
- Look for any defects or irregularities, such as missing or damaged teeth.
- A flawed blade can result in uneven cuts and increased safety risks.
- If you discover any issues, replace the blade with a new, defect-free one.
8. Test the Saw
- After successfully changing the blade, plug in the miter saw and turn it on briefly to ensure it rotates smoothly without any unusual noises.
- If you observe any vibrations, wobbling, or unusual sounds, turn off the saw immediately and recheck your blade installation.
9. Keep the Work Area Safe
- Maintain a clean, organized, and well-lit work area.
- Remove clutter, debris, or potential tripping hazards around the saw.
- Ensure the workpiece is secured correctly and your workspace is free from distractions.
10. Dispose of Old Blades Safely
- Old saw blades can still be sharp and dangerous.
- When disposing of them, do so following local regulations and guidelines.
- Blades should be handled with care and not discarded in a way that could harm others.
11. Seek Professional Help if Necessary
- If you encounter challenges or uncertainties during the blade replacement process, don’t hesitate to seek assistance from a qualified technician or a professional with expertise in miter saw maintenance.
Conclusion
changing the blade on a DeWalt compound miter saw is a fundamental maintenance task that every woodworking enthusiast or professional should be well-acquainted with. This process requires a clear understanding of the critical parts to ensure safety and efficiency.
Beginning with the blade guard, which protects against accidental contact with the sharp blade, and the spindle lock, a vital safety feature that immobilizes the blade during replacement, these components play pivotal roles in keeping the procedure safe.