
Are you tired of searching for that elusive chuck key whenever you need to change the drill bit on your power tool? Well, you’re in luck because today, we will show you a hassle-free method to accomplish this task.
This guide (How to Change the Drill Bit Without the Chuck Key), makes your DIY projects and home improvements much more convenient. Say goodbye to the frustration of misplaced chuck keys, and let’s dive into this straightforward process.
Importance of Safety When Working with Power Tools
Safety is central when working with power tools. Power tools can be handy but pose significant risks if not used correctly. It’s essential to prioritize safety at all times. Failure to do so can result in accidents, injuries, or even fatalities. Always read and follow the manufacturer’s instructions and safety guidelines for your specific power tool.
Ensure you clearly understand how to operate the device safely before using it. If you need more clarification about any aspect of the agency or the task, seek guidance or training from a qualified expert. Remember that safety is not just about protecting yourself but also those around you.
Keep work areas clear of clutter and ensure that bystanders are safe. Regularly inspect your tools for wear and damage, and maintain them properly to ensure safe operation. In summary, safety is non-negotiable when working with power tools and should always be your top priority.
Protective Gear Such as Safety Glasses and Ear Protection
Wearing the right protective gear is fundamental to working safely with power tools. Two critical pieces of personal protective equipment (PPE) are safety glasses or goggles and ear protection:
- Safety Glasses or Goggles: While working with power instruments, your eyes are highly vulnerable. Flying debris, sparks, and dust can cause severe eye injuries. Always wear safety glasses or goggles that meet industry standards and are appropriate for your task. They provide a barrier against potential eye hazards and should always be worn while using power tools.
- Ear Protection: Many power tools generate high noise levels, damaging your hearing over time. Prolonged exposure to loud noise without ear protection can lead to permanent hearing loss. Use earplugs or earmuffs designed for noise reduction when working with power tools, especially in enclosed spaces or when using tools that produce significant noise.
In addition to safety glasses and ear protection, you may need other PPE depending on the type of power tool and the specific task.
Always consult the manufacturer’s guidelines and local safety regulations to determine the appropriate protective gear for your work. Remember that wearing protective equipment is not optional; it’s crucial to preventing injuries and maintaining your long-term health when working with power tools.
Alternative Tools You’ll Need
When working on various tasks, it’s often helpful to have alternative tools on hand if your primary device is unavailable or requires a different approach. Here are three alternative tools you may need:
- Pliers: Pliers are versatile hand tools with pivoting jaws for gripping, bending, cutting, and turning objects. They come in various types, such as slip-joint pliers, needle-nose pliers, and locking pliers. Pliers are handy for gripping and holding small things, bending wires, and accessing hard-to-reach areas.
- Screwdriver: A screwdriver is a manual tool for turning screws and bolts. It typically consists of a handle and a shaft with a shaped tip (slotted, Phillips, Torx, etc.) that fits into the corresponding screw head. Screwdrivers are indispensable for tasks involving fasteners, such as assembling furniture, tightening or loosening screws, and opening or closing objects held together with screws.
- Adjustable Wrench: Otherwise called a bow wrench or adjustable spanner, this tool has a movable jaw has a versatile jaw that can be acclimated to fit various sizes of nuts, screws, and different clasps. It’s used for tightening or loosening nuts and bolts when a specific-sized wrench is not available or practical. Adjustable wrenches are versatile and come in handy for plumbing and mechanical work.
Purpose of Each Tool
- Pliers: Pliers are designed to provide a firm grip on objects. They can hold, bend, or straighten materials, tiny items like wires or nails. Needle-nose pliers are excellent for reaching into tight spaces while locking pliers (e.g., Vise-Grips) can hold objects in place without manual pressure. Slip-joint pliers have an adjustable pivot point, allowing them to grip various sizes of objects.
- Screwdriver: Screwdrivers are essential for turning screws and bolts. The tip of a screwdriver corresponds to the shape of the screw head, ensuring a secure fit. Slotted screwdrivers work with slotted or flat-head screws, while Phillips and Torx are designed for their respective screw types. Screwdrivers are indispensable for assembling furniture, installing hardware, or working on electrical systems.
- Adjustable Wrench: Adjustable wrenches are versatile tools for working with nuts, bolts, and other fasteners of varying sizes. The adjustable jaw allows you to fit the wrench to a specific pin, eliminating the need for multiple sizes. They are helpful for plumbing work, bicycle repairs, automotive maintenance, and many other applications where fasteners require tightening or loosening.
Having these alternative tools in your toolbox provides flexibility. It ensures you can tackle a wide range of tasks effectively, even when your primary tools are not suitable or available for the job.
Preparing the Drill
Preparing your Drill for use is a critical process ensuring safety and efficiency. Begin by prioritizing safety; ensure the Drill is turned off and disconnected from its power source by unplugging it for corded drills or removing the battery pack for cordless ones. Equip yourself with the necessary safety gear, such as safety glasses and, where needed, ear protection, to shield against potential hazards.
Conduct a thorough inspection of the Drill, checking for visible damage, loose parts, or worn cords, and address any issues before use. Select the right drill bit for your task, considering material and hole size, and ensure it’s compatible with your Drill’s chuck type.
Insert the chosen bit into the Drill’s chuck, ensuring it’s centred and tightly secured; tighten it by rotating the chuck clockwise for keyless chucks or using the chuck key for chucks with a key. A quick test run of the Drill verifies the bit’s secure fastening and stability.
Adjust the Drill’s speed and settings as required for your task, usually opting for lower rates for drilling and higher speeds for fastening. If you’re drilling into a workpiece, secure it in place. Clear the work area of obstructions and ensure bystanders are safe. Confirm you’re wearing the necessary safety gear before reconnecting power; plug it back in for corded drills, or insert the battery pack for cordless drills.
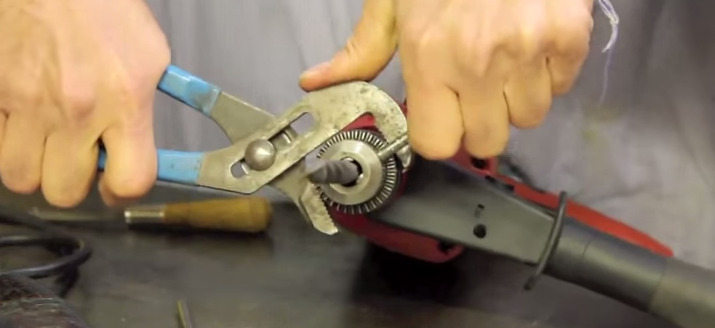
Using Pliers to Change the Drill Bit
Using the standard chuck tightening and loosening methods, using pliers to change a drill bit can be helpful in situations where the bit is stuck or difficult to remove. Here’s a step-by-step guide on how to use pliers to change the drill bit:
Inspect the Chuck
Examine the Drill’s chuck, which is the part that holds the drill bit. Determine whether your Drill has a keyless chuck or one that requires a chuck key for loosening.
- Keyless Chuck: If your Drill has a keyless chuck, you can typically remove the drill bit without using pliers. Refer to the standard procedure for removing a drill bit using your hand (as previously mentioned).
- Chuck with Key: If your Drill has a chuck that requires a key, but the bit is stuck or difficult to remove, proceed with using pliers.
Gather the Necessary Tools
- Pliers: Choose a pair of locking or slip-joint pliers that provide a good grip. Locking pliers, or Vise-Grips, can be particularly effective for this task.
Loosen the Chuck with Pliers
Locking Pliers (Vise-Grips)
- Position the locking pliers around the chuck, with the upper jaw gripping the top part and the lower jaw below it.
- Squeeze the pliers to lock them securely onto the chuck.
- While holding the Drill firmly, use the pliers to rotate the chuck counterclockwise (to the left) to loosen it. This should help break the bit free.
Slip-Joint Pliers
- If you’re using slip-joint pliers, adjust them to the appropriate jaw width to fit the chuck securely.
- Grip the chuck with the pliers and turn counterclockwise to loosen it.
Remove the Old Bit
Once you’ve successfully loosened the chuck with the pliers, you can eliminate the old boring apparatus by pulling it straight out.
Inspect the Chuck
After removing the old bit, take a moment to inspect the chuck to ensure there are no remnants of the old bit left behind. This can sometimes happen, especially if the bit is stuck.
Clean the Chuck
If you notice any debris or residue in the chuck, utilize a delicate brush or compacted air to clear it out. A clean chuck ensures a better grip on the new drill bit.
Prepare for the New Bit
Before inserting the new drill bit, inspect it to ensure it’s the correct size and type for your task. If necessary, tighten or loosen the chuck to accommodate the new bit.
Insert the New Bit
Insert the new drill bit into the chuck, ensuring it’s seated securely. Push it in so the chuck jaws appropriately grip it.
Tighten the Chuck
If you have a keyless toss, hold the Drill with one hand and turn the hurl clockwise (to the right) with the other hand to tighten it securely. If you have a chuck with a key, use the chuck key to draw it.
Using a Screwdriver to Change the Drill Bit
Using a screwdriver to change a drill bit can be a practical approach when your drill chuck is compatible with a screwdriver bit or when the chuck key or tightening method is not readily accessible. Here’s a step-by-step guide on how to use a screwdriver to change the drill bit:
Inspect the Chuck
Examine the Drill’s chuck, which is the part responsible for holding the drill bit. Determine whether your Drill has a keyless chuck or one that requires a chuck key for loosening.
- Keyless Chuck: If your Drill has a keyless chuck, the standard procedure for changing the bit manually (as previously mentioned) might suffice. However, you can use a screwdriver if the bit is stuck or challenging to remove.
- Chuck with Key: If your Drill has a chuck that requires a key but is unavailable, using a screwdriver can be an alternative method.
Select the Screwdriver Bit
Choose a screwdriver bit that fits securely into the chuck. The screwdriver bit should have a shape compatible with the chuck, such as a flat-head or Phillips head.
Secure the Screwdriver Bit
Insert the screwdriver bit into the chuck, ensuring it’s centred and seated securely.
Hold the Drill Steadily
Securely hold the drill body with one hand. Ensure you have a firm grip to maintain control during the bit-changing process.
Use the Screwdriver Bit to Loosen the Chuck
- Clockwise for Loosening: You’ll need to rotate the chuck counterclockwise (to the left) to loosen it for most drills. To do this, insert the screwdriver bit into one of the chuck’s three jaws. Position it securely but without excessive force.
- Counter the Direction: While holding the drill body steadily, apply gentle pressure in the opposite direction of the Drill’s rotation (counter to the tightening trend). This action should loosen the chuck.
Remove the Old Bit
Once you’ve successfully loosened the chuck with the screwdriver bit, you can pull the old drill bit straight from the chuck.
Inspect the Chuck
After removing the old bit, inspect the chuck to ensure no remnants of the old bit are left behind. Cleaning out any debris provides a better grip for the new drill bit.
Prepare for the New Bit
Examine the new drill bit to verify your task’s correct size and type. If necessary, adjust the chuck to accommodate the new bit.
Insert the New Bit
Insert the new drill bit into the chuck, ensuring it’s seated securely. Push it in to guarantee a proper grip by the chuck jaws.
Tighten the Chuck
If you have a keyless chuck, use one hand to hold the Drill securely and the other hand to rotate the chuck clockwise (to the right) to tighten it firmly. If you have a chuck with a key, use the chuck key to draw it.
Using an Adjustable Wrench to Change the Drill Bit
Using an adjustable wrench to change a drill bit can be a handy approach when you need to loosen a stuck or hard-to-remove bit from the chuck. Here’s a step-by-step guide on how to use an adjustable wrench to change the drill bit:
Inspect the Chuck
Examine the Drill’s chuck, which is the component responsible for holding the drill bit. Determine whether your Drill has a keyless chuck or one that requires a chuck key for loosening.
- Keyless Chuck: If your Drill has a keyless chuck, the standard procedure for changing the bit manually (as previously mentioned) might work. However, if the bit is stuck or difficult to remove, you can use an adjustable wrench.
- Chuck with Key: If your Drill has a chuck that requires a key but is unavailable, an adjustable wrench can be an alternative method.
Select the Adjustable Wrench
Choose an adjustable wrench that fits the chuck securely. Ensure the wrench is adjusted to the appropriate jaw width to grip the chuck effectively.
Secure the Drill
Hold the drill body firmly with one hand, ensuring you have a stable grip to maintain control during the bit-changing process.
Utilize the Customizable Wrench to Slacken the Hurl
- Counterclockwise for Loosening: You’ll need to rotate the chuck counterclockwise (to the left) to loosen it for most drills. Position the adjustable wrench’s jaws securely onto the chuck to do this.
- Apply Gentle Pressure: While holding the drill body firmly, apply gentle pressure in the opposite direction of the Drill’s rotation (counter to the tightening trend). This action should help loosen the chuck.
Remove the Old Bit
Once you’ve successfully loosened the chuck with the adjustable wrench, you can pull the old drill bit straight from the chuck.
Inspect the Chuck
After removing the old bit, inspect the chuck to ensure there are no remnants of the old bit left behind. Cleaning out any debris provides a better grip for the new drill bit.
Prepare for the New Bit
Examine the new drill bit to verify your task’s correct size and type. If necessary, adjust the chuck to accommodate the new bit.
Insert the New Bit
Insert the new drill bit into the chuck, ensuring it’s seated securely. Push it in to guarantee a proper grip by the chuck jaws.
Inserting the New Drill Bit
Inserting a new drill bit correctly ensures safe and efficient drilling or fastening. First, prioritize safety by turning off the Drill and disconnecting it from its power source, either by unplugging it or removing the battery pack for cordless drills. Don’t wear safety glasses or goggles to protect your eyes during this process.
Next, select the appropriate drill bit for your project, considering the material and hole size requirements. With one hand, securely hold the Drill and keep the chuck open with the other. The chuck is the part of the Drill that has the bit. Align the shank of the new drill bit with the chuck’s jaws, ensuring it’s centred and seated securely.
Insert the bit fully into the chuck, eliminating any gap between the jaws and the bit. Depending on your Drill’s chuck type, turn the chuck clockwise (for keyless chucks) or use a chuck key (for chucks with a key) to tighten it securely. Give the bit a gentle tug to confirm it’s firmly held and won’t wobble or come loose during operation.
Remember to wear safety gear, reconnect the power source, briefly test the Drill to ensure the bit is secure, and proceed with your drilling or fastening task. This method ensures that your new drill bit is inserted correctly and ready for use in your project.
Testing the Drill
Testing the Drill is vital in ensuring that the newly installed drill bit is securely fastened and that the Drill itself is in proper working order. Safety should always come first, so do the necessary safety gear, including safety glasses or goggles, to protect your eyes before proceeding.
Ensure the testing environment is free from obstructions and that no one or nothing can accidentally come into contact with the rotating drill bit.
As you move, maintain a secure grip on the Drill, holding it firmly with both hands. Activate the Drill using the trigger or power button, starting with a lower speed setting if you’re uncertain about the material’s hardness or it’s the first use with this particular bit. Listen and observe closely as the Drill operates.
A securely fastened drill bit should result in smooth, steady rotation without unusual noises, excessive vibration, or wobbling. If any irregularities are noted, it could indicate a problem with the bit’s installation.
Conduct a test drill on a scrap piece of the same material you’ll be working with for your project, ensuring that the bit is suitable for the material and drilling smoothly and accurately.
Keep a close eye on the drill bit to ensure it remains securely in the chuck without slipping or loosening. If any issues arise during testing, promptly turn off the Drill, disconnect it from the power source, and recheck the bit’s installation.
Adjust the Drill’s speed and pressure as needed based on the material and bit type. Once you’re satisfied with the Drill’s performance during testing, proceed with your drilling or fastening project, maintaining a secure grip, working steadily, and always keeping safety at the forefront of your efforts.
Conclusion
Learning to change a drill bit without a chuck key can be valuable for any DIY enthusiast or professional tradesperson. While it may seem challenging initially, it becomes a straightforward task with practice and the proper technique.
Remember to prioritize safety by unplugging the Drill or removing the battery before attempting to change the bit, and always use reasonable precautions to avoid accidents.
Whether on a job site or tackling a home improvement project, swapping out drill bits without a chuck key can save you time and frustration, allowing you to work more efficiently and effectively.
So, don’t be deterred by the absence of a chuck key; instead, use these alternative methods to keep your projects moving smoothly.