
In the world of woodworking, where precision and creativity merge to form functional masterpieces, a square hole in wood often becomes the key to unlocking the next level of craftsmanship.
While modern tools like jigsaws and routers make such tasks seemingly effortless, there’s something uniquely satisfying about tackling a woodworking challenge with limited resources and an inventive spirit.
This brings us to the fascinating realm how to cut a square hole in a wood without a jigsaw. This skill not only harks back to the days of old-world craftsmanship but also celebrates the boundless creativity and resourcefulness of the human mind.
In this guide, we embark on a journey that takes us beyond the constraints of power tools, embracing the simplicity of manual techniques and the thrill of problem-solving. Whether you’re a seasoned woodworker looking to broaden your skill set or a novice eager to dive into the world of woodworking, this topic promises to open up new horizons in your craft.
So, let your imagination roam free and prepare to be inspired as we unlock the secrets of mastering the art of cutting a square hole in wood without a jigsaw—a testament to the indomitable spirit of human creativity and the timeless allure of woodworking.
Explanation of the no-jigsaw approach
Creating a square hole in wood without a jigsaw requires patience, precision, and the right tools. Here, we will explore a step-by-step explanation of the no-jigsaw approach using essential hand tools and techniques:
Tools and Materials
- Wood: The wood you want to create the square hole in.
- Combination Square: This tool will help you mark precise measurements and angles.
- Chisels: A set of various sizes with sharp and well-maintained edges.
- Mallet: A wooden or rubber mallet to provide controlled force to the chisel.
- Marking Pencil or Knife: For making accurate layout lines.
- Drill and Bits: To create pilot holes for the chisels.
- Ruler and Measuring Tape: For measuring and marking.
- Workbench and Clamps: To secure the wood in place.
Step-by-Step Process
Measure and Mark: Begin by measuring and marking the dimensions of the square hole on the wood’s surface using your combination square and marking pencil or knife. Ensure your measurements are precise and that all angles are precisely 90 degrees.
Create Pilot Holes: Using the appropriate-sized drill bit, Make pilot holes at each corner you’ve marked. These holes will serve as starting points for your chisel work and prevent splintering.
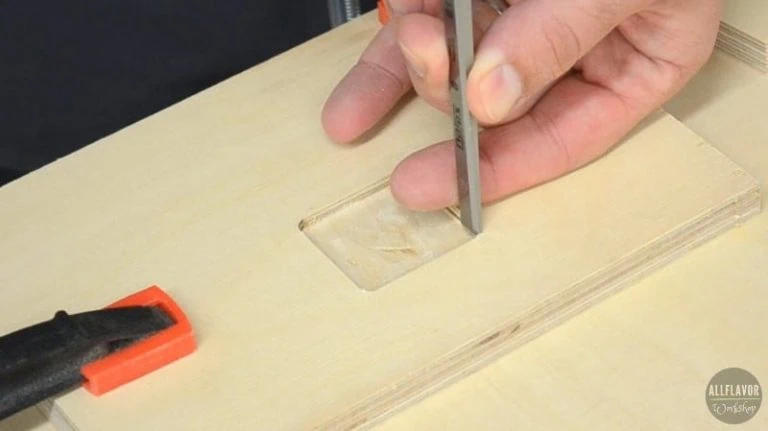
Define the Edges
- Carefully make vertical cuts along the marked lines with your chisel and mallet.
- Start from the pilot holes and work your way towards the center of the square.
- Take time to ensure the cuts are straight and the corners are sharp.
Remove Waste Material
Once you’ve defined the edges, remove the waste material from within the square by chiseling along the grain.
- Make shallow cuts at first and gradually deepen them.
- Use the mallet as needed to provide controlled force.
- Keep the chisel perpendicular to the wood to maintain a clean, straight edge.
Check for Depth and Squareness: Periodically check the depth of your square hole and ensure it matches your desired dimensions. Use the combination square to verify that the corners maintain their 90-degree angles.
Fine-tuning: As you approach the desired depth, make finer cuts to smooth the bottom of the hole and remove any remaining imperfections. Take your time in this step to achieve a clean and even surface.
Test Fit: Periodically test fit the object or component that will occupy the square hole to ensure it fits snugly and aligns appropriately.
Finish and Sand: Once you’ve achieved the desired depth and squareness, finish the square hole by sanding its interior surfaces to remove any roughness or splinters. Sand the edges to achieve a smooth, clean finish.
Sealing and Protecting: If needed, apply an appropriate wood finish or sealant to protect the newly created square hole and enhance its appearance.
Final Inspection: Inspect your work for imperfections or irregularities, making necessary adjustments or touch-ups.
List of required tools
Creating square holes in wood without a jigsaw with precision and accuracy. Here’s a list of the essential tools you’ll need for this task:
- Wood: The wood you want to create the square hole in.
- Combination Square: This tool marks precise measurements and ensures your angles are 90 degrees.
- Chisels: A set of chisels in various sizes with sharp, well-maintained edges is essential for making clean cuts and shaping the square hole.
- Mallet: A wooden or rubber mallet provides a controlled force to the chisels while making cuts.
- Marking Pencil or Knife: You’ll need this to make accurate layout lines on the wood.
- Drill and Bits: To create pilot holes at the corners of the square, which serve as starting points for your chisels.
- Ruler and Measuring Tape: These are used for measuring and marking the dimensions of the square hole.
- Workbench: A sturdy workbench provides a stable surface for your woodworking project.
- Clamps: Clamps are essential for securing the wood in place on the workbench, preventing it from moving while you work on it.
Optional tools that can be helpful in the process include
- Chisel Sharpening Kit: Maintaining sharp chisel edges is crucial for achieving clean and precise cuts. A sharpening kit can help keep your chisels in top condition.
- Wood Finish or Sealant: A wood finish or sealant can be applied to protect the square hole and enhance its appearance.
- Sandpaper and Sanding Blocks: These are used for smoothing the interior surfaces of the square hole and refining its edges.
While these tools are the core requirements for creating square holes in wood without a jigsaw, having good lighting and proper safety gear, such as safety glasses and ear protection, is also essential for a safe and successful woodworking project.
Marking and Measuring
Accurate marking and measuring are crucial when creating square holes in wood without a jigsaw. Here’s a step-by-step guide on how to do it effectively:
Tools Needed
- Combination square
- Ruler or measuring tape
- Marking pencil or knife
- The wood piece you’re working on
Step-by-Step Process
Prepare Your Workspace
Start by setting up your workbench or workspace. Ensure it’s well-lit and the wood piece is securely clamped to prevent movement while you work.
Measure the Dimensions
Determine the exact dimensions of the square hole you want to create. For example, let’s say you want to create a square hole that is 4 inches by 4 inches.
Mark the Starting Point
Identify one corner of the square hole. This will be your starting point for marking. Starting at one of the corners is common because it allows you to measure and mark from a known reference point.
Use the Combination Square
Take your combination square and set it to the desired dimensions of your square hole. In our example, set it to 4 inches.
Make the Initial Mark
Place the combination square at your starting point, ensuring one side of the square aligns with the wood’s edge. Hold it firmly, and then use the marking pencil or knife to make a straight and clear mark along the square’s edge.
Mark the Adjacent Sides
With one side marked, rotate the combination square 90 degrees, ensuring it’s still aligned with the wood’s edge. Make another mark parallel to the first one. You’ve now marked two sides of your square.
Complete the Square
Continue this process, rotating the combination square and marking the remaining two sides of the square. Ensure that all four sides are parallel and equal in length.
Double-Check Measurements
After marking all four sides, use your ruler or measuring tape to double-check that the dimensions of your square hole are accurate.
Mark the Corners
To mark the corners of your square, extend the lines you’ve made on each side until they meet at the corners. This will give you precise corner points for your square hole.
Mark Pilot Holes
If you plan to use a drill to create pilot holes before chiseling, mark these holes at the corners or along the sides of the square. These holes will serve as starting points for your chisels. These steps will ensure that your square hole is accurately marked and measured, setting the foundation for a precise and well-crafted woodworking project.
Tools Needed
- Chisels
- Mallet
- Wood piece with pilot holes
- Workbench with clamps
- Safety gear (safety glasses, hearing protection)
Step-by-Step Process
Secure the Wood
Ensure that the wood piece with the pilot holes is securely clamped to your workbench. This will prevent the wood from moving while you work and help maintain stability.
Select the Correct Chisel
Choose a chisel that matches the width of the cut you need to make. Start with a chisel slightly narrower than the width of the square hole to avoid overcutting.
Position the Chisel
Place the selected chisel into one of the pilot holes at a corner of the square hole. Ensure that the chisel is perpendicular to the surface of the wood.
Use the Mallet
With the chisel in the pilot hole, gently tap it with the mallet to create the initial cut. Start with light taps to establish the groove, and gradually increase the force as needed. The mallet provides a controlled force to push the chisel into the wood.
Work along the Edge
After creating the initial cut, move the chisel along one of the edges of the square hole. Continue tapping the chisel with the mallet while applying even pressure to maintain control.
Maintain Perpendicularity
Ensure the chisel remains perpendicular to the wood surface to achieve clean and straight cuts. You can use the combination square to double-check the angle as you work.
Progress Gradually
Work your way along the edge, removing material incrementally. Take only a little wood in a single pass to maintain control and accuracy. Tap the chisel with slightly more force as you go deeper.
Move to Adjacent Edges
Once you’ve completed one edge, move on to an adjacent one. Place the chisel into the pilot hole at a corner and continue making cuts. Keep a consistent depth and maintain straight lines.
Repeat for All Sides
Repeat this process for all four sides of the square hole. Ensure your chisel cuts meet at the corners, forming a square shape.
Check for Depth
Periodically check the depth of your cuts to ensure they match the desired depth for the square hole.
Fine-Tune and Smooth
Once you’ve achieved the desired depth and square shape, use the chisels to fine-tune the edges, remove any remaining imperfections, and create clean, straight lines.
Test Fit
Periodically test the fit of the object or component occupying the square hole to ensure it fits snugly and aligns appropriately.
Smoothing and finishing
These steps help ensure that the square hole fits its intended purpose and looks clean and professional. Here’s how to smooth and finish your square hole:
Tools Needed
- Chisels (in various sizes)
- Mallet
- Sandpaper (various grits, e.g., coarse, medium, fine)
- Sanding blocks
- Woodworking vice (optional)
- Safety gear (safety glasses, dust mask, hearing protection)
Step-by-Step Process
Inspect Your Work
Before smoothing and finishing, carefully inspect the square hole you’ve created. Look for any rough edges, uneven surfaces, or remaining imperfections
Secure the Wood
You can secure the wood piece with the square hole if you have a woodworking vice. This can provide stability and make it easier to work on the hole. If you don’t have a vice, ensure the wood is securely clamped to your workbench.
Smooth the Interior Surfaces
Begin by using chisels and a mallet to smooth the interior surfaces of the square hole. Consider any ridges or high spots created during the initial cutting process. Use light taps and controlled pressure to remove these irregularities.
Round the Corners
If your square hole has sharp corners and you prefer rounded corners, use a chisel to round them carefully. This is a matter of personal preference and the requirements of your project.
Sanding
Start with coarse-grit sandpaper (e.g., 80 or 120 grit) to remove any remaining tool marks and rough spots. Sand along the length of the square hole, working systematically. Keep the sandpaper flat to maintain the square shape. As you progress, switch to finer-grit sandpaper (e.g., 220 or 320 grit) for a smoother finish.
Sanding Blocks
Consider using sanding blocks to maintain flat and even surfaces. Sanding blocks help achieve straight, flat sides in your square hole.
Deeper Sanding
You can go even further with finer-grit sandpaper (e.g., 400 or 600 grit) for a smooth finish. This step can give the interior of the square hole a polished appearance.
Clean the Hole
Remove all sawdust and debris from the square hole. Ensure the hole is completely clean before proceeding.
Final Inspection
Inspect the square hole one last time to ensure it meets your desired level of smoothness and finish. Check for any remaining imperfections.
Sealing or Finishing
Depending on the project and your preferences, you can apply a wood finish or sealant to protect the square hole and enhance its appearance. Follow the manufacturer’s instructions for the chosen product.
Test Fit Again
Before considering your project complete, test fit the object or component occupying the square hole to ensure it fits snugly and aligns appropriately.
Conclusion
Learning how to cut a square hole in wood without a jigsaw is valuable for any DIY enthusiast or woodworker. Remember to prioritize safety, take your time, and practice to improve your proficiency in this essential woodworking technique.
With patience and dedication, you can create square holes that perfectly fit your project needs, enhancing the quality and craftsmanship of your woodworking projects.
.