
Are you looking to master making straight cuts with a circular saw? Well, you’ve come to the right place! Whether you’re a seasoned DIY enthusiast or a beginner eager to tackle your first woodworking project, understanding the fundamentals of achieving precise and straight cuts is crucial.
In this guide, we’ll walk you through the step-by-step process of How to make straight cuts with a circular saw? By following these simple instructions, you’ll soon be able to harness the power of this versatile tool and create clean, professional-looking cuts in no time.
Gather the Required Tools and Safety Equipment
Before you start making straight cuts with a circular saw, gathering the necessary tools and safety equipment is essential. This step ensures you have everything you need to perform the task safely and efficiently.
1. Circular Saw
The central tool for making straight cuts is a circular saw. Ensure you have a reliable and properly functioning circular saw before starting the project. Check the blade for any damage and replace it if necessary. Adjust the saw’s cutting depth according to your material thickness.
2. Workpiece
Prepare the workpiece that needs to be cut. Measure and mark the desired cut line using a measuring tape, straight edge, and pencil. Please ensure the workpiece is adequately supported and secured to prevent it from moving during cutting.
3. Safety Equipment
Safety should be your top priority when using a circular saw.
Gather safety equipment:
- a. Safety goggles or glasses: Protect your eyes from debris, wood chips, and sawdust.
- b. Ear protection: Use earplugs or earmuffs to reduce the noise the saw produces.
- c. Dust mask or respirator: Prevent inhalation of sawdust and airborne particles.
- d. Gloves: Wear gloves to safeguard your hands and improve your grip on the saw.
4. Clamps and Sawhorses
Clamps: Use clamps to secure the workpiece firmly to a stable surface, such as a workbench or sawhorse. This prevents the material from shifting or vibrating during the cutting process.
Sawhorses: If you don’t have a workbench, sawhorses provide a stable and elevated platform to support the workpiece while cutting.
5. Extension Cords:
If your circular saw requires an electrical power source, ensure that you have a suitable extension cord. Use an extension cord rated for the saw’s power requirements and check for any damaged or frayed wires before use.
Gathering the required tools and safety equipment, you set yourself up for a safe and successful experience when making straight cuts with a circular saw.
A well-maintained circular saw, properly prepared workpiece, and necessary safety gear will enable you to proceed confidently, ensuring precise and accurate cuts. Remember to prioritize safety throughout the cutting process to avoid accidents and injuries.
Prepare the Work Area
Preparing the work area is important before making straight cuts with a circular saw. Guaranteeing a perfect, coordinated, and safe workplace can enhance efficiency and minimize the risk of accidents.
1. Clear the Work Area
Start by removing any clutter, debris, or obstacles from the work area. Clear the floor and surrounding surfaces to create a clean and unobstructed workspace. This prevents tripping hazards and allows smooth movement while handling the circular saw.
2. Adequate Lighting
Ensure the work area is well-lit, preferably with natural light or additional lighting sources. Sufficient illumination will help you see the cut line clearly, reducing the chances of errors or misalignment.
3. Stable Surface
Place your workbench or sawhorses on a level surface to provide stability. Ensure they are positioned firmly and securely before placing the workpiece on them. If using sawhorses, ensure they are set at an appropriate height to support the workpiece comfortably.
4. Create Support for Long Workpieces
For long workpieces that extend beyond the sawhorses or workbench, create additional support using temporary tables or sawhorses. This prevents the material from sagging or tipping during the cutting process, ensuring accurate and straight cuts.
5. Consider Dust Collection
Circular saws generate a significant amount of sawdust. Set up a dust collection system or use a shop vacuum to minimize airborne dust particles. This improves visibility, prevents debris from interfering with the cut, and promotes a cleaner work environment.
6. Keep Excess Materials Clear:
Ensure any excess material, such as offcuts or scrap pieces, is clear of the cutting area. This prevents the saw from accidentally coming into contact with these materials, reducing the risk of kickbacks or damage to the blade.

Preparing the work area before using a circular saw is crucial for a safe and efficient cutting process. You can minimize potential hazards and distractions by clearing the work area, ensuring proper lighting, and creating a stable and organized setup.
A well-prepared work area contributes to better visibility, improved accuracy, and a smoother workflow, allowing you to achieve precise and straight cuts with your circular saw.
Adjust the Circular Saw
It’s essential to adjust the tool properly before making straight cuts with a circular saw. You can achieve accurate and straight cuts by ensuring correct adjustments while enhancing safety during the cutting process.
1. Blade Alignment
Check the alignment of the circular saw blade. Ensure that it is perpendicular to the saw’s base or shoe. This alignment ensures that the blade will cut straight and minimize the risk of binding or wandering during the cut.
2. Cutting Depth
Change the cutting profundity of the round saw according to the thickness of the material you are cutting. Most circular saws have a depth adjustment lever or knob that allows you to set the desired cutting depth. Ensure the blade extends just enough to cut through the material without excessive exposure.
3. Bevel Angle
If you need to make beveled cuts, adjust the bevel angle of the circular, saw accordingly. The bevel angle determines the blade’s tilt relative to the material’s surface. Refer to your saw’s user manual for instructions on adjusting the bevel angle, and use a protractor or angle guide for accuracy.
4. Blade Guard and Anti-Kickback Mechanism
Check that the blade guard is properly functioning and in good condition. The guard covers most of the blade when not used, protecting against accidental contact. Additionally, ensure that the anti-kickback mechanism is engaged. This mechanism helps prevent kickbacks by minimizing the possibility of the saw binding or catching on the material.
5. Secure Fasteners
Before operating the circular saw, ensure that all the fasteners, such as bolts and screws, are securely tightened. Loose fasteners can cause instability and compromise the accuracy of your cuts.
6. Test Cuts
Perform a test cut on scrap material before starting your project. This allows you to verify the accuracy of the adjustments you have made. If necessary, make further adjustments to the blade alignment, cutting depth, or bevel angle to achieve the desired results.
Properly adjusting your circular saw is crucial for making straight cuts and ensuring a safe cutting experience. By aligning the blade, setting the cutting depth, changing the bevel angle, and confirming the functionality of the blade guard and anti-kickback mechanism, you can optimize the performance of your circular saw.
Mark the Cutting Line
Before making straight cuts with a circular saw, it is important to mark the cutting line accurately. Keeping the cutting line guides your saw, ensuring your cuts are straight and precise.
1. Measure and Plan
Begin by measuring and determining the desired length or width of your cut. Take into account any allowances or margins needed for your project.
2. Marking Tools
Choose a suitable marking tool to mark the cutting line on the material. Options include a pencil, marker, or scribe. Ensure the marking tool produces a visible line that is easy to follow during cutting.
3. Straight Edge or Guide
Using a straight edge or guide can be helpful for longer cuts or cuts requiring consecutive lines. A straight edge can be a ruler, level, or a long piece of wood with a straight edge.

Position the straight edge along the marked cutting line and secure it in place using clamps or weights. This will serve as a guide for your circular saw to run along, ensuring a straight cut.
4. Double-Check Measurements
Before cutting, double-check your measurements and the alignment of the marked cutting line. Confirm that the cutting line is parallel to the edge of the material and that it accurately represents your desired cut.
5. Multiple Markings
If you have a long cut or are working with a large piece of material, consider marking the cutting line at multiple points along the length. This provides additional reference points and helps maintain accuracy throughout the cut.
6. Consider Blade Kerf
Consider the width of the circular saw blade, known as the blade kerf, when marking the cutting line. The blade kerf is the material that will be removed during the cutting process. Adjust the marking line accordingly so that the final cut matches your intended measurement.
Marking the cutting line accurately is crucial in achieving straight cuts with a circular saw. By measuring carefully, using suitable marking tools, employing a straight edge or guide, and double-checking your measurements, you can ensure that your cuts are precise and aligned with your project requirements. Taking the time to mark the cutting line correctly sets the foundation for successful and straight cuts with a circular saw.
Position and Support the Material
Proper positioning and supporting the material are essential when making straight cuts with a circular saw. By ensuring the material is secure and well-supported, you can achieve accurate and straight cuts while maintaining safety during the cutting process.
1. Workbench or Sawhorses
Place your material on a sturdy workbench or sawhorse. Ensure that the surface is level and provides adequate support for the entire length of the material. A stable work surface prevents the fabric from shifting or vibrating during the cut, which can affect the accuracy of the amount.
2. Secure the Material
Use clamps or other suitable methods to secure the material to the workbench or sawhorses. This prevents the fabric from moving or shifting while you cut. Ensure the clamps are positioned away from the cutting line to avoid interfering with the circular saw.
3. Overhang Support
If your material extends beyond the workbench or sawhorses, provide additional support to prevent sagging or tipping during the cut. Use temporary supports such as tables, sawhorses, or wood blocks to create a level and secure surface for the overhanging portion of the material.
4. Consider Cutting Height
Adjust the cutting height of the circular saw to ensure that the blade will cut through the material without contacting the work surface. The depth of cut should be sufficient to penetrate the fabric while leaving a small gap between the blade and the work surface.
5. Anticipate Falling Pieces
When cutting, anticipate the path of the falling pieces. Ensure that the area beneath the material is clear and free of any obstacles or obstructions. This prevents the cut-off pieces from getting stuck or causing accidents during the cutting process.
6. Personal Safety
Prioritize personal safety by wearing appropriate safety equipment such as safety goggles, ear protection, dust mask, and gloves. These safety measures protect you from potential hazards, including flying debris, excessive noise, and sawdust.
Make the Cut
Once you have prepared the tools, adjusted the circular saw, marked the cutting line, and positioned the material correctly, it’s time to cut. Proper technique and safety measures will help you achieve a straight and precise amount with a circular saw.
Position Yourself
Stand in a comfortable and balanced position with your feet shoulder-width apart. Keep a firm grip on the saw’s handle, ensuring that you have full control and stability during the cutting process.
Activate the Saw
Before bringing the saw blade into contact with the material, ensure that it is properly activated and running at full speed. Refer to the manufacturer’s instructions for starting and operating the circular saw.
Approach the Cut
Begin the cut by positioning the saw blade slightly away from the marked cutting line. This approach helps prevent accidental contact between the blade and the material before you are ready to start the cut.
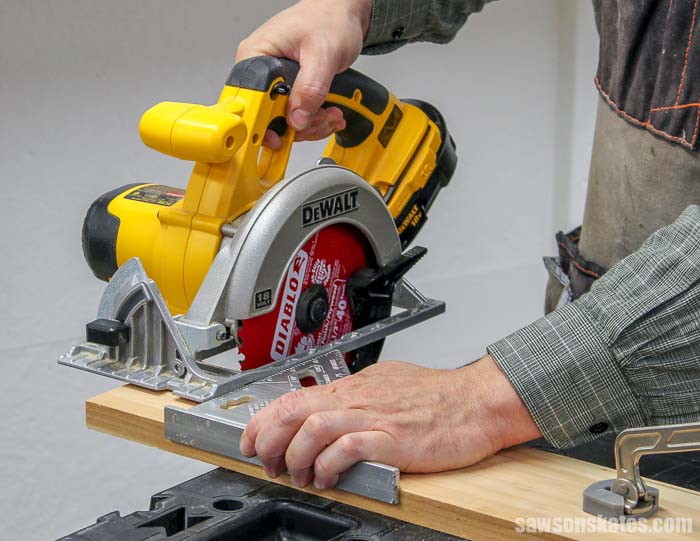
Steady the Saw
Rest the front edge of the circular saw’s base or shoe firmly on the material, ensuring it is stable and well-supported. Keep the saw’s base flat against the fabric throughout the cut to maintain stability and control.
Start the Cut
Slowly and steadily guide the saw blade into the material, aligning it with the marked cutting line. Apply gentle downward pressure to maintain contact between the saw blade and the fabric while allowing the edge to do the cutting. Let the saw’s teeth work, and avoid forcing or pushing too hard.
Follow the Cutting Line
Maintain a steady and controlled motion as you follow the marked cutting line with the saw blade. Focus on the cutting line ahead of the edge to ensure accuracy. Maintain a consistent speed and avoid jerky movements that could lead to an uneven cut.
Support the Material
As you approach the end of the cut, ensure that the material remains well-supported to prevent it from falling or breaking off prematurely. Maintain control of the saw until the amount is complete.
Complete the Cut
Once you have reached the end of the cut, slowly withdraw the saw from the material while keeping it running. Allow the saw blade to come to a complete stop before setting it down.
Check the Cut
Inspect the cut to ensure it is straight, smooth, and meets your desired specifications. If necessary, use sandpaper or a file to smooth any rough edges.
Safety Precautions
After completing the cut, take necessary safety precautions. Disengage the saw, set it aside safely, and clear any debris or offcuts from the work area. Store the circular saw safely, and always follow proper maintenance procedures.
Making a straight cut with a circular saw requires proper technique, focus, and adherence to safety measures. You can achieve a clear and precise cut by positioning yourself correctly, starting the amount with care, following the cutting line accurately, and supporting the material throughout. Remember to prioritize safety at all times during the cut and post-cut procedures.
Complete the Cut and Finish
Completing the cut and finishing the workpiece properly is the final step in making straight cuts with a circular saw. By ensuring a clean and precise finish, you can achieve professional-looking results.
Allow the Blade to Stop:
After completing the cut, allow the circular saw blade to come to a complete stop before proceeding. This ensures safety and prevents any accidental contact with the blade.
Remove Clamps or Supports
If you used clamps or supports to secure the material during the cut, remove them carefully. Make sure not to disturb the workpiece or cause any damage.
Inspect the Cut
Once the cut is complete, inspect it closely to ensure it meets your desired specifications. Check for deviations from the intended line, rough edges, or other imperfections needing attention.
Sand or File, if Necessary
If there are any rough edges or imperfections in the cut, use sandpaper or a file to smooth them out. Gently sand the edges or use the file to remove any irregularities and achieve a clean finish
Remove Sawdust and Debris
Clear away any sawdust, wood chips, or debris from the workpiece. Use a brush or a clean cloth to remove the residue. This helps you assess the quality of the cut and prepares the workpiece for further processing or assembly.
Measure and Verify
Take measurements to ensure that the cut length or width matches your intended dimensions. Use a tape measure or ruler to verify the accuracy of the cut.
Proceed with Project or Next Steps
If the cut is part of a larger project, determine the next steps based on your design or plans. Whether it involves combining pieces, applying finishes, or incorporating the workpiece into a larger assembly, proceed according to your project requirements.
Clean and Store the Circular Saw
Clean the circular saw by removing any sawdust or debris that may have accumulated during the cutting process. Store the circular saw safely and securely until its next use.
Completing the cut and finishing the workpiece is the final stage in making straight cuts with a circular saw. You can achieve a clean and precise finish by carefully inspecting the amount, addressing imperfections, and clearing away debris.
Ensure that the dimensions of the amount match your intended specifications and proceed with the appropriate steps for your project.
Properly cleaning and storing the circular saw maintains its longevity and prepares it for future use. With attention to detail and a focus on quality, you can achieve professional-looking results in your woodworking or construction projects.