
Are you tired of using a dull table saw blades that hinder your woodworking projects? You are not alone in this turmoil. Pick our hand to know How to Sharpen Table Saw Blades?
A table saw is an invaluable tool in any woodworking shop, but its blades can lose their sharpness over time, leading to subpar performance and frustrating outcomes.
By learning the proper techniques for sharpening table saw blades, you can restore their cutting power and achieve cleaner, more precise cuts.
Step by Step guide to sharpening your table saw blade
1. Remove the blade
How to do this step easily?
Removing the blade from a table saw can be done quickly by following these simple steps. It is essential to exercise caution and wear protective gloves to prevent any potential injuries.
Things required to complete this step
- Safety gloves
- Adjustable wrench or a blade removal tool specific to your table saw model
Description
Locate the blade lock button or lever, typically positioned near the blade on the table saw. This lock button or lever is designed to prevent the blade from spinning during removal. Press or engage the blade lock to secure the blade in place.
Next, access the arbor nut that holds the blade in position. Depending on your table saw’s model, a blade guard or throat plate may cover the nut. Remove any covers or plates that obstruct your access to the arbor nut.
Use the adjustable wrench or blade removal tool to position it on the arbor nut. It may require some force, so hold the blade steady with your other hand to prevent it from spinning.
Once the arbor nut is loose, remove it and set it aside. Now, you can carefully lift the blade off the arbor shaft, ensuring you support its weight to avoid accidents. If the blade appears stuck, gently tap or wiggle it from side to side to loosen it before lifting it.
After removing the blade, inspecting it for any signs of damage or wear is recommended. Remember to handle the blade cautiously, as the teeth can be sharp.
2. Clean the blade
How to do this step easily?
Cleaning the blade of a table saw can be quickly done by following these steps.
Things required to complete this step
- Safety gloves
- Eye protection
- Soft-bristle brush
- Mild detergent or specialized blade cleaning solution
- Water
- Clean cloth or towel
Description
Start by creating a clean working area by removing debris or sawdust from the table saw and its surroundings. This will help prevent debris from getting onto the blade during cleaning.
Next, remove the blade from the table saw using the earlier steps. Place the blade on a flat, clean surface, ensuring it is stable and won’t move during cleaning.
Take the soft-bristle brush and gently scrub the blade’s teeth and surfaces to remove accumulated dirt, resin, or pitch. Apply light pressure and avoid using abrasive materials that could damage the blade.

If stubborn residues are on the blade, prepare a mild detergent or a specialized blade cleaning solution mixed with wastewater to remove any residue from the cleaning solution. Ensure that all soap or cleaning agent is thoroughly washed off.
Once rinsed, dry the blade using a clean cloth or towel. It’s essential to remove all moisture to prevent rusting or corrosion.
Inspect the blade to ensure it is clean and free from debris or cleaning solution residue. If necessary, repeat the cleaning process to achieve the desired level of cleanliness.
Finally, reattach the clean blade to the table saw by following the steps for blade removal in reverse order. Make sure the blade is securely fastened before operating the table saw again.
3. Inspect for damage
How to do this step easily?
Inspecting a table saw blade for damage can be quickly done by following these steps. Before you begin, ensure the power is turned off, and the saw is unplugged. It is also recommended to wear safety gloves and eye protection to prevent any potential injuries.
Things required to complete this step
- Safety gloves
- Eye protection
- Adequate lighting
Description
Start by removing the blade from the table saw using the previously mentioned steps. Place the blade on a clean and flat surface, ensuring it is stable and won’t move during inspection.
Thoroughly examine the blade for any visible signs of damage, such as chipped or missing teeth, warping, cracks, or excessive wear. Utilize adequate lighting to ensure a comprehensive inspection and avoid overlooking any issues.
If you notice any chips or missing teeth on the blade, it may impact its performance and safety. Consider replacing the blade or seeking professional assistance for repair.
Inspect the blade for signs of warping or bending. Place a straight edge, such as a ruler or level, against the blade’s surface and check for any gaps or deviations. A warped blade can lead to inaccurate cuts and should be replaced.
Check the blade carefully for cracks, especially around the arbor hole or near the teeth. Cracked blades are unsafe to use and should be replaced immediately.

Additionally, examine the blade for signs of excessive wear, such as uneven tooth height or significant dulling. If the blade appears excessively worn, it can result in poor cutting performance or an increased risk of kickback. Consider sharpening the blade or replacing it as necessary.
During the inspection, ensure that no foreign objects, such as sawdust or debris, are lodged in the teeth or between the blade and the arbor.
Once the inspection is complete, reattach the blade to the table saw by following the steps for blade removal in reverse order. Make sure the blade is securely fastened before operating the table saw.
4. Secure the blade
How to do this step easily?
Securing the blade of a table saw can be quickly done by following these steps. Before you begin, ensure the power is turned off, and the saw is unplugged. It is also essential to exercise caution and wear protective gloves to prevent any potential injuries.
Things required to complete this step
- Safety gloves
- Adjustable wrench or a blade tightening tool specific to your table saw model
Description
Start by locating the arbor nut on the table saw. The arbor nut is responsible for holding the blade in place and is usually situated at the center of the blade, where it attaches to the arbor shaft.
Carefully place the blade onto the arbor shaft, ensuring it sits flush against the flange. Align the mounting holes on the blade with the holes on the arbor shaft.
Use the adjustable wrench or blade tightening tool to position it onto the arbor nut. Apply firm pressure while tightening to keep the blade firmly in place.
Tightening the arbor nut firmly is essential but avoid over-tightening as it can damage the blade or the arbor shaft.
After securing the arbor nut, give the blade a gentle tug or wiggle to check if it is properly tightened. The blade should not move or feel loose. If you detect any movement, re-tighten the arbor nut until the blade is securely placed.
Once the blade is securely fastened, you can make other necessary adjustments or operations on your table saw.
5. Choose the sharpening method
When deciding on a method to sharpen a table saw blade, several options exist. Standard methods include:
- Using a table saw blade sharpener.
- A diamond blade sharpener.
- Seeking the services of a professional sharpening service.
Let’s explore each method
1. Table Saw Blade Sharpener
A table saw blade sharpener is a popular choice for sharpening blades and is specifically designed for this purpose. These sharpeners often feature a grinding wheel or abrasive disk that effectively removes dull edges and restores the sharpness of the blade’s teeth.
To use a table saw blade sharpener, carefully follow the instructions provided by the manufacturer. These sharpeners typically have adjustable settings for different blade sizes and tooth configurations. The process generally involves:
- Securely mounting the blade.
- Adjusting the sharpener’s settings.
- Passing the blade through the sharpener slowly to grind away the dull edges.
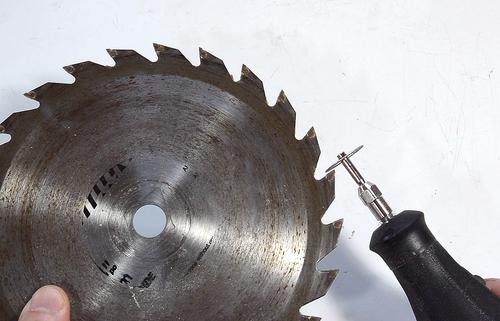
2. Diamond Blade Sharpener
Using a diamond blade sharpener is another option, as these sharpeners utilize diamond abrasives for effective sharpening. They can be handheld manual sharpeners or attachments that fit onto power tools such as drills.
To sharpen the blade with a diamond sharpener, clamp the blade securely and follow the instructions for the specific sharpener. Move the diamond sharpener along the blade’s teeth, applying gentle pressure and ensuring consistent contact with each tooth. This method allows for precise and controlled sharpening.
3. Professional Sharpening Service
If you prefer to avoid sharpening the blade yourself or if your blade has complex configurations, you can opt for a professional sharpening service. Many blade manufacturers or local sharpening shops offer specialized services for table saw blades.
When selecting a professional sharpening service, research local options or contact the blade manufacturer for recommendations. Before sending the blade for sharpening, clean it and remove any debris. Securely package the blade according to the service provider’s instructions for shipping or drop-off.
Considerations
Before choosing a sharpening method, assess the blade’s condition, age, and comfort level with sharpening tools. If the blade is significantly damaged or excessively worn, replacing it may be more cost-effective than sharpening. Additionally, ensure you have the necessary tools and follow safety precautions when using sharpening equipment.
4. Sharpen the teeth
Things required to complete this step
- Safety gloves
- Eye protection
- Diamond file or specialized blade sharpening tool
- Lubricant (optional)
- Clean cloth or towel
Description
Start by removing the blade from the table saw using the earlier steps. Place the blade on a clean and flat surface, ensuring it is stable and won’t move during sharpening.
Inspect the teeth of the blade to identify any dull or damaged areas. Focus on one tooth at a time for precise sharpening.
Take the diamond file or specialized blade sharpening tool and position it at the tooth’s base, angling it to match the original bevel angle of the tooth. Apply light pressure and move the file or sharpening tool along the tooth’s cutting edge in a smooth motion. Repeat this process for each tooth, maintaining a consistent angle and pressure.
If the blade or sharpening tool becomes hot during the sharpening process, you can apply a lubricant to reduce friction and heat. However, ensure the lubricant is compatible with the blade material and does not interfere with the sharpening process.
After sharpening all the teeth, inspect them to ensure they are sharp and evenly sharpened. Remove any metal shavings or debris from the blade using a clean cloth or towel.
Once the sharpening is complete and the blade is clean, reattach it to the table saw by following the steps for blade removal in reverse order. Make sure the blade is securely fastened before operating the table saw.
5. Balance the blade
How to do this step easily?
Balancing the blade of a table saw can be easily accomplished by following these steps. Before you begin, ensure the power is turned off, and the saw is unplugged. It is essential to exercise caution and wear safety gloves to prevent any potential injuries.
Things required to complete this step
- Safety gloves
- Blade balancing kit (optional)
Description
Start by removing the blade from the table saw using the previously mentioned steps. Place the blade on a clean and flat surface, ensuring it remains stable and does not move during the balancing process.
Inspect the blade for any imbalance, such as wobbling or uneven weight distribution. An imbalanced blade can cause vibrations during operation, leading to poor-quality cuts or potential damage to the saw.
If you have a blade balancing kit, refer to the instructions provided with the kit. These kits often include a cone or arbor shaft along with small weights. The cone or arbor shaft helps identify the heaviest side of the blade, while the weights can be added to the lighter side to restore balance.
You can manually balance the blade if you do not have a balancing kit. Carefully hold the blade at its center hole, using your finger as a pivot point. Observe if one side of the blade is noticeably heavier than the other.

To manually balance the blade, add small adhesive weights or tape to the lighter side of the blade. Continue adding or adjusting the weights until the blade spins smoothly without any wobbling.
Once you have achieved a balanced blade, reattach it to the table saw by following the steps for blade removal in reverse order. Make sure the blade is securely fastened before operating the table saw.
6. Reinstall the blade
How to do this step easily?
Reinstalling the blade on a table saw can be quickly done by following these steps.
Things required to complete this step
- Safety gloves
- Adjustable wrench or a blade tightening tool specific to your table saw model
Description
Start by locating the arbor shaft on the table saw. The arbor shaft is the spindle onto which the blade mounts. Identify the arbor nut used to secure the blade in place.
Carefully place the blade onto the arbor shaft, ensuring it sits flush against the flange. Align the mounting holes on the blade with the holes on the arbor shaft.
Use the adjustable wrench or blade tightening tool to position it onto the arbor nut. Rotate the wrench clockwise to tighten the nut securely. Apply firm pressure while tightening to keep the blade firmly in place.
Ensure that the arbor nut is tightened securely, but avoid over-tightening, as it can damage the blade or the arbor shaft.
After securing the arbor nut, give the blade a gentle tug or wiggle to check if it is properly tightened. The blade should not move or feel loose. If you detect any movement, re-tighten the arbor nut until the blade is securely placed.
Once the blade is securely fastened, you can make other necessary adjustments or operations on your table saw.
7. Test the blade
How to do this step easily?
Testing the blade of a table saw can be easily accomplished by following these steps. Before you begin, ensure the power is turned off, and the saw is unplugged. It is essential to exercise caution and wear safety gloves to prevent any potential injuries.
Things required to complete this step
- Safety gloves
- Scrap wood or test material
Description
Start by following the earlier steps and ensuring the blade is installed correctly and secured on the table saw. Make sure the blade is aligned and centered on the arbor shaft.
Observe the blade to check if it rotates smoothly without wobbling or vibration. A balanced and well-installed blade should spin evenly.
Next, select a scrap wood or test material you can safely cut. Position the material against the table saw’s fence and slowly push it through the blade while maintaining a steady and controlled feed rate. Observe the cutting action and listen for any unusual sounds.
An adequately sharpened and aligned blade should produce clean and accurate cuts without excessive tear-out or burning of the material. If you notice any issues with the cut, such as rough edges or burning, it may indicate a need for further adjustments or blade maintenance.
After testing the blade, please turn off the power to the table saw and unplug it. If necessary, address any problems or consult a professional for further assistance.
Does The Blade Need A Good Cleaning?
Maintaining a clean table saw blade is essential to ensure its optimal performance and longevity. Over time, blades tend to accumulate pitch, resin, and sawdust, impairing their cutting efficiency. This section will discuss the significance of cleaning table saw blades and provide detailed instructions on cleaning them effectively.
Importance of Cleaning Table Saw Blades
Regularly cleaning your table saw blades offers numerous benefits:
Enhanced Cutting Performance
The debris build-up on the blade’s teeth can hinder its cutting ability. Cleaning the blade can restore its sharpness and precision, resulting in cleaner and smoother cuts.
Prolonged Blade Lifespan
Pitch and resin on the blade can cause overheating and increased friction, potentially damaging the blade’s carbide tips or steel teeth. By cleaning the blade, you can remove these detrimental substances and help prolong its lifespan.
Improved Safety
A clean blade reduces the risk of kickback, a hazardous occurrence where the workpiece is forcefully thrown back at the operator. Removing debris from the blade minimizes the chance of irregular cuts and kickback incidents, fostering a safer working environment.
Signs that Indicate a Table Saw Blade Needs Sharpening
Decreased Cutting Efficiency
One of the primary indicators that a table saw blade requires sharpening is a noticeable decrease in cutting efficiency. If you observe the blade struggling to make clean and smooth cuts, resulting in burn marks or torn material, it will likely dull and need sharpening.
Increased Feed Pressure
A sharp blade effortlessly cuts through the material with minimal resistance, requiring little force from the operator. However, applying excessive feed pressure to push the material through the blade indicates that the blade has become dull and needs sharpening.
Burn Marks on the Material
A dull blade generates excessive heat during cutting, leaving burn marks on the material. You are cutting if you notice dark burn marks on the edges of the wood or other materials.
Splintering or Chipping
Dull blades often cause splintering or chipping along the cut edges of the material. Instead of producing clean and smooth cuts, a dull blade may tear or chip the wood fibers, resulting in a rough and uneven finish. If you frequently observe splintering or chipping, it’s a clear sign that your table saw blade needs sharpening.
Excessive Vibration or Noise
A dull blade can create excessive vibration and noise during operation. If you notice increased vibration or unusual noises, such as buzzing or rattling, the blade is not cutting efficiently and may require sharpening.
Irregular or Wandering Cuts
When a blade becomes dull, it may veer off course or produce irregular cuts instead of following the intended path. If you experience difficulty maintaining a straight line or notice the blade deviating from the desired cutting path, it strongly indicates that the blade needs sharpening.
Recognizing signs indicating a table saw blade needs sharpening is crucial for optimal cutting performance.
It is time to sharpen your blade if you observe decreased cutting efficiency, increased feed pressure, burn marks on the material, splintering or chipping, excessive vibration or noise, or irregular cuts.
Regular maintenance and sharpening will ensure that your table saw blade remains sharp, providing clean and precise cuts for your woodworking projects.
Is It Worth Sharpening Table Saw Blades?
Table saw blades are essential for woodworking, and maintaining their sharpness is crucial for achieving clean and precise cuts. Over time, blades can become dull due to wear and tear from cutting various materials. This section will discuss the importance of sharpening table saw blades and whether it is worth the effort and investment.
Benefits of Sharpening Table Saw Blades
1. Improved Cutting Performance
Sharpening a table saw blade restores its cutting efficiency and allows it to slice through materials easily. A sharp blade produces cleaner cuts, reducing the risk of tear-out, splintering, and other imperfections. This results in higher-quality artistry and saves time on sanding or reworking the cut surfaces.
2. Cost Savings
Investing in regular blade sharpening can save you money in the long run. Instead of purchasing new blades, which can be expensive, sharpening the existing ones allows you to extend their lifespan. This primarily benefits high-quality, specialized blades designed for specific woodworking tasks.
3. Extended Blade Lifespan
By sharpening table saw blades, you remove the dullness and maintain the integrity of the blade’s teeth. This helps prevent premature wear and damage to the blade, extending its lifespan. Regular sharpening ensures the blade performs optimally and remains in good condition for extended periods.
4. Safer Operation
Dull blades can lead to unsafe operating conditions. Sharpening the blade ensures smoother cuts, reduces the chances of kickback, and promotes a safer woodworking environment.
Factors to Consider
Blade Quality
High-quality blades with premium materials and carbide tips are often worth sharpening since they have a longer lifespan and can be more expensive to replace.
Blade Condition
The overall condition of the blade plays a role in determining whether it is worth sharpening. If the blade is heavily damaged, has missing or chipped teeth, or has been sharpened multiple times before, replacing it may be more cost-effective.
Sharpening Cost and Accessibility
Consider the cost of professional sharpening services or the investment in a sharpening tool if you plan to do it yourself. If sharpening services are readily available and affordable, it can be a worthwhile investment. However, if the cost or accessibility is prohibitive, replacing the blade may be more practical.
Sharpening table saw blades offers several benefits, including improved cutting performance, cost savings, extended blade lifespan, and enhanced safety. Maintaining the quality and longevity of your blades is a worthwhile endeavor.
However, factors such as blade quality, condition, and the cost and accessibility of sharpening services should be considered. Evaluating these factors will help you decide whether it is worth sharpening your table saw blades or opting for replacement.
Is It Worth Sharpening Table Saw Blades Yourself?
Maintaining the sharpness of your table saw blades is essential for achieving clean and precise cuts in woodworking projects. When the blades become dull, you can sharpen them yourself or seek professional sharpening services.
This section will discuss the advantages and considerations of sharpening table saw blades, helping you determine whether it is worth the effort and investment.
Advantages of Sharpening Table Saw Blades Yourself
Cost Savings
Sharpening your table saw blades yourself can result in significant cost savings. Professional sharpening services can be expensive, especially if you have multiple blades or frequently require sharpening. Learning how to sharpen the blades yourself eliminates the need for ongoing service costs.
Convenience and Accessibility
Having the ability to sharpen the blades yourself offers convenience and accessibility. You can sharpen the blades whenever needed without waiting for an appointment or relying on external services.
Skill Development and Knowledge
Sharpening table saw blades yourself allows you to develop valuable skills and knowledge about blade maintenance. You better understand the blade’s anatomy, tooth geometry, and the sharpening process itself. This knowledge can empower you to maintain and optimize the performance of your blades, resulting in better woodworking outcomes.
Considerations for Sharpening Table Saw Blades Yourself
Learning Curve
Sharpening table saw blades requires acquiring a certain level of skill and knowledge. A learning curve is involved, especially if you are new to blade sharpening.
Equipment and Tools
Sharpening table saw blades yourself requires the necessary equipment and tools. You will need a sharpening system or specific files for sharpening saw blades. Consider the initial investment required to acquire these tools.
Blade Condition and Complexity
The condition of the blade plays a role in determining whether it is suitable for self-sharpening. Severely damaged or excessively worn blades may require professional services or replacement.
Some blades have complex tooth geometries, such as specialized blades for dado cuts or specific materials. Sharpening such blades may require advanced techniques or professional expertise.
Sharpening table saw blades yourself can offer cost savings, convenience, and the opportunity to develop valuable skills and knowledge.
It is worth considering if you are willing to invest time in learning the sharpening process, have access to the necessary equipment, and the blades are in suitable condition for self-sharpening.
However, professional sharpening services remain a viable option if you need more time, resources, or confidence to sharpen the blades. Ultimately, the decision to sharpen table saw blades yourself depends on your comfort level, available resources, and the condition of the blades.