
Are you tired of struggling with a dull chainsaw blade that hampers your cutting efficiency? Look no further. This comprehensive guide will unveil the secrets of How to use an Electric Chainsaw Sharpener?
Whether you’re a seasoned professional or a DIY enthusiast, our step-by-step instructions will equip you with the knowledge and skills to achieve razor-sharp precision with your chainsaw.
Bid farewell to time-consuming manual sharpening methods and embrace the ease and effectiveness of an electric chainsaw sharpener. Get ready to witness the transformative power of this essential tool as we delve into the ins and outs of its operation. So, let’s embark on a journey towards flawless cuts by mastering the art of using an electric chainsaw sharpener.
Follow preventive measures
When using an electric chainsaw sharpener, it is crucial to prioritize safety. Following proper precautionary measures, you can minimize the risk of accidents and ensure a smooth and effective sharpening process. This article will outline some essential safety precautions to remember when using an electric chainsaw sharpener.
Read the User Manual
Before operating any equipment, it is vital to thoroughly read and understand the user manual provided by the manufacturer. The manual will contain specific instructions on using the electric chainsaw sharpener correctly and safely. Ensure you familiarize yourself with all the safety guidelines and recommendations outlined in the manual.
Wear Appropriate Safety Gear
Always wear appropriate safety gear to protect yourself from potential hazards. This includes:
- Safety goggles or a face shield: To shield your eyes and face from flying debris.
- Ear protection: Electric chainsaw sharpeners can be noisy, so earplugs or earmuffs can help protect your hearing.
- Gloves: Choose gloves that provide a good grip and protection from sharp edges.
- Protective clothing: Wear long sleeves, pants, and sturdy shoes to protect your skin from accidental contact with the sharpener or chainsaw parts.
Choose a Safe Work Area
- Select a well-lit and well-ventilated work area for operating the electric chainsaw sharpener.
- Ensure there is ample space for you to move around comfortably.
- Keep the work area clean and clutter-free to avoid tripping hazards.
Secure the Chainsaw and Sharpener: Before beginning the sharpening process, ensure that the chainsaw and the sharpener are securely fastened or clamped down. This will prevent any unwanted movement or slippage during the sharpening process, reducing the risk of accidents.
Unplug the Sharpener: Always unplug the electric chainsaw sharpener from the power source before making any adjustments or performing maintenance. This step is crucial to prevent accidental startup and potential injuries.
Follow Proper Handling Procedures
- Keep both hands on the tool and maintain a firm grip when handling the electric chainsaw sharpener.
- Avoid placing your hands near the grinding wheel while it is in motion.
- Only remove your hands from the tool once the grinding wheel has stopped.
Maintain the Correct Grinding Angle
To ensure effective sharpening, maintain the correct grinding angle as the chainsaw manufacturer recommends. This angle can vary depending on the type and model of the chainsaw. Refer to the chainsaw’s user manual or the sharpener’s instructions for the correct grinding angle specifications.
Take Breaks and Avoid Fatigue
Sharpening a chainsaw can be physically demanding. Take regular breaks to rest and prevent fatigue, which can lead to decreased focus and increased chances of accidents. Stay hydrated and listen to your body’s signals to avoid overexertion.
Examine the chain
Cleaning the Chain
Start by removing the chain from the chainsaw, following the manufacturer’s instructions. Use a stiff brush or compressed air to remove any debris, sawdust, or resin that may have accumulated on the chain. Cleaning the chain thoroughly will provide a clearer view of its condition.
Assessing the Chain’s Condition
Once the chain is clean, carefully examine it for signs of wear, damage, or any other issues. Here are some key aspects to consider:
a) Chain Tension: Check the chain’s tension by lightly pulling it away from the guide bar. Ideally, the chain should have slightly slack but not sag excessively. Proper tension ensures efficient cutting and minimizes the risk of kickback.
b) Cutting Teeth: Inspect the cutting teeth on the chain for sharpness and uniformity. Look for any chipped, broken, or excessively worn teeth. If you notice any damaged teeth, they may need to be filed or replaced. Dull or damaged teeth can lead to reduced cutting performance and increased wear on the chainsaw.
c) Depth Gauges: Examine the depth gauges and small metal protrusions in front of each cutting tooth. These gauges determine the depth of the cut and play a crucial role in safe and efficient cutting. Ensure the depth gauges are at the proper height relative to the cutting teeth. If they are too high, filing them down may be necessary.
d) Chain Rivets: Check the chain rivets holding the cutting teeth in place. Look for loose or damaged rivets that could affect the chain’s stability and durability. If you find any issues, consult the manufacturer’s guidelines or consider replacing the chain.
Maintenance and Corrections
After examining the chain and identifying any issues, it’s time to address them. Here are some common maintenance tasks:
a) Sharpening the Chain: If the cutting teeth are dull or damaged, sharpen them using an electric chainsaw sharpener. Follow the manufacturer’s instructions to ensure proper sharpening angles and techniques. Regular sharpening will enhance cutting performance and minimize strain on the chainsaw motor.
b) Adjusting Chain Tension: If the chain tension is too loose or tight, adjust it according to the manufacturer’s recommendations. Proper tension is crucial for safe and efficient cutting operations.
c) Replacing the Chain: If the chain is excessively worn, damaged beyond repair, or fails to meet safety standards even after maintenance, it may be time to replace it. Consult the chainsaw’s manual or contact the manufacturer for guidance on selecting the appropriate replacement chain.
Sharpening stone
A sharpening stone is a valuable tool for maintaining the cutting performance of your chainsaw chain. Combined with an electric chainsaw sharpener, it becomes a powerful duo for optimal sharpness.
Selecting the Right Sharpening Stone
Before you begin sharpening your chainsaw chain, choosing the appropriate sharpening stone is important. Different types of sharpening stones are available, such as diamond stones and abrasive stones. Make sure the stone you select is compatible with your electric chainsaw sharpener and suitable for the type of chainsaw chain you have.
Preparing the Chainsaw Chain
Start by removing the chain from the chainsaw, following the manufacturer’s instructions. Clean the chain thoroughly using a brush or compressed air to remove debris, sawdust, or resin.

Cleaning the chain ensures better visibility and prevents the accumulation of grit on the sharpening stone.
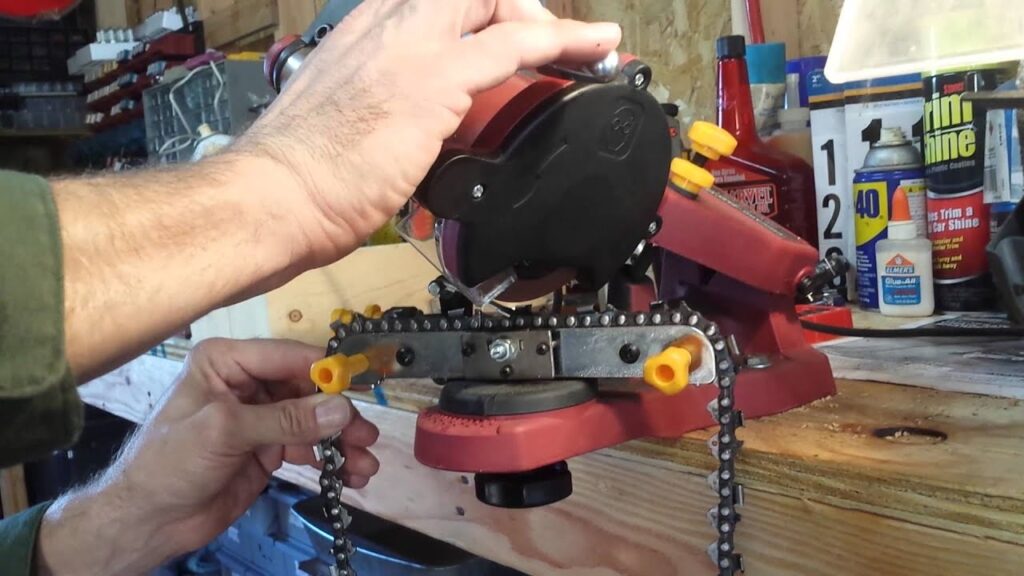
Setting Up the Electric Chainsaw Sharpener
- Set up your electric chainsaw sharpener according to the manufacturer’s guidelines.
- Ensure the sharpener is securely mounted on a stable surface and positioned at a comfortable working height.
- Familiarize yourself with the sharpener’s controls and safety features before proceeding.
Applying Lubrication
Apply a suitable lubricant or chainsaw chain oil to the sharpening stone. Lubrication helps prevent excessive heat buildup during the sharpening process, enhances the stone’s effectiveness, and extends its lifespan. Follow the manufacturer’s recommendations for the specific lubricant to use.
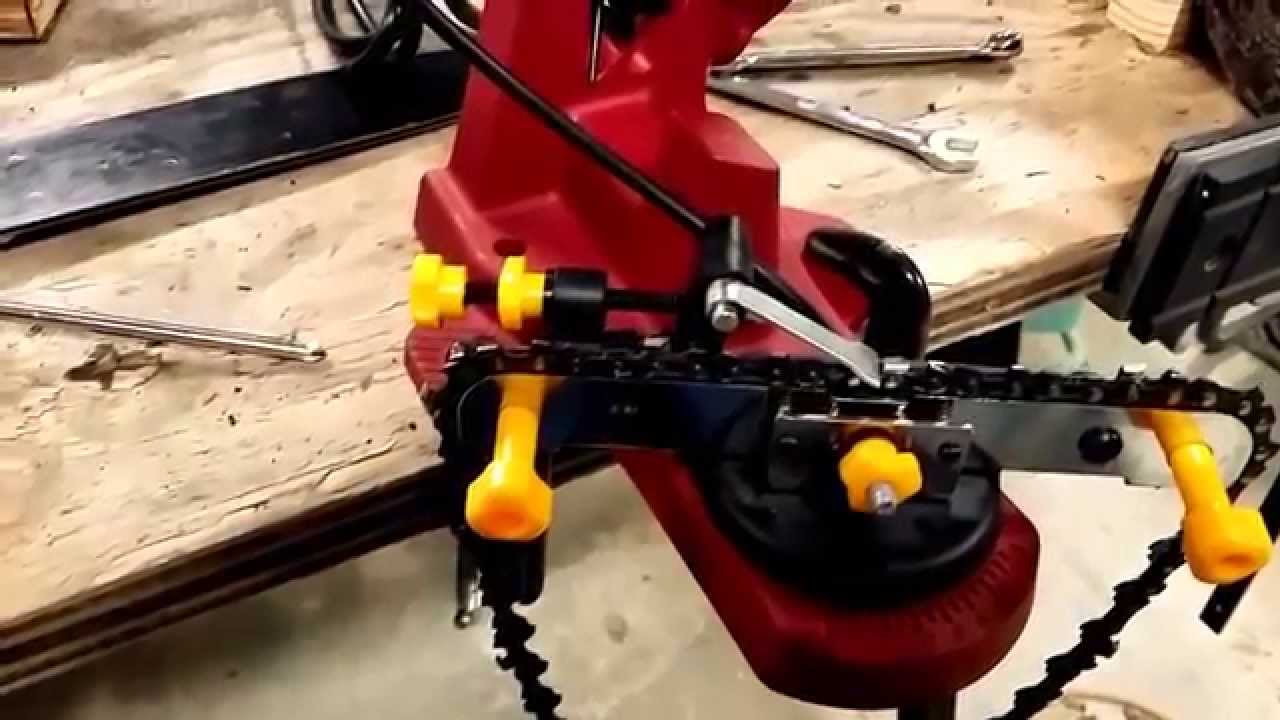
Positioning the Chain
Place the chainsaw chain on the sharpener, ensuring the cutting teeth align with the sharpening stone. Most electric chainsaw sharpeners feature a guide or clamping mechanism to secure the chain during sharpening. Double-check that the chain is properly positioned and securely fastened.
Sharpening the Chain
- Switch on the electric chainsaw sharpener and activate the sharpening stone.
- Slowly and steadily move the chain across the stone, following the natural curve of the cutting teeth.
- Apply light and consistent pressure while maintaining a steady pace.
- Make multiple passes over each cutting tooth to ensure even sharpening.
Checking the Progress
Periodically pause the sharpening process to examine the chain’s teeth. Look for signs of improved sharpness, such as restored bevels and removed nicks or burrs. It’s essential to maintain uniformity in tooth length and shape. Continue sharpening until the desired sharpness is achieved.
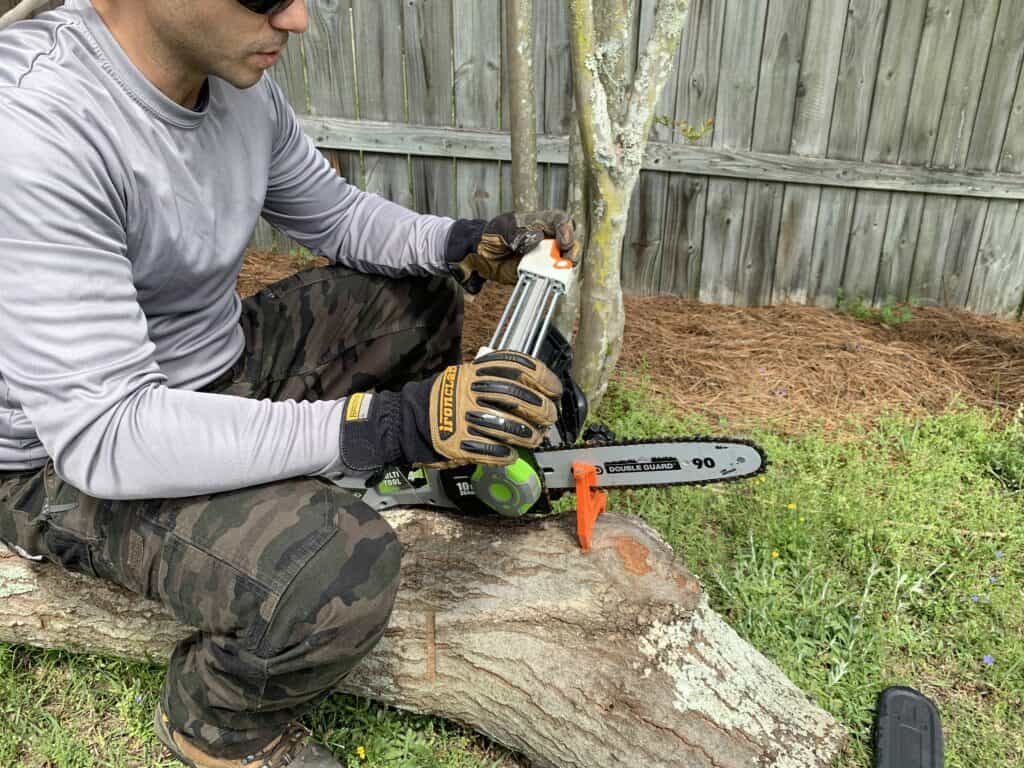
Testing the Sharpness
Once satisfied with the sharpening results, conduct a quick test to assess the chain’s cutting ability. Use a suitable test material, such as a small log or a branch, and observe how the chainsaw cuts through it.
If the performance is satisfactory, you can proceed to the next steps. Otherwise, re-evaluate the chain and perform further sharpening if needed.
Reassembling the Chainsaw
After sharpening the chain, reassemble it onto the chainsaw according to the manufacturer’s instructions. Ensure the chain is correctly tensioned and properly lubricated. Conduct a final check to verify that all components are securely placed before using the chainsaw.
Prep the chain
Detangling the Chain
If the chain is tangled or twisted, take the time to untangle it carefully before sharpening. Gently work through any knots or twists using your fingers or a small tool, ensuring the chain is free from entanglement. A properly aligned and untangled chain will facilitate a more effective sharpening process.
Adjusting Chain Tension
Proper chain tension is crucial for cutting performance and safe operation. Check the chain’s tension by lightly pulling it away from the guide bar. Adjust the tension according to the manufacturer’s recommendations. Ensure the chain has a slight slack but does not sag excessively. This proper tension will contribute to a more precise sharpening process.
Lubricating the Chain
Apply a suitable lubricant or chainsaw chain oil before sharpening. Lubrication reduces friction, heat, and wear during the sharpening process. Follow the manufacturer’s guidelines for the recommended lubricant type and application method.
Preparing the Electric Chainsaw Sharpener:
- While preparing the chain, set up your electric chainsaw sharpener according to the manufacturer’s instructions.
- Ensure it is securely mounted on a stable surface and positioned at a comfortable working height.
- Familiarize yourself with the sharpener’s controls and safety features before proceeding.
Mounting the chain
Mounting the chainsaw chain correctly on an electric sharpener is crucial for achieving accurate and efficient sharpening results. This article will guide you through mounting the chainsaw chain on an electric chainsaw sharpener.
Safety First
Before beginning any maintenance or mounting tasks, prioritize safety. Turn off the chainsaw first and disconnect from any power source. Use personal protective equipment, including gloves and safety goggles, to protect yourself from potential hazards.
Assessing the Chain Orientation
Examine the chainsaw chain and take note of its orientation before mounting it on the sharpener. The chain should have a cutting edge that faces forward, and the drive links should face the guide bar. Familiarize yourself with the correct chain orientation by referring to the manufacturer’s instructions or the chain’s markings.
Setting Up the Electric Chainsaw Sharpener
- Set up your electric chainsaw sharpener according to the manufacturer’s guidelines.
- Ensure that it is securely mounted on a stable surface and positioned at a comfortable working height.
- Familiarize yourself with the sharpener’s controls and safety features before proceeding.
Loosening the Chain Tension
Using a wrench or socket tool, locate the chain tensioning mechanism on your chainsaw and loosen it. This will create slack in the chain and make it easier to mount onto the sharpener. Follow the manufacturer’s instructions for your chainsaw model’s specific chain tensioning method.
Locating the Chain Guide
On the electric chainsaw sharpener, locate the chain guide or clamping mechanism designed to hold the chainsaw chain in place during sharpening. A metal guide usually fits around the chain and ensures proper alignment.
Placing the chain on the Sharpener
\With the chain tension loosened, carefully position the chainsaw chain onto the chain guide of the electric chainsaw sharpener. Ensure that the cutting teeth align with the sharpening stone or grinding wheel and that the drive links fit securely into the guide. Take time to align the chain properly, as incorrect positioning may result in uneven sharpening or damage to the chain.
Adjusting the Chain Guide
- Once the chain is in place, adjust the chain guide or clamping mechanism on the sharpener to secure the chain.
- Follow the manufacturer’s instructions to properly tighten the guide, ensuring the chain is held firmly and securely during sharpening.
- Avoid over-tightening, as this could lead to excessive pressure on the chain or damage to the sharpener.
Double-Checking Alignment
Before proceeding with sharpening, double-check the alignment of the chainsaw chain on the sharpener. Verify that the cutting teeth are properly positioned before the sharpening stone or grinding wheel and that the chain is straight and not twisted. This alignment will contribute to accurate and consistent sharpening results.
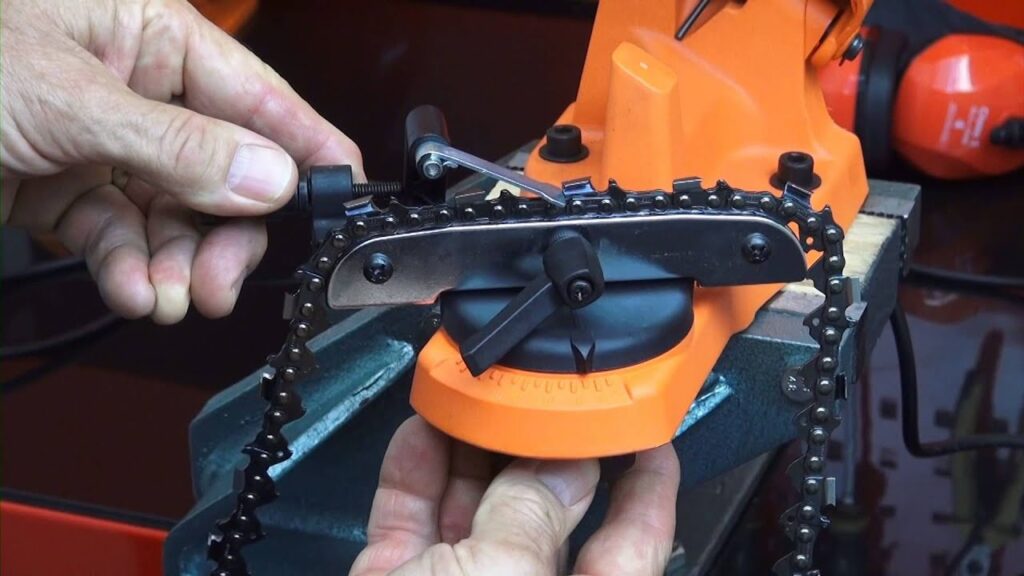
Angle adjustments
Identifying the Sharpening Angle
The sharpening angle of your chainsaw chain depends on the manufacturer’s specifications and the cutting teeth on the chain. Joint angles for chainsaw chains are 25 degrees, 30 degrees, or 35 degrees. Consult the manufacturer’s guidelines or markings on the chain to determine the correct sharpening angle.
Locating the Angle Adjustment Mechanism
Identify the angle adjustment mechanism on the electric chainsaw sharpener. This mechanism may be located near the sharpening stone or wheel or on the side of the sharpener.
Adjusting the Angle
Set the desired sharpening angle using the angle adjustment mechanism. Refer to the manufacturer’s instructions or markings on the sharpener for specific guidance. Some sharpeners may have pre-set detents or markings at common angles, making it easier to select the correct angle.

Verifying the Angle
Once you have made the angle adjustment, it is crucial to verify the accuracy of the selected angle. Double-check that the angle corresponds to the recommended sharpening angle for your chainsaw chain. Comparing the setting to a protractor or an angle guide for chainsaw sharpening can help ensure accuracy.
Locking the Angle Adjustment
Secure the angle adjustment mechanism to lock it in place after confirming the correct angle. This ensures that the sharpening stone or grinding wheel maintains a consistent angle throughout the sharpening process. Check for any locking mechanisms or fasteners near the angle adjustment mechanism and tighten them as necessary.
Test Sharpening
Before sharpening the entire chain, performing a test sharpening on a single cutting tooth is a good practice. This allows you to assess the results and make any adjustments if needed.
Use the sharpener per the manufacturer’s instructions, sharpening the selected tooth at the chosen angle. Evaluate the sharpened tooth and adjust the angle if necessary before sharpening the entire chain.
Depth adjustments
Understanding Depth Gauges
Depth gauges are small metal protrusions in front of each cutting tooth on the chainsaw chain. These gauges control the depth of the cut and play a crucial role in safe and efficient cutting operations. Proper depth adjustments ensure the gauges are set at the appropriate height relative to the cutting teeth.
Locating the Depth Adjustment Mechanism
Identify the depth adjustment mechanism on the electric chainsaw sharpener.
Assessing the Recommended Depth Setting
Consult the chainsaw manufacturer’s guidelines or the chain’s specifications to determine the recommended depth setting for your particular chain. The recommended setting is the distance between the cutting teeth and the depth gauges. Common measurements range from 0.025 to 0.030 inches (0.63 to 0.76 mm).
Adjusting the Depth
- Set the desired depth according to the recommended measurement using the depth adjustment mechanism.
- Rotate the dial, turn the knob, or manipulate the lever to move the sharpening stone or grinding wheel closer to or farther away from the depth gauges.
- Make small adjustments and periodically check the depth to ensure accuracy.
Verifying the Depth
Once you have made the depth adjustment, it is crucial to verify the accuracy of the selected depth. Use a depth gauge tool or a specialized file to measure the distance between the cutting teeth and the depth gauges. Compare the measurement to the recommended depth setting to ensure proper alignment.
Locking the Depth Adjustment
Secure the depth adjustment mechanism to lock it in place after confirming the correct depth. This ensures that the sharpening stone or grinding wheel maintains a consistent depth throughout the sharpening process. Check for any locking mechanisms or fasteners near the depth adjustment mechanism and tighten them as necessary.
Sharpening
Activating the Sharpener: Switch on the electric chainsaw sharpener and activate the sharpening stone or grinding wheel. Some sharpeners have built-in features that automatically advance the chain, while others require manual movement.
Sharpening Technique:
- Hold the chainsaw firmly and guide the chain across the sharpening stone or grinding wheel using a smooth and steady motion.
- Follow the natural curve of the cutting teeth and maintain consistent pressure.
- Make multiple passes over each cutting tooth to ensure even sharpening.
- Remember to sharpen all the teeth facing in one direction before moving on to the teeth facing the other direction.
Monitoring Progress:
- Periodically pause the sharpening process to examine the sharpened teeth.
- Look for restored bevels, removed nicks, and a consistent cutting edge.
- Check that all the teeth have been sharpened to the same level.
- Adjust the sharpening technique or angle as needed to achieve consistent results.
Equal the cutters
Identifying Uneven Cutters: Inspect the cutters on the chainsaw chain and identify any that appear uneven or have excessive wear. Look for differences in the shape or height of the cutters. Uneven cutters may be caused by uneven use, improper sharpening, or irregular wear patterns.
Equalizing the Cutters: To equalize them, focus on the higher cutters and reduce their height to match the lower ones. This process involves removing material from the higher cutters until they are at the same level as the lowest cutter. Use the electric chainsaw sharpener’s sharpening stone or grinding wheel to carefully grind down the higher cutters.
Applying Light and Consistent Pressure:
- Hold the chainsaw chain securely and apply light and consistent pressure to the higher cutters as you pass them over the sharpening stone or grinding wheel.
- Maintain a steady pace and ensure you are grinding down the higher cutters uniformly.
- Avoid applying excessive pressure, resulting in uneven or excessive material removal.
Checking for Uniformity:
- Periodically pause the sharpening process to check the progress and verify that the cutters are becoming more uniform in height.
- Compare the heights of the cutters using a gauge or by eye to ensure they are all at a similar level.
- Make additional grinding passes as necessary to achieve uniformity.