
This step-by-step tutorial will equip you with the knowledge and skills on How to Port a Chainsaw to optimize your chainsaw’s performance and take your cutting game to the next level.
From understanding the fundamentals of chainsaw porting to mastering the techniques required for fine-tuning, we’ve got you covered. So, grab your safety goggles, and let’s dive into chainsaw porting, where power and precision meet.
Preparations before Porting a Chainsaw
Porting a chainsaw is a process that involves modifying its engine to enhance its performance. By optimizing the airflow and fuel mixture, you can increase power and efficiency.
However, before diving into the porting process, it is crucial to make certain preparations to ensure a successful modification. These steps will help you understand the importance of proper planning, safety precautions, and gathering the necessary tools and materials.
Research and Understanding
Before you begin porting your chainsaw, conducting thorough research and gaining a comprehensive understanding of the process is essential. Familiarize yourself with the concepts of porting, including the different techniques, effects on engine performance, and potential risks involved.
Gather information from reliable sources such as chainsaw manufacturer manuals or reputable websites, or seek guidance from experienced professionals.
Safety Precautions
Working with power tools requires utmost caution and adherence to safety protocols. When preparing to port a chainsaw, prioritize safety to prevent accidents and injuries.
Wear protective gear: Wear safety glasses, ear protection, gloves, and a dust mask to safeguard yourself from flying debris, loud noise, and harmful particles.
Work in a well-ventilated area: Porting generates fine metal shavings and dust, which can be hazardous if inhaled. Ensure proper ventilation to minimize the risk.
Disconnect the spark plug: Disconnect the spark plug wire before starting any work on the chainsaw to prevent accidental ignition.
Secure the chainsaw: Use a sturdy workbench or clamp the chainsaw securely to a stable surface to avoid movement during the porting process.
Tools and Equipment
You’ll need the appropriate tools and equipment to perform a successful porting operation. Here are some of the common tools required for chainsaw porting:
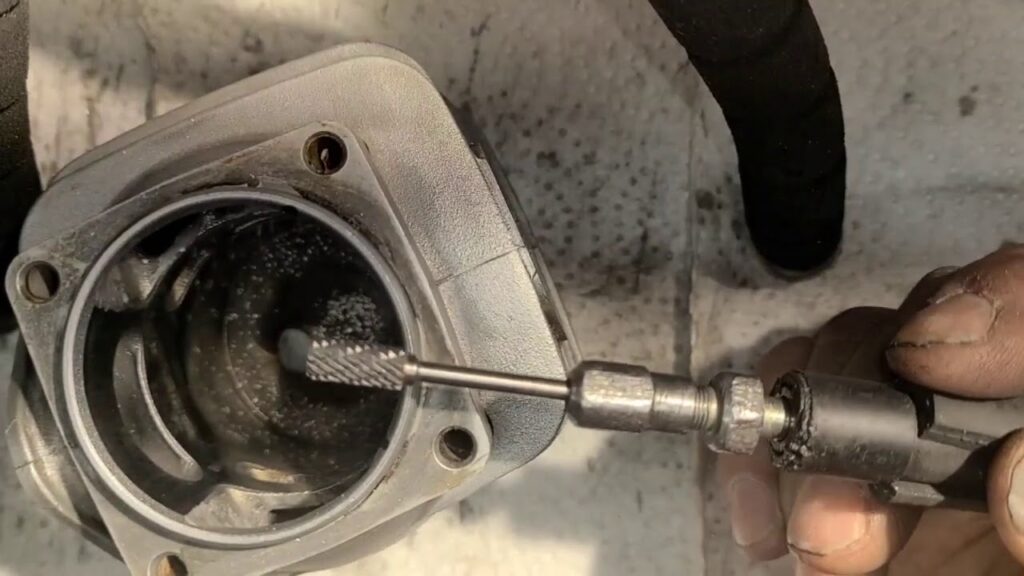
Cylinder porting kit: This kit typically includes various burrs, sanding rolls, and grinding stones designed for porting tasks.
Dremel or die grinder: These rotary tools with different attachments help you effectively shape and smooth the ports
Calipers: Use calipers to accurately measure port dimensions and ensure consistency during modification.
Gasket scraper: This tool helps remove gaskets and old sealant without damaging the engine parts.
Feeler gauges: Feeler gauges are essential for measuring port height and checking port timing.
Disassembly and Inspection
Before beginning the porting process, carefully disassemble the chainsaw and inspect its components. Clean the engine thoroughly, removing dirt, debris, or old gasket material.
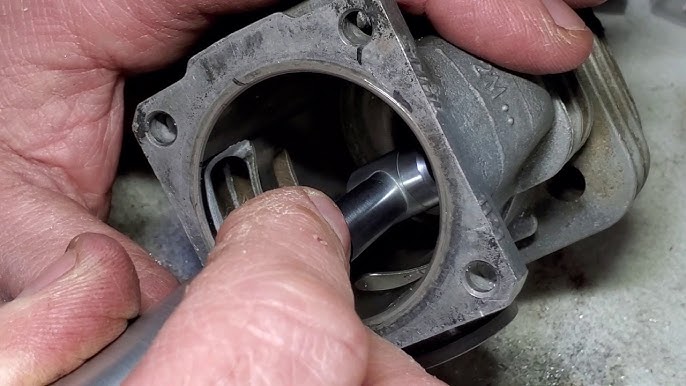
Inspect the cylinder, piston, crankshaft, and bearings for signs of wear or damage. Address any issues, such as worn-out parts or leaks, before porting.
Documentation and Photography
Documenting the original condition of your chainsaw can be beneficial during the porting process. Take detailed photographs and notes of the engine’s current state, focusing on the ports, piston, cylinder, and other relevant components. These records will guide you throughout the modification process and help you maintain consistency.
Muffler’s Top Removal and Exhaust Widening
Modifying a chainsaw’s muffler and widening the exhaust can significantly improve its performance by increasing power output and optimizing airflow.
These modifications enhance the engine’s efficiency and allow it to effectively expel exhaust gases. We will guide you through removing the top of the muffler and widening the exhaust, providing step-by-step instructions to help you achieve optimal results.
Importance of Muffler Modifications
The muffler is crucial in reducing noise and controlling exhaust emissions in a chainsaw. However, stock mufflers can restrict the engine’s performance.
Modifying the muffler and widening the exhaust can enhance the engine’s power and efficiency. These modifications increase the airflow, reducing backpressure and allowing the engine to breathe more freely.
Precautions and Safety Measures
Before starting any modifications, ensure that you follow essential safety precautions:
- Disconnect the spark plug wire to prevent the accidental starting of the chainsaw during the modification process.
- Allow the engine to cool down completely to avoid burns from hot components.
- Wear appropriate personal protective equipment (PPE), including safety glasses, ear protection, gloves, and a dust mask, to protect yourself from debris and harmful particles.
Removing the Muffler’s Top
To remove the top of the muffler, follow these steps:
- Locate the muffler on your chainsaw. It is typically positioned near the exhaust port at the rear of the engine.
- Remove the mounting screws or bolts that secure the muffler to the engine. Keep track of the fasteners for reassembly later.
- Gently pull the muffler away from the engine. If it feels stuck, use a rubber mallet or a wooden block to tap it lightly to loosen any residue or carbon buildup.
- Once the muffler is detached, inspect it for damage, such as cracks or excessive carbon deposits. Clean the muffler thoroughly using a wire brush or a muffler cleaning solution.
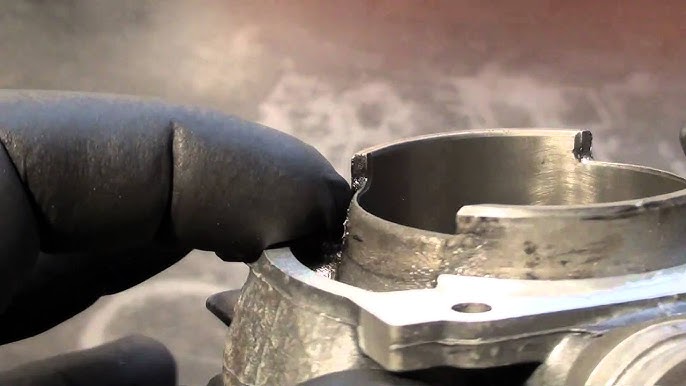
Widening the Exhaust
Widening the exhaust involves enlarging the exhaust port to improve the engine’s breathing capacity.
a. Identify the exhaust port on the cylinder. It is the opening where the exhaust gases exit the engine.
b. Carefully use a rotary tool with a grinding stone or a cylindrical burr to widen the exhaust port. Start by removing small amounts of material at a time and check the progress frequently. Avoid removing too much material, as it can adversely affect the engine’s performance.
c. Ensure the port remains smooth and even throughout the widening process. Remove any sharp edges or burrs that may hinder the flow of exhaust gases.
d. Use a vacuum or compressed air to clean the cylinder and exhaust port of any debris or metal shavings.
Cutting All the Saw Metals
Chainsaws are versatile tools primarily designed for cutting through wood, but with the right techniques and precautions, they can also be used for cutting various metals. Whether you need to dismantle metal structures, cut pipes, or perform other metal-cutting tasks, understanding the proper techniques and employing appropriate safety measures is essential.
Selecting the Right Chainsaw
Not all chainsaws are suitable for cutting metals. To ensure efficient metal cutting, consider the following factors when selecting a chainsaw:
a. Power and Engine Size: Opt for a chainsaw with ample power and engine size to handle the demands of cutting through metal. Gas-powered chainsaws are generally more suitable for metal-cutting tasks.
b. Bar Length and Chain Type: Choose a chainsaw with an appropriate bar length and a chain specifically designed for cutting metal. Specialized carbide or diamond-coated chains provide better cutting performance on metal surfaces.
Safety Precautions
Safety should be your top priority when cutting metals with a chainsaw. Take the following precautions to minimize risks:
a. Personal Protective Equipment (PPE): Wear safety goggles, ear protection, heavy-duty gloves, a face shield or mask, and steel-toed boots to protect yourself from metal shavings, sparks, and other potential hazards.
b. Work Area Preparation: Clear the work area of flammable materials and ensure proper ventilation. Perform metal cutting tasks in a well-ventilated outdoor space or a well-equipped workshop.
c. Secure the Metal: Firmly secure the metal you cut using clamps or a vise. This prevents it from moving or vibrating during cutting, reducing the risk of accidents.
d. Fire Safety: Keep a fire extinguisher nearby in case of accidental sparks or ignition. Regularly check for flammable materials or gases in the vicinity before commencing metal cutting.
Blade and Chain Preparation
Preparing your chainsaw blade and chain for metal cutting is crucial.
a. Use a specialized metal-cutting chain: Replace the wood-cutting chain with a chain designed for cutting through metals. These chains have teeth specifically designed to handle the hardness of metal surfaces.
b. Check the chain tension: Ensure the chain is properly tensioned. A loose chain can derail during cutting, while an overly tight chain can increase the risk of kickback. Follow the manufacturer’s guidelines for adjusting the chain tension.
c. Lubrication: Apply a suitable lubricant specifically designed for metal cutting to the chain. This reduces friction and prolongs the chain’s lifespan during metal-cutting tasks.
Cutting Techniques
When cutting metal with a chainsaw, employ the following techniques:
a. Gradual Cutting: Cut slowly to allow the chainsaw to establish a groove on the metal surface. Apply consistent pressure to gradually cut through the material.
b. Angle and Approach: Position the chainsaw at an appropriate angle, typically 90 degrees, to the metal surface. Maintain a stable grip and approach the cut with controlled movements.
c. Cooling and Chip Removal: Metal cutting generates heat and metal chips. Pause periodically to allow the metal to cool and clear away accumulated chips, ensuring a cleaner and safer cutting process.
d. Cutting Depth: When cutting thick metals, make multiple passes with the chainsaw, gradually increasing the cutting depth. This helps maintain control and prevents the chainsaw from binding or getting stuck.
Maintenance and Cleaning
After metal cutting tasks, it is crucial to properly maintain and clean your chainsaw:
a. Chain Inspection: Regularly inspect the chain for signs of wear or damage. Replace the chain if it becomes dull or damaged during metal cutting.
b. Cleaning the Chainsaw: Metal cutting can leave metal shavings and debris on the chainsaw. Clean the chainsaw thoroughly, removing any accumulated metal particles that could affect its performance.
c. Sharpening and Maintenance: Follow the manufacturer’s instructions to sharpen the chain and perform regular maintenance on your chainsaw to ensure optimal performance and longevity.
Placement of Muffler Top
Placing the muffler top in a chainsaw is critical to ensuring its proper alignment and functionality. The muffler plays a vital role in reducing noise and controlling exhaust emissions; incorrect placement can impact engine performance and overall efficiency. This article will discuss the importance of correctly positioning the muffler top in a chainsaw and provide guidelines to ensure optimal placement.
Step 1: Understanding Muffler Functionality
Before delving into the placement of the muffler top, it’s essential to understand its role in a chainsaw’s operation. The muffler serves two primary purposes:
- a. Noise Reduction: The muffler contains sound-dampening materials and a design that helps minimize noise produced during engine operation, ensuring a quieter working environment.
- b. Exhaust Emission Control: By directing and regulating the flow of exhaust gases, the muffler helps reduce harmful emissions and ensures compliance with environmental regulations.
Step 2: Reference Manufacturer Guidelines
The first step in correctly placing the muffler top is to refer to the manufacturer’s guidelines. Different chainsaw models may have specific instructions or requirements regarding muffler installation. Consult the chainsaw’s manual or the manufacturer’s website for the recommended muffler placement and associated specifications.
Step 3: Inspect and Clean the Muffler
Before positioning the muffler top, inspecting and cleaning the muffler to ensure optimal performance is crucial. Follow these steps:
- a. Remove any accumulated dirt, debris, or carbon buildup from the muffler using a wire brush or a muffler cleaning solution. Clean the internal baffles and outlet ports as well.
- b. Inspect the muffler for any signs of damage, such as cracks or excessive rust. Replace the muffler if necessary to maintain proper functionality.
Step 4: Aligning the Muffler Top
Proper alignment of the muffler top is essential to maintain the integrity of the exhaust system. Follow these guidelines for accurate placement:
- a. Identify the mounting location on the chainsaw where the muffler top connects to the muffler body. This is typically a designated area near the exhaust port.
- b. Position the muffler top over the muffler body, ensuring that any gaskets or seals are correctly aligned.
- c. Align the mounting holes on the muffler top with the corresponding holes on the body.
- d. Insert the screws or bolts through the aligned holes, ensuring a secure fit. Tighten them according to the manufacturer’s specifications, taking care not to overtighten and damage the threads.
Step 5: Check for Proper Clearance and Sealing
After attaching the muffler top, checking for proper clearance and sealing is crucial to prevent any potential issues.
- a. Clearance: Ensure that the muffler top and assembly have sufficient clearance from surrounding components, such as the engine housing or handles, to avoid contact or interference during operation.
- b. Sealing: Verify that the gaskets or seals between the muffler top and body are intact and provide a proper seal. This prevents exhaust leaks and maintains optimal performance.
Step 6: Functional Testing
Once the muffler top is correctly positioned and secured, conduct a functional test to ensure everything works properly. Start the chainsaw and listen for unusual noises or vibrations from the muffler area. Observe the exhaust emissions to ensure they are directed out of the muffler as intended.
Drilling a Hole in Muffler
Drilling a hole in a muffler is a common modification technique used to enhance the performance and sound of a chainsaw. By increasing the exhaust flow, this modification can improve power output and create a more aggressive exhaust note.
Step 1: Understand the Purpose and Risks
Before drilling a hole in the muffler, it is crucial to understand the purpose and potential risks associated with this modification. The primary goal is to increase exhaust flow, which can result in improved engine performance.
However, keep in mind that drilling a hole in the muffler may also lead to increased noise levels and potential changes in emissions. Adhere to local regulations and consider the impact on the environment and your safety.
Step 2: Gather the Necessary Tools and Equipment
To successfully drill a hole in a muffler, you will need
- a. Power drill: Choose a drill with sufficient power and a suitable drill bit for metal. Ensure it is in good working condition.
- b. Drill bit: Select a drill bit with the desired diameter for the hole you intend to create. It should be appropriate for drilling through metal.
- c. Safety equipment: Wear protective gear such as safety glasses, ear protection, gloves, and a dust mask to shield yourself from metal shavings and debris.
Step 3: Prepare the Chainsaw
Before starting the modification process, take the following steps to prepare the chainsaw
- a. Turn off the chainsaw and let it cool down completely to avoid burns or accidents during the modification.
- b. Disconnect the spark plug wire to prevent accidental engine activation while working on the muffler.
- c. Remove the muffler from the chainsaw by loosening the mounting bolts or screws. This will allow for easier access during the drilling process.
Step 4: Mark the hole Placement
Carefully determine the desired location for drilling the hole in the muffler. Remember that drilling closer to the engine may result in a louder sound, while drilling farther away may have a more moderate effect. Use a marker or scribe to make a clear and precise mark on the muffler’s surface
Step 5: Drill the Hole
- a. Secure the muffler in a vise or clamp it down to ensure stability during the drilling process.
- b. Put on your safety equipment to protect yourself from flying debris.
- c. Position the drill bit on the marked spot and align it perpendicular to the muffler’s surface.
- d. Apply steady pressure and start drilling at a low speed.
- e. Gradually increase the drill speed while maintaining a consistent downward pressure until the drill bit penetrates the muffler completely, creating the desired hole.
Finishing Up the Porting Process
The porting process of a chainsaw involves modifying the engine to improve performance and optimize airflow. Once the major porting modifications are complete, there are essential steps to finish the process and ensure a successful modification.
We will discuss the final steps in finishing the chainsaw porting process, ensuring your modifications are complete and ready for use.
Clean and Inspect
After completing the porting modifications, it is crucial to thoroughly clean the engine components and inspect them for any debris or residue.
- a. Use a brush, compressed air, or a parts cleaning solution to remove any leftover debris, metal shavings, or carbon buildup from the engine components.
- b. Inspect the ports, cylinder, piston, and other engine parts for cleanliness and smoothness. Ensure there are no remaining obstructions or irregularities that may affect performance.
- c. Check for any signs of damage or wear during the porting process. Before proceeding, address any issues, such as cracks, worn-out parts, or leaks.
Reassemble the Engine
Once the cleaning and inspection are complete, it’s time to reassemble the engine.
- a. Refer to the manufacturer’s instructions or your reference materials to ensure the correct reassembly of the engine components.
- b. Apply a suitable lubricant to moving parts, such as the piston rings and bearings, to ensure smooth operation.
- c. Install new gaskets and seals to ensure proper sealing between components.
- d. Tighten all bolts and fasteners to the manufacturer’s recommended torque specifications, ensuring a secure and leak-free engine assembly.
Carburetor Adjustment
After porting modifications, it may be necessary to adjust the carburetor to optimize the fuel and air mixture for the modified engine.
- a. Consult the chainsaw’s manual or the manufacturer’s guidelines for the recommended carburetor adjustments for your specific model.
- b. Make small adjustments to the low-speed and high-speed carburetor screws while the chainsaw runs, monitoring engine performance and exhaust smoke color.
- c. Achieve a balance between fuel and air mixture by adjusting the carburetor screws in small increments until optimal performance is achieved.
Test and Fine-Tuning
Once the chainsaw is reassembled and carburetor adjustments are made, it’s time to test the modified engine and fine-tune the performance.
- a. Start the chainsaw and let it run idle to check for any abnormalities, such as strange noises, vibrations, or excessive smoke.
- b. Gradually increase the throttle and observe the engine’s response, acceleration, and overall performance.
- c. Fine-tune the carburetor adjustments, if necessary, based on the observed performance. Make small adjustments and retest until optimal performance is achieved.
Regular Maintenance
After completing the porting process, it is essential to make a regular maintenance routine.
- a. Regularly clean and inspect the engine components, including ports, cylinder, piston, and spark plug.
- b. Check and clean or replace the air filter to maintain proper airflow.
- c. Ensure regular oil and fuel changes according to the manufacturer’s recommendations.