
Unlocking the potential of your coping saw begins with a skill that every woodworking enthusiast should master: knowing how to change a coping saw blade.
Whether you’re a seasoned craftsman or just starting your journey in the world of woodworking, the ability to effortlessly swap out a coping saw blade is a fundamental skill that can elevate your craftsmanship to new heights.
We will demystify the process, making it as accessible as possible, even if you’re a complete beginner. So, if you’ve ever wondered about the secrets behind swapping out that tiny yet crucial component of your coping saw, you’re in the right place.
We’ll walk you through the steps, using straightforward language and clear instructions to ensure you can confidently tackle this essential task.
Changing a Coping Saw Blade:
Changing a coping saw blade is fundamental for any DIY or woodworking enthusiast. Whether working on a home improvement project or crafting intricate wooden designs, knowing how to replace a coping saw blade is essential.
Tools and Materials You’ll Need
Before we explore into the detailed steps, let’s gather the tools and materials required for this task:
Coping Saw: Ensure you have a coping saw in good working condition.
Replacement Blade: Choose the appropriate blade for your project, considering the material and thickness you’ll be cutting.
Safety Gear: Always prioritize safety.
Allen Wrench: Some coping saws may require an Allen wrench for blade replacement.
Now that we need everything let’s change the coping saw blade.
Step 1: Safety First
Before you begin, wear your safety goggles and work gloves to protect yourself from accidents. Safety should always be your top priority when working with tools.
Step 2: Examine the Current Blade
Inspect the existing blade on your coping saw. Determine whether it’s worn out, damaged, or unsuitable for your current project. If the blade is dull or damaged, it’s time for a replacement.
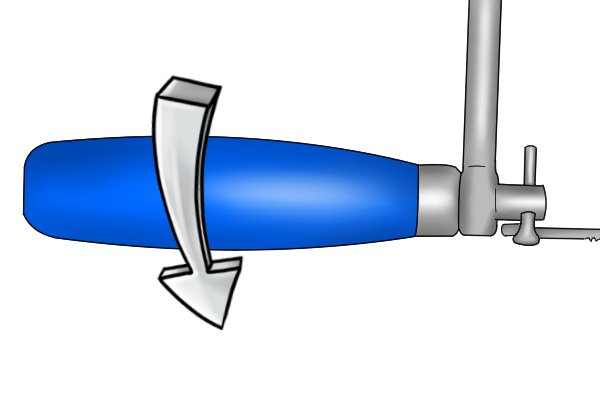
Step 3: Loosen the Blade Tension
Most coping saws have a tensioning mechanism that holds the blade in place. To release the tension, locate the tensioning knob on the saw frame and turn it counterclockwise using your hand or an Allen wrench. This will slacken the blade.
Step 4: Remove the Old Blade
With the tension released, gently slide the old blade out of the saw frame. Be cautious not to touch the blade, as it may still be sharp.
Step 5: Insert the New Blade
Take your replacement coping saw blade and carefully slide it through the saw frame, ensuring it’s properly seated in the blade holders. Make sure the teeth of the blade are facing forward, as this is the cutting direction.
Step 6: Re-Tension the Blade
Now that the new blade is in place, it’s time to tension it properly. Turn the tensioning knob clockwise to tighten the blade. Ensure it’s tensioned enough to stay in place during use but not so tight that it bends or snaps.
Step 7: Test the Blade
Before you start your project, give the blade a test run on a scrap piece of material. This allows you to ensure that the blade is properly tensioned and cutting smoothly.
Step 8: Get to Work
You’re ready to tackle your woodworking project with your newly installed coping saw blade and safety gear. Remember to take your time, follow your cutting lines precisely, and let the saw do the work without applying excessive force.
Step 9: Maintenance and Storage
After completing your project, release the tension on the coping saw blade by turning the tensioning knob counterclockwise. This will prolong the life of your blade. Clean your tools, including the saw blade, before storing them to prevent rust.
Maintenance Tips for Coping Saw Blades
In the ever-evolving realm of woodworking, the coping saw is a trusty companion for precision and versatility. Whether you’re a seasoned woodworker or just starting to explore the world of crafting with wood, understanding the nuances of maintaining your coping saw blades is paramount.
A well-maintained coping saw blade ensures that your projects not only meet the highest standards of craftsmanship but also guarantee your safety and efficiency.
Why Blade Maintenance Matters
Before we dive into the nitty-gritty of maintaining your coping saw blades, it’s crucial to understand why this maintenance is essential. Coping saws are renowned for their ability to make intricate and precise cuts, making them indispensable tools for carpenters, woodworkers, and hobbyists alike. However, your coping saw blades must be pristine to harness their full potential.

Dull or damaged blades can lead to inaccurate cuts, splintered edges, and frustrating project setbacks. Beyond the impact on your woodworking projects, paying attention to blade maintenance can result in a shortened lifespan for your coping saw blades. By following our maintenance tips, you’ll achieve flawless cuts and extend your tools’ longevity.
Cleaning and Lubrication of Coping Saw Blades
One of the fundamental aspects of coping saw blade maintenance is regular cleaning and lubrication. Over time, sawdust, resin, and moisture can accumulate on the blade’s teeth, causing it to become less effective. Here’s how you can keep your coping saw blades in optimal condition:
1. Cleaning: Carefully remove the blade from your coping saw after each use.
2. Lubrication: Apply a thin layer of blade lubricant or silicone spray to the blade’s teeth. This will prevent rust and reduce friction during cutting, ensuring smoother and cleaner cuts.
Blade Replacement
Even with meticulous maintenance, coping saw blades have a finite lifespan. It’s essential to recognize the signs indicating that it’s time to replace the blade:
1. Dullness: If your coping saw is struggling to make clean cuts or requires excessive force to push through the wood, it’s a clear sign that the blade has dulled and should be replaced.
2. Bending or Warping: Coping saw blades can bend or warp over time, negatively impacting their performance. If you observe any irregularities in the blade’s shape, it’s time for a replacement.
3. Broken Teeth: Cracked or missing teeth on the blade can lead to uneven cuts and reduced precision.
Proper Storage
Storing your coping saw and blades correctly is another critical aspect of blade maintenance. Improper storage can lead to rust and premature wear. Follow these storage tips to ensure the longevity of your coping saw blades:
1. Blade Protection: When not in use, cover the blade with a blade guard or cardboard sleeve to shield it from dust and damage.
2. Vertical Storage: Whenever possible, store your coping saw blades vertically to prevent them from resting on their teeth, which can lead to deformation.
Blade Sharpening
Sharpening your coping saw blades is an advanced technique that can significantly extend their lifespan. While it may require some practice to master, the results are well worth the effort. Here’s a brief overview of the sharpening process:
1. Safety First: Wear safety goggles and gloves before sharpening to protect yourself from potential accidents.
2. Use a File: Secure the blade in a vise, ensuring it’s stable. Use a fine-toothed file to sharpen each tooth individually, following the original angle of the teeth. Stroke away from the blade to maintain the correct angle.
3. Test the Blade: After sharpening, reinstall the blade in your coping saw and test it on a scrap piece of wood
Advanced Techniques for Coping Saw Blade Change (Coping Joints, Beveling, etc.)
Blade Selection for Precision
Selecting the right blade is one of the most crucial aspects of achieving top-notch results with your coping saw. Blades come in various types and sizes, each suited to specific tasks. Opt for finer blades with more teeth per inch (TPI) when working on intricate projects.
These blades provide greater control and precision. On the other hand, coarser blades with fewer TPI are best for faster cuts and rougher work.
Mastering Blade Change
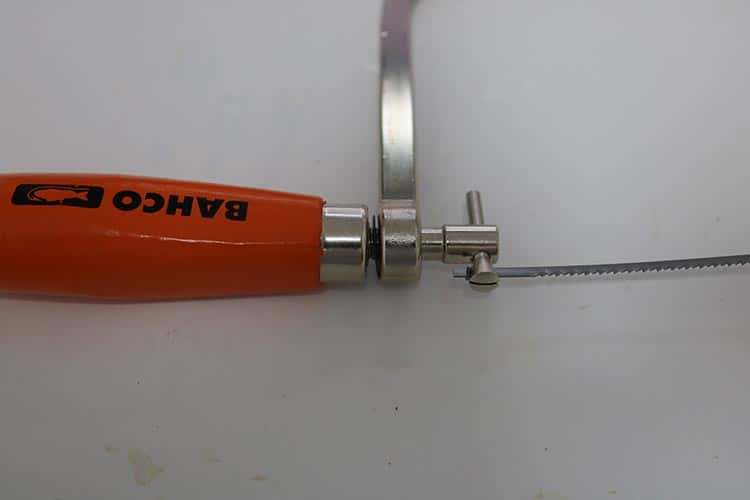
Efficient blade changes are a hallmark of skilled woodworkers. To change the blade on your coping saw swiftly, follow these steps:
Loosen the Tension Screw: Begin by loosening the tension screw at the front of the saw frame. This will release the blade’s tension, allowing for easy removal.
Remove the Old Blade: Gently slide the old blade between the frame’s jaws. Take care not to damage the blade or your fingers.
Install the New Blade: Insert the new blade into the frame, ensuring the teeth face forward. Tighten the tension screw until the blade is taut but not overly stretched. A correctly tensioned blade is crucial for precision cuts.
Test the Tension: Give the blade a gentle pluck; it should produce a clear, resonant tone. If it sounds dull, adjust the tension until it’s just right.
Coping Joints with Precision
Coping joints are essential in carpentry, particularly when installing baseboards, crown molding, or trim work. This technique ensures a seamless fit between two pieces of wood, even when they are not perfectly square.
Cut the First Piece: Make a standard square cut on the first trim piece using a miter saw or a simple handsaw.
Cope the Second Piece: Now, take the second piece of trim that needs to fit snugly against the first. Use your coping saw to carefully remove the excess wood along the edge, following the profile of the first piece. This allows for a perfect fit, even if the angle is slightly irregular.
Fine-tune the Fit: After coping, fine-tune the fit using a file or sandpaper to smooth any rough edges. The two pieces should now fit together seamlessly.
The Art of Beveling
Beveling is another advanced technique that can elevate your woodworking projects to a professional level. This involves cutting a precise angle along the edge of a board, creating beautiful edges, and enhancing the overall aesthetics of your work.
Setting the Angle: Start by determining the desired angle for your bevel cut. This is typically done using a bevel gauge or a protractor.
Secure the Workpiece: Ensure that the wood is securely clamped to prevent movement during the cutting process.
Making the Bevel Cut: Carefully follow the marked angle while cutting using your coping saw. Take your time to maintain precision and control throughout the cut.
Finishing Touches: After the bevel cut is complete, use sandpaper or a hand plane to smooth and refine the beveled edge.
Coping Saw Variations: Your Ultimate Guide to Choosing the Perfect Tool
When it comes to woodworking, having the right tools at your disposal is crucial to achieving precision and perfection in your projects. The coping saw stands out as a versatile and indispensable instrument among the arsenal of woodworking tools.
Blade Types and TPI (Teeth per Inch)
One of the most critical aspects of a coping saw is its blade. Coping saw blades come in various types, each designed for specific tasks. We recommend understanding the two primary blade types: standard tooth and spiral tooth.
Standard Tooth Blades: These blades have evenly spaced teeth with a set number of teeth per inch (TPI). They are ideal for general-purpose cutting and creating smooth, straight lines. A standard tooth blade is an excellent starting point if you are new to coping saws.
Spiral Tooth Blades: Spiral tooth blades have teeth that spiral around the blade, resulting in a more aggressive cutting action. These blades are perfect for curved and intricate cuts, making them a favorite among experienced woodworkers and professionals.
Frame Variations
Coping saw frames come in various materials, each offering its unique advantages:
Wooden Frames: Wooden frames provide a comfortable grip and absorb vibrations, making them suitable for prolonged use. They are famous for those who prioritize comfort during extended woodworking sessions.
Adjustable Frames: Some coping saws come with adjustable frames, allowing you to change the angle of the blade to cope with different cutting angles. This versatility makes them a valuable addition to your woodworking toolkit.
Choosing the Right Coping Saw for Your Needs
Selecting the perfect coping saw depends on your specific woodworking requirements.
1. Project Type
The nature of your woodworking project plays a significant role in determining the coping saw you should use. A spiral tooth blade and a lightweight frame are ideal for intricate, detailed work, such as scrollwork or coping joints. On the other hand, for straight cuts and general woodworking tasks, a standard tooth blade with a wooden or metal frame will suffice.
2. Budget
While high-end coping saws offer premium features and durability, budget-friendly options can still deliver satisfactory results for hobbyists and beginners.
3. Comfort and Ergonomics
If you use the coping saw extensively, consider its comfort and ergonomics. A saw with a comfortable grip and minimal vibrations will reduce fatigue during long woodworking sessions.
4. Maintenance and Care
To ensure the longevity of your coping saw, proper maintenance is essential. After each use, clean the blade and frame to remove any sawdust and debris. Keep the blade sharp by periodically replacing it or sharpening it with a suitable file. Storing your coping saw in a dry place will prevent rust and maintain its performance.
Common Mistakes to Avoid while Changing the Blade of Coping Saw
In the realm of woodworking and DIY projects, one tool that frequently finds its way into the hands of craftsmen and hobbyists alike is the coping saw. This versatile tool is essential for tasks involving intricate cuts, curves, and detailed work. However, the proficiency of a coping saw lies not just in its design but also in the skill with which it is used.
In this article, we explore into the common mistakes to avoid while changing the blade of a coping saw. These errors can hinder your woodworking progress and even lead to less-than-ideal results. Let’s explore these pitfalls and ensure you can make seamless blade changes, keeping your projects on track and your woodworking skills honed.
1. Neglecting Blade Compatibility
Before you even begin to replace the blade on your coping saw, it’s crucial to ensure that you have the right blade for the job. Coping saws accommodate different types of blades, each designed for specific cutting tasks. The mistake many woodworkers make is neglecting to check if the blade they intend to use is compatible with their coping saw.
Pro Tip: Always refer to your coping saw’s user manual to identify the types of blades it can accept. Choosing the appropriate blade for your project is the first step to success.
2. Rushing the Process
In the rush to complete a project, it’s easy to overlook the importance of patience and precision. Changing a coping saw blade is a task that requires careful attention to detail. One common mistake is rushing to ensure the blade is secured correctly.
Pro Tip: Take your time when changing the blade. Make sure it is tightly and securely fastened in place. A blade that needs to be secured appropriately can lead to imprecise cuts and potential accidents.
3. Ignoring Blade Tension
The tension of the coping saw blade plays a crucial role in its performance. Some woodworkers must pay more attention to checking or adjusting the tension before using the saw. When the blade is too loose, it may wander during cuts, resulting in uneven and jagged edges.
Pro Tip: Always check the tension of your coping saw blade before use. Most coping saws have a tension adjustment mechanism that allows you to fine-tune the blade’s tightness. A correctly tensioned blade ensures cleaner and more accurate cuts.
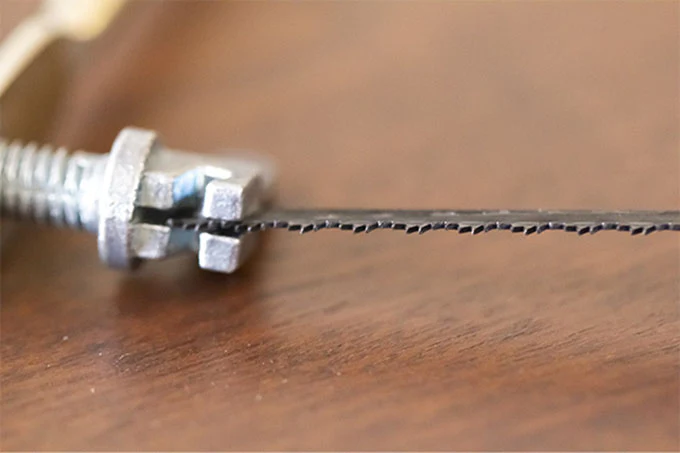
4. Neglecting Blade Orientation
The orientation of the blade in your coping saw can significantly impact the quality of your cuts. Some woodworkers need to remember to position the blade correctly, leading to less effective cutting and increased effort.
Pro Tip: Ensure that the teeth of the blade face forward when installing it in your coping saw. This orientation allows for smoother cutting and better control over your workpiece.
5. Overlooking Blade Maintenance
Like any cutting tool, a coping saw blade can wear down over time. Neglecting blade maintenance is a common mistake, resulting in subpar cutting performance and increased effort required to make precise cuts.
Pro Tip: Regularly inspect your coping saw blade for signs of wear or dullness. If the blade shows signs of wear, replace it promptly to maintain the quality of your work.
6. Incorrect Blade Selection for Material
Not all coping saw blades are created equal and designed to cut different materials with varying degrees of precision. Using the wrong blade for the material at hand is a mistake that can lead to frustration and compromised results.
Pro Tip: Match the type of coping saw blade to your work material. Fine-toothed blades are ideal for delicate cuts, while coarser blades are better suited for thicker or more rigid materials.
Conclusion
Learning how to change a coping saw blade is valuable for anyone who regularly works with this versatile hand tool. Remember to prioritize safety throughout the blade replacement process, wearing appropriate protective gear and exercising caution when handling sharp blades. With practice, changing a coping saw blade will become second nature, allowing you to focus on the task and achieve the best results in your craftsmanship.