
Welcome to our comprehensive guide on (How to Change the Ryobi Miter Saw Blade). Whether you’re a seasoned woodworker looking to upgrade your equipment or a DIY enthusiast embarking on a new project, understanding how to replace the Blade on your miter saw is essential for achieving precise and clean cuts.
So, let’s dive in and learn how to effortlessly change the Blade on your Ryobi miter saw, helping you tackle your woodworking tasks with confidence and precision.
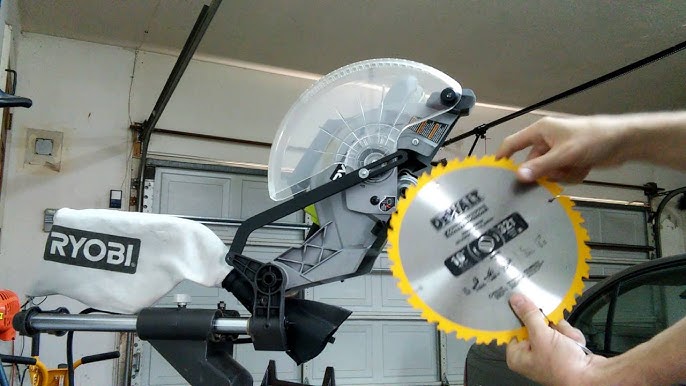
Step-by-Step Guide
Changing the Blade on a Ryobi miter saw is a straightforward process, but following safety precautions and using the right tools is essential. Here’s a step-by-step guide on how to change the Blade on a Ryobi miter saw:
Tools and Materials You Will Need:
- Screwdriver or Allen wrench (provided with the saw)
- Blade lock pin (usually included with the saw)
- The new miter saw Blade
- Safety glasses and gloves
Steps:
- Unplug or Remove the Battery: Ensure your miter saw is not connected to a power source. If it’s a cordless model, remove the battery.
- Raise the Blade Guard: Lift the blade guard to expose the Blade. Most miter saws have a blade guard release lever or knob that allows you to do this. This will give you access to the Blade and its mounting bolt.
- Lock the Blade: To prevent the Blade from moving while loosening the mounting bolt, use the blade lock pin. Insert the blade lock pin through the hole in the Blade and into the hole in the saw’s base to immobilize the Blade.
- Loosen the Blade Bolt: With the Blade locked, use a wrench or Allen wrench (whichever applies to your specific model) to loosen the Blade mounting bolt. Turn the bolt counterclockwise (lefty loosey) to loosen it. Hold the Blade in place with the lock pin while doing this.
- Remove the Blade: Once the bolt is sufficiently loose, you can remove it entirely. Carefully slide the Blade off the arbor (the shaft that holds the Blade). Note the orientation of the old Blade so you can install the new one similarly.
- Install the New Blade: Slide the new Blade onto the arbor, ensuring that any locating pins or holes on the Blade match up with the arbor. Ensure the Blade faces the correct direction (usually downward for miter saws).
- Tighten the Blade Bolt:
- Reinsert the blade bolt and tighten it securely by turning it clockwise (righty tight).
- Make sure it’s snug, but don’t overtighten it.
- Refer to your saw’s user manual for the specific torque specifications.
- Release the Blade Lock: Remove the blade lock pin from the Blade and base.
- Lower the Blade Guard: Carefully lower the blade guard back into its closed position. Ensure it moves freely and covers the Blade adequately.
- Plug in or Reinsert the Battery: If you unplugged the saw or removed the battery, plug it back in or reinsert it.
- Test the Saw: Before making any cuts, test the miter saw with the new Blade to ensure it’s working correctly. Make sure everything is properly aligned and secure.
Why You Need to Change the Blade on a Ryobi Miter Saw?
Here are several reasons why you might need to change the Blade on a Ryobi miter saw:
- Blade Wear: Over time, the teeth of a miter saw Blade can become dull and worn out, mainly if you use the saw frequently or cut through hard materials like hardwood or metal. Dull blades can lead to rough cuts, burning, and decreased cutting efficiency.
- Blade Damage: Accidents can happen, and blades can become chipped, bent, or damaged. A damaged blade can affect the quality of your cuts and pose safety risks.
- Changing Material: If you’re switching from cutting one type of material to another (e.g., from wood to metal or vice versa), you may need a different type of Blade with the appropriate tooth configuration and material compatibility.
- Specialized Cuts: Some projects require specialized cuts that may be best achieved with a different blade type. For example, a fine-toothed blade is suitable for clean crosscuts, while a coarse-toothed blade is better for ripping.
- Improved Performance: Upgrading to a higher-quality blade or a blade designed for specific applications (e.g., a blade designed for clean, fine cuts) can improve your cuts’ overall performance and finish.
- Safety Concerns: A damaged or worn blade can be more prone to kickbacks or other safety issues, making it essential to replace it to ensure safe operation.
- Reducing Friction and Heat: A fresh blade will produce less friction and heat during cutting, which can extend the life of your saw and reduce the risk of overheating.
Tips and Tricks on Successful Changing Of Ryobi Miter Saw Blade
Successfully changing the Blade on a Ryobi miter saw involves careful attention to detail and safety precautions:
- Read the User Manual: Familiarize yourself with the user manual that came with your Ryobi miter saw. It contains specific safety instructions and guidelines for your particular model.
- Secure Workpiece: Ensure your workpiece is securely clamped or placed with appropriate workpiece supports or fixtures to prevent it from moving during cutting. Unsecured workpieces can lead to accidents.
- Keep Hands Clear: Keep your hands and body clear of the Blade’s path during operation. Use a push stick or a hold-down clamp when making close cuts to maintain a safe distance from the Blade.
- Blade Guard: Ensure that the blade guard is appropriately working and always covers the Blade when not in use. Do not disable or remove the blade guard.
- Disconnect Power: Unplug the saw from the power source before changing the Blade. This prevents accidental startup while you’re working on the Blade.
- Proper Blade Installation:
- Ensure the new Blade is installed correctly, with the teeth facing in the right direction.
- Tighten the blade bolt securely but not excessively.
- Follow the manufacturer’s guidelines for torque specifications if available.
- Clear the Workspace: Keep your work area clean and free of clutter. Remove sawdust and debris from the saw’s table, base, and surrounding area to maintain a safe working environment.
- Inspect the Saw: Inspect your miter saw for loose parts, damaged cords, or other issues. If you notice any problems, address them before using the saw.
- Maintenance: To ensure it operates smoothly and safely, perform routine maintenance on your miter saw, such as Blade sharpening.
- Stay Focused: Concentrate on the task and avoid distractions when operating the miter saw. Accidents are more likely to occur when you’re partially focused.
- Educate Yourself: If you’re new to using a miter saw, consider seeking guidance or training from experienced individuals or professionals to learn best practices.
Components of a Ryobi Miter Saw
A Ryobi miter saw comprises several essential components that enable accurate and controlled cutting operations:
- Base: Provides stability during cutting tasks, with a flat table and extendable wings for additional support.
- Fence: Located at the back of the table, aids in aligning workpieces and maintaining precise angles.
- Blade: The circular Blade, designed for specific cutting applications, is mounted on the arbor.
- Arbor: Can be adjusted horizontally for miter cuts and vertically for bevel cuts.
- Miter and Bevel Scales: Facilitate angle adjustments.
- Handle: Offers control during operation.
- Safety Features: Include trigger switches, blade guards, and dust collection systems to enhance user safety and workspace cleanliness.
- Miter and Bevel Lock Mechanisms: Ensure angle accuracy.
- Extension Wings: Support more extended materials.
These components harmonize Ryobi miter saws, versatile tools for cutting wood, plastic, and some metals.
Necessary Tools Required for Easy Replacement of Saw Blade
To ensure an easy and successful replacement of a saw blade on your Ryobi miter saw, it’s essential to have the right tools and equipment:
- Screwdriver or Allen Wrench: Depending on your specific Ryobi miter saw model, you may need to tighten the Blade mounting bolt. Check your saw’s user manual to determine which tool is required.
- Blade Lock Pin: Many Ryobi miter saws have a blade lock pin designed to immobilize the Blade during blade replacement. Make sure you have this pin available.
- New Saw Blade: Ensure you have a replacement saw blade compatible with your miter saw model and suited to your cutting needs. Check the Blade’s specifications, including size and tooth configuration, to match your project requirements.
- Workbench or Stable Surface: Place your miter saw on a stable workbench or surface at a comfortable working height. This will help you work more safely and efficiently.
- Extension Cord (if applicable): If your miter saw is corded and not near a power outlet, ensure you have a suitable extension cord to reach the nearest power source.
- Owner’s Manual: Keep the owner’s manual for your Ryobi miter saw handy. It contains specific instructions for your model and is a valuable reference for maintenance and safety guidelines.
- Clean Cloth or Brush: Clean debris or sawdust from the saw’s arbor and surrounding areas before installing the new Blade. A clean workspace ensures proper blade installation.
Problems That Can Arise During Changing of Ryobi Miter Saw Blade
While changing the Blade on a Ryobi miter saw is a relatively straightforward process, problems and challenges can still arise if not done correctly. Here are some common issues that may occur during the blade replacement process:
- Blade Bolt Stuck: One of the most common problems is the blade bolt being stuck or difficult to loosen. This can happen if the bolt rusted or was overtightened during the previous blade installation.
- Blade Not Aligning: Improper alignment of the new Blade with the arbor can lead to issues. If the Blade is not seated correctly, it may wobble during operation, causing poor cuts and potential safety hazards.
- Overtightening the Blade Bolt: While securing the blade bolt is crucial, overtightening it can cause problems, such as difficulty removing the bolt during the next blade change.
- Missing or Misplaced Blade Lock Pin: If you can’t find the Blade lock pin or misplace it, you may need help to immobilize the Blade during replacement.
- Inadequate Cleaning: Neglecting to clean sawdust and debris from the arbor and the surrounding area can interfere with proper blade installation.
- Lack of Safety Gear: Failure to wear safety glasses and other appropriate safety gear can result in eye injuries or other accidents.
- Blade Compatibility Issues: Using a blade that is incompatible with your Ryobi miter saw can lead to problems with cutting performance, stability, and safety problems.
- Electrical Issues: For corded miter saws, electrical problems can occur if the power cord is damaged or not connected adequately after blade replacement.
Safety and Precautions
- Read the User Manual: Familiarize yourself with the user manual that came with your Ryobi miter saw. It contains specific safety instructions and guidelines for your particular model.
- Secure Workpiece: Ensure your workpiece is securely clamped or placed with appropriate workpiece supports or fixtures to prevent it from moving during cutting.
- Keep Hands Clear: Keep your hands and body clear of the Blade’s path during operation. Use a push stick or a hold-down clamp when making close cuts to maintain a safe distance from the Blade.
- Blade Guard: Ensure that the blade guard is appropriately working and always covers the Blade when not in use. Do not disable or remove the blade guard.
- Disconnect Power: Unplug the saw from the power source before changing the Blade. This prevents accidental startup while you’re working on the Blade.
- Use the Blade Lock: Utilize the blade lock pin provided with your miter saw to immobilize the Blade when changing it. This prevents the Blade from accidentally turning during removal and installation.
- Proper Blade Installation:
- Ensure the new Blade is installed correctly, with the teeth facing in the right direction.
- Tighten the blade bolt securely but not excessively.
- Follow the manufacturer’s guidelines for torque specifications if available.
- Clear the Workspace: Keep your work area clean and free of clutter. Remove sawdust and debris from the saw’s table, base, and surrounding area to maintain a safe working environment.
- Inspect the Saw: Inspect your miter saw for loose parts, damaged cords, or other issues. If you notice any problems, address them before using the saw.
- Maintenance: To ensure it operates smoothly and safely, perform routine maintenance on your miter saw, such as Blade sharpening.
- Stay Focused: Concentrate on the task and avoid distractions when operating the miter saw. Accidents are more likely to occur when you’re partially focused.
- Educate Yourself: If you’re new to using a miter saw, consider seeking guidance or training from experienced individuals or professionals to learn best practices.
Conclusion
Changing the Blade on a Ryobi miter saw is a task that can be easily accomplished by following the proper steps and safety precautions.
The critical components of the saw, including the base, table, fence, Blade, arbor, scales, and safety features, work harmoniously to facilitate precise and controlled cuts in various materials.
To ensure a successful blade replacement, safety should always be a top priority, with the user manual serving as a valuable reference for specific instructions and guidelines.