
If you own a Ryobi circular saw and need to replace the blade, you’ve come to the right place! Understanding how to change the blade on your Ryobi circular saw is an essential skill for any DIY enthusiast or professional woodworker.
With the right knowledge and step-by-step instructions, this task can be easily accomplished, allowing you to maintain optimal cutting performance and safety.
We will walk you through the process of changing the blade on a Ryobi circular saw, providing you with the necessary guidance and tips to complete the task. So, let’s dive in and learn how to change the blade on the Ryobi circular saw, ensuring you’re ready for your next woodworking project!
How to change the blade on the Ryobi circular saw?
Safety Precautions
Changing the blade on a Ryobi circular saw is a relatively simple process that can enhance the performance and versatility of your tool. However, it’s crucial to prioritize safety when working with power tools. This note will outline the necessary safety precautions before changing the blade on your Ryobi circular saw.
Disconnect the Power Source
Before starting any maintenance or blade replacement, unplug the circular saw from the power outlet. This ensures the tool won’t accidentally start during the blade change process, reducing the risk of injuries.
Wear Personal Protective Equipment (PPE)
- Prioritize your safety by wearing appropriate personal protective equipment:
- Safety glasses: Protect your eyes from debris or metal shards.
- Ear protection: Reduce the noise generated by the circular saw to prevent hearing damage.
- Work gloves: Provide a secure grip and protect your hands from cuts or abrasions.
Choose the Right Working Area
Select a clean and well-lit workspace for changing the blade. Ensure there is enough space to maneuver the circular saw safely.
Remove potential tripping hazards and ensure a stable work surface to prevent accidents.
Familiarize Yourself with the Manual
Refer to the instruction manual provided by Ryobi for your circular saw model. Familiarize yourself with the specific guidelines and safety instructions outlined by the manufacturer.

Inspect the Saw and Blade
Before changing the blade, inspect the circular saw and the old blade for any damage. Look for signs of wear, chipping, or missing teeth on the blade, and ensure the circular saw is in good working condition.
Allow the Blade to Cool Down (if applicable)
If you have been using the circular saw recently, let the blade cool down completely before changing it. Hot blades can cause burns or other injuries.
Gathering the Tools
Changing the blade on a Ryobi circular saw is a task that requires a few essential tools. By ensuring you have the necessary tools at hand, you can make the blade replacement process smooth and efficient. This note will guide you through the tools you need to gather before changing the blade on your Ryobi circular saw.
Replacement Blade
Before starting, ensure you have a suitable replacement blade for your Ryobi circular saw. Consider the cuts you’ll make and choose a blade with the appropriate tooth count and design.
Hex Key or Blade Wrench
Most Ryobi circular saws come with a hex key or a blade wrench designed for blade changes. Check your circular saw’s manual or packaging to determine the correct tool for your model.
Workbench or Stable Surface
Prepare a workbench or a stable surface to place your circular saw during the blade change process securely. This will provide stability and ease of access.
Sawhorse (optional)
If you have a sawhorse available, it can support longer pieces of material or provide additional stability while changing the blade.
Cleaning Brush
A cleaning brush, such as a small handheld or a toothbrush, will help you remove any debris or sawdust that may have accumulated in and around the blade area.
Vacuum or Dust Collection System (optional)
While not mandatory, a vacuum or a dust collection system can help keep your work area clean by removing sawdust and debris as you change the blade.
Rag or Shop Towel
Keep a rag or shop towel nearby to wipe any excess grease or dirt from the saw’s arbor or blade housing during the process.
Preparing the Circular Saw
Properly preparing your Ryobi circular saw before changing the blade is essential for a smooth and successful replacement. The necessary steps to prepare the saw will ensure safety and make the task easier. This note will provide a step-by-step guide on training your Ryobi circular saw for changing the blade.
Power Off and Disconnect
Ensure the circular saw is completely powered off and unplugged from the power source. This eliminates the risk of accidental starts and keeps you safe during preparation.
Secure the Blade Guard
Locate the blade guard, which is the protective covering over the blade. Gently push it down and check if it locks into place. Make sure the blade guard is secure and functioning correctly before proceeding.
Clear the Work Area
Remove any materials, debris, or obstacles from the work area that could interfere with the blade replacement process. Create a clean and clutter-free workspace for better maneuverability and safety.
Position the Saw
Place the circular saw on a stable surface, such as a workbench or sawhorse, with the blade facing upward. Ensure the saw is well-balanced and won’t tip over during the blade change.
Check the Tension and Position of the Blade
Look at the current blade to determine its position and note how it is tensioned against the arbor. Understanding the current blade’s orientation will help you align the new edge correctly.

Lock the Blade in Place
Depending on your Ryobi circular saw model, there may be a lock button or a blade lock mechanism. Engage this feature to keep the blade in place, preventing it from rotating while loosening the arbor nut.
Remove the Battery (if applicable)
For cordless Ryobi circular saws, if the Battery is removable, remove it before proceeding with the blade change. This prevents accidental activation of the saw during the process.
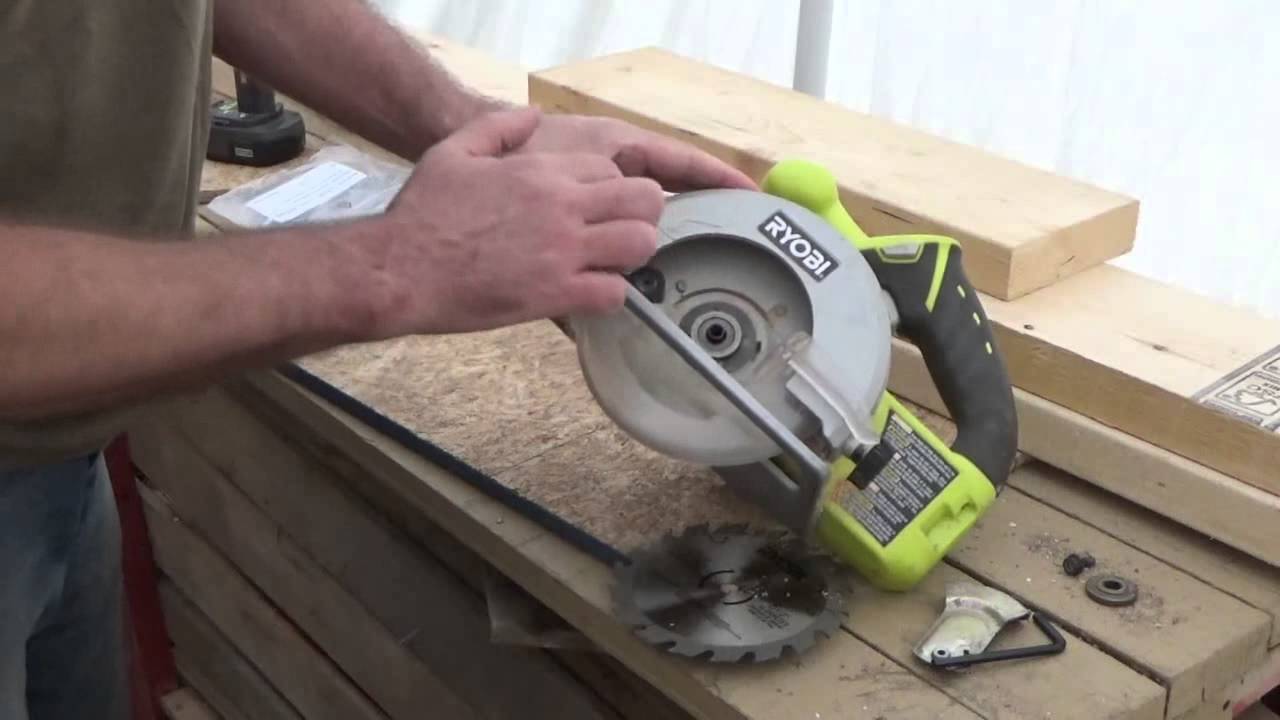
Removing the Old Blade
Removing the old blade from your Ryobi circular saw is a crucial step in the blade replacement process. By following the correct procedure, you can safely and efficiently remove the old blade and prepare for the installation of a new one. This note will guide you through releasing the old blade from your Ryobi circular saw.
Wear Protective Gloves
Before proceeding, wear protective gloves to safeguard your hands from sharp edges or potential accidents during the blade removal.
Locate the Arbor Lock
Look for the arbor lock button or lever on your Ryobi circular saw. This is typically located near the blade housing or the motor. The arbor lock is designed to immobilize the blade and prevent it from spinning while you loosen the arbor nut.
Engage the Arbor Lock
While pressing or engaging the arbor lock, rotate the blade until it locks in place. This ensures the blade remains stationary and allows you to loosen the arbor nut safely.
Loosen the Arbor Nut
Use the appropriate tool, such as a hex key or blade wrench, to loosen the arbor nut by turning it counterclockwise. Be sure to hold the blade steady with one hand while loosening the nut with the other. If the nut is tight, you may need to apply some force to reduce it.
Remove the Arbor Nut and Outer Washer
Once the arbor nut is sufficiently loosened, remove it and the outer washer from the arbor shaft. Set them aside in a safe place to avoid misplacing them.
Remove the Old Blade
With the arbor nut and washer removed, gently slide the old blade off the shaft. Take care not to touch the blade’s sharp edges, and set it aside in a safe location.
Inspect the Arbor and Clean it if Necessary
Inspect the arbor shaft before installing the new blade for any dirt, debris, or buildup. Use a clean cloth or a brush to wipe away any residue and ensure a clean surface for the new blade.
Installing the New Blade
After successfully removing the old blade from your Ryobi circular saw, the next step is to install the new blade. Proper installation is essential to ensure optimal performance and safety during operation. This note will guide you through installing the new blade on your Ryobi circular saw.
Choose the Correct Blade
Select a new blade compatible with your Ryobi circular saw model and appropriate for the cuts you intend to make. Ensure the blade’s diameter and arbor size match the specifications of your saw.
Inspect the New Blade
Before installing the new blade, inspect it for any visible damage, missing teeth, or manufacturing defects. Ensure that it is in good condition and ready for use.
Align the Blade
Hold the new blade by its center hole, aligning it with the arbor shaft. The teeth of the blade should be facing in the correct direction, typically with the tooth tips pointing in the same direction as the rotation arrow indicated on the saw’s blade guard.
Slide the Blade onto the Arbor Shaft
Carefully slide the center hole of the new blade onto the arbor shaft, ensuring that it fits snugly and is properly seated. Ensure the edge is aligned with the saw’s guard and the arbor shaft passes through the blade’s center hole.
Replace the Outer Washer and Arbor Nut
Once the new blade is properly positioned on the arbor shaft, place the outer washer back onto the arbor shaft. Then, thread the nut onto the arbor shaft and hand-tighten it securely.

Secure the Blade
To prevent the blade from rotating while you tighten the arbor nut, engage the arbor lock again by pressing or activating the arbor lock button or lever. Hold the blade steady with one hand and use the appropriate tool to tighten the arbor nut firmly in a clockwise direction.
Check Blade Tightness
After tightening the arbor nut, check the blade’s tightness by gently trying to rotate it. The blade should be secure and not move. Recheck the installation and tighten the arbor nut further if there is any looseness.
Release the Arbor Lock
With the arbor nut securely tightened, release the lock to allow the blade to rotate freely during operation. Ensure the blade spins smoothly and does not rub against any part of the saw.
Double-Checking the Blade Installation
After installing the new blade on your Ryobi circular saw, it is crucial to double-check the blade installation to ensure it is secure and properly aligned. Double-checking the blade installation adds an extra safety layer and guarantees optimal operation performance.
Disconnect the Power Source
Before proceeding with the double-checking process, ensure that the circular saw is unplugged or its Battery is removed, depending on the power source. This eliminates the risk of accidental starts and keeps you safe.
Inspect the Blade Alignment
Inspect the new blade to ensure it is aligned parallel to the saw’s base or shoe. The blade should be straight and not tilted or misaligned. Improper alignment can affect the accuracy and quality of your cuts.
Check for Proper Clearance
With the blade installed, inspect the blade’s clearance from the blade guard and the saw’s housing. There should be sufficient space between the blade and these components to prevent interference during operation.
Verify the Tightness of the Arbor Nut
Using the appropriate tool, verify the tightness of the arbor nut. Ensure it is securely fastened but avoid over-tightening, as it may damage the blade or the saw’s arbor. The arbor nut should be tightened enough to prevent blade movement during operation.

Perform a Test Run
Reconnect the power source (plug in or reinsert the Battery), and conduct a brief test run with the circular saw. Activate the saw and listen for any unusual sounds or vibrations. Observe the blade’s rotation to ensure it spins smoothly and without wobbling.
Check for Blade Guard Functionality
While the circular saw is still running, observe the movement of the blade guard as you gently lower and raise the saw. Ensure the guard retracts properly during cutting and returns to cover the blade when released.
Assess the Quality of Cuts
Perform a test cut on a piece of material to assess the quality and accuracy of the cuts. Ensure the blade is cutting smoothly and without excessive vibration or deviation.
Testing the Saw
After completing the blade replacement process on your Ryobi circular saw, it is essential to test the saw to ensure everything functions correctly. Testing the saw after blade installation helps verify the tool’s accuracy, performance, and safety before using it for your projects.
Reconnect the Power Source
If you disconnected the power source during the blade replacement process, now is the time to reconnect it. Plug in the saw or reinsert the Battery, depending on your saw’s power source.
Safety Check
Before powering on the saw, ensure the work area is clear of any obstructions, debris, or potential hazards. Confirm that you have ample space to maneuver the saw during the test safely.
Adjust Depth and Angle Settings
Set the desired cutting depth and angle on the saw according to the requirements of your project. Refer to the saw’s user manual for instructions on adjusting these settings.
Secure the Workpiece
Place a suitable workpiece securely on a stable surface or clamp it down to prevent movement during the test. Ensure that the workpiece is properly supported and positioned for the desired cut.
Activate the Saw
Switch on the power button or trigger of the circular saw to start the motor.
Make a Test Cut
With the saw running, carefully guide the blade into the workpiece, following the intended cutting line. Maintain a steady and controlled motion throughout the cut. Observe the saw’s performance, including the smoothness of the amount, any vibrations, or unusual noises.
Evaluate the Cut Quality
After completing the test cut, inspect the quality of the amount. Ensure the saw produces a clean, accurate cut without excessive tear-out or jagged edges. Evaluate the overall performance and precision of the saw during the test.
Verify Safety Features
During the test, pay attention to the functioning of safety features such as the blade guard, anti-kickback mechanism, and electric brake. Confirm that these features are operating correctly and providing adequate protection during operation.
Testing your Ryobi circular saw after changing the blade is an essential step to ensure its proper functionality, performance, and safety. By following the steps outlined above, including reconnecting the power source, performing a safety check, adjusting depth and angle settings, securing the workpiece, activating the saw, making a test cut, evaluating the cut quality, and verifying the functioning of safety features, you can ensure that your saw is ready for use in your projects.