
Are you curious about how to cut angles with a circular saw? Whether you’re a DIY enthusiast or a professional carpenter, making precise angled cuts is a crucial skill in woodworking.
While a circular saw is commonly used for making straight cuts, it can also be a versatile tool for cutting angles when approached correctly.
Cutting tips with a circular saw allows you to create beveled edges, miters, or compound angles for various woodworking projects. This comprehensive guide will walk you through the step-by-step process of cutting tips with a circular saw, providing the knowledge and techniques to achieve accurate and clean angled cuts.
So, let’s delve into the world of angled cutting and discover how to cut angles with a circular saw.
Essential Tools and Materials
To successfully cut angles with a circular saw, you will need the following tools and materials:
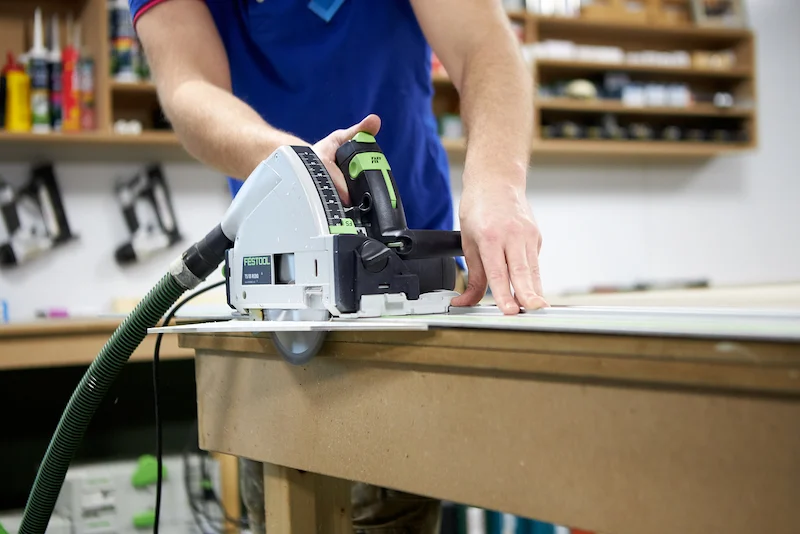
- Circular saw: A circular saw is a handheld power tool with a circular blade ideal for making straight and angled cuts in various materials, including wood, plastic, and metal.
- Measuring tools: Accurate measurements are crucial when cutting angles. Therefore, you will need the following measuring tools:
- Tape measure: A tape measure is crucial for measuring the length of the material and determining the angle you want to cut.
- Speed square: A speed square, also known as a rafter square, is a versatile tool that helps you mark and measure angles accurately.
- Clamps: Clamps firmly secure the material, preventing it from moving while you make the angled cuts.
- Safety equipment: Safety should be a top priority when operating any power tool, including a circular saw. Make sure you have the following safety equipment:
- Safety glasses: Protect your eyes from flying debris and sawdust by wearing safety glasses.
- Ear protection: Circular saws can produce a loud noise, so wearing ear protection, such as earplugs or earmuffs, is important to prevent hearing damage.
- Dust mask: To avoid inhaling sawdust and other airborne particles, wear a dust mask or respirator.
- Work gloves: Work gloves provide extra hand protection and improve grip while handling materials.

Ensure you have the tools and materials to cut angles effectively with a circular saw. A circular saw, measuring devices like a tape measure and speed square, clamps for stability, and appropriate safety equipment are necessary for a successful and safe cutting experience. By gathering these tools and prioritizing safety, you’ll be well-prepared to tackle angle cuts with a circular saw.
Safety Precautions
When cutting angles with a circular saw, it is vital to follow proper safety precautions to protect yourself and others from potential hazards. The following safety precautions should be observed:
Wear Personal Protective Equipment (PPE): Before operating a circular saw, wear the appropriate Personal Protective Equipment (PPE) to minimize the risk of injury. This includes:
- Safety glasses: Protect your eyes from flying debris, wood chips, and sawdust.
- Ear protection: Circular saws can produce loud noise levels that can damage hearing. Wear earplugs or earmuffs to reduce noise exposure.
- Dust mask: Prevent inhalation of sawdust and other airborne particles by wearing a dust mask or respirator.
- Work gloves: Use gloves to protect your hands from cuts and enhance grip while handling materials.
Secure the Workpiece: Ensure that the workpiece is properly secured and supported before making any cuts. Unsecured materials can shift or bind during cutting, leading to dangerous kickbacks or inaccurate cuts. Use clamps or other suitable methods to secure the workpiece to the work surface firmly.
- Check the Blade and Saw: Inspect the circular saw and its blade before use to ensure they are in proper working condition:
- Blade condition: Make sure the blade is sharp, free from damages or cracks, and securely tightened.
- Saw condition: Check that the saw’s safety guards, handles, and adjustment mechanisms function correctly.
- Adjust the Cutting Depth: Set the cutting depth of the circular saw to a depth that allows the blade to extend slightly beyond the thickness of the cut material. This helps prevent the saw from binding or causing kickbacks.
- Plan and Mark Your Cuts: Take the time to plan your cuts and mark the intended cut lines clearly on the material. This helps ensure accuracy and minimizes the risk of incorrect or unsafe amounts.
- Maintain Proper Body Position: Position your body properly and maintain a stable stance while operating the circular saw:
- Firm footing: Stand with your feet shoulder-width apart for stability.
- Balanced posture: Maintain a balanced posture and avoid overreaching while cutting.
- Keep hands away: Keep your hands and fingers away from the blade’s path to prevent accidental contact.
Use Proper Cutting Techniques
Follow these techniques while cutting angles with a circular saw:
- Start and end cuts carefully: Begin and end each cut with caution to prevent kickbacks.
- Maintain a controlled pace: Do not rush the cutting process; maintain a steady and controlled pace.
- Support longer materials: For long or heavy materials, have a helper support the fabric to prevent it from sagging or causing instability.
- Never force the saw: Allow the saw’s blade to cut through the material naturally. Forcing the saw can lead to dangerous kickbacks or damage to the blade.

Cutting angles with a circular saw requires strict adherence to safety precautions. Wearing appropriate Personal Protective Equipment (PPE), securing the workpiece, checking the blade and saw condition, adjusting the cutting depth, planning and marking cuts, maintaining proper body position, and using proper cutting techniques are crucial for a safe cutting experience.
Marking and Measuring
Accurate marking and measuring are essential when cutting angles with a circular saw. Properly marking the material ensures precise cuts and helps achieve the desired angle. The following steps outline the process of observing and measuring tips for cutting with a circular saw
- Measure and Mark the Material: Begin by measuring the length of the material you need to cut.
- Determine the Angle: Decide on the angle you want to cut. Curves can be measured in degrees; common grades include 45 degrees, 30 degrees, or any other specific angle required for your project.
- Use a Speed Square: A speed square is a handy tool for accurately marking and measuring angles. It typically has a square base with a ruler along one edge and a pivot point at the corner.
Follow these steps to keep the tip using a speed square:
- Place the speed square against the edge of the material, aligning the ruler with the considerable length.
- Pivot the speed square until the desired angle aligns with the edge of the material. The corner of the speed square will point towards the mark for the angle cut.
- Use a pencil or marking tool to trace along the edge of the speed square, marking the angle on the material.
- Double-Check the Angle: Double-check the marked angle to ensure accuracy before proceeding with the cut. Use a protractor or angle measuring tool to confirm the angle if necessary.
- Extend the Marked Line: To provide a clear-cutting guide, extend the marked line beyond the edge of the material. Use a straightedge or a ruler to develop the line straight and continuously.
- Align the Circular Saw: Align the circular saw’s blade with the marked line, ensuring that the edge is on the waste side of the material (the part that will be discarded). This ensures that the actual cut will follow the intended line.
- Clamp and Secure the Material: Before cutting, securely clamp the material to the work surface to prevent movement or slipping during the cutting process. This ensures a safe and accurate amount.
Marking and measuring angles correctly is crucial for achieving precise cuts with a circular saw. By accurately measuring the material, determining the desired angle, using a speed square to mark the rise, double-checking the measurement, extending the marked line, aligning the circular saw, and securing the material, you can ensure accurate and successful angle cuts with your circular saw.
Adjusting the Circular Saw
Before making angled cuts with a circular saw, it is important to adjust the saw properly to ensure accurate and safe cutting. Changing the circular saw involves setting the cutting depth and adjusting the bevel angle.
Cutting Depth Adjustment: The cutting depth refers to how deeply the saw blade cuts into the material. To adjust the cutting depth
- Unplug the circular saw or remove the battery (for cordless models) to ensure safety.
- Locate the cutting depth adjustment lever or knob on the saw. It is usually located near the base of the saw.
- Loosen or release the cutting depth adjustment mechanism as per the instructions provided by the manufacturer.
- Adjust the cutting depth by moving the saw’s base up or down. Align the desired cutting depth indicator on the floor with the appropriate measurement on the scale.
- Once the desired cutting depth is set, securely tighten the adjustment mechanism.
Bevel Angle Adjustment: The bevel angle determines the tilt of the saw blade, allowing you to make angled cuts. To adjust the bevel angle
- Ensure the circular saw is unplugged or the battery is removed for safety.
- Locate the bevel adjustment lever or knob near the front or rear of the saw’s base.
- Loosen or release the bevel adjustment mechanism per the manufacturer’s instructions.
- Tilt the saw’s base to the desired bevel angle, aligning it with the appropriate angle indicator on the floor or the scale.
- Once the desired bevel angle is set, securely tighten the adjustment mechanism.
Verify the Adjustments: Double-check the cutting depth and bevel angle adjustments to ensure accuracy before proceeding with the cut. Confirm that the blade depth is appropriate for the material thickness and the bevel angle matches the desired angle for the amount.

Secure the Adjusted Settings: Once you have verified the adjustments, ensure that the cutting depth and bevel angle settings are securely locked. This prevents unintentional changes during the cutting process and maintains accuracy and safety.
Properly adjusting the circular saw is essential for achieving accurate and safe angled cuts. You can ensure precise and clean cuts by adjusting the cutting depth to the appropriate measurement and setting the bevel angle according to the desired cut angle.
Always follow the manufacturer’s instructions for your specific circular saw model when adjusting the cutting depth and bevel angle. Taking the time to make accurate adjustments will enhance the performance of your circular saw and help you achieve professional results when cutting tips.
Cutting Techniques
When cutting angles with a circular saw, proper cutting techniques are crucial for achieving accurate and clean cuts while ensuring safety.
- Set Up the Work Area: Ensure a clean and well-lit work area. Clear any obstructions or debris that may interfere with the cutting process. Secure the workpiece firmly using clamps or other appropriate methods to prevent movement during the cut.
- Safety Precautions: Before starting the cutting process, review and adhere to the safety precautions mentioned earlier, including wearing appropriate Personal Protective Equipment (PPE) such as safety glasses, ear protection, dust mask, and work gloves.
- Start with a Test Cut: If you are unsure about the accuracy of your angle marking or the stability of the workpiece, start with a test cut on a scrap piece of material. This allows you to verify the angle and make necessary adjustments before cutting the workpiece.
- Positioning and Alignment: Align the marked cutting line on the workpiece with the circular saw’s blade. Ensure the waste side of the material (the part that will be discarded) is positioned to the outside of the cut.
- Start the Cut: Hold the circular saw firmly and position the blade above the material. Start the saw and allow it to reach full speed before lowering it into the fabric. Make sure the edge is perpendicular to the surface of the material.
- Maintain a Steady Pace: Move the saw along the marked cutting line at a steady and controlled pace. Do not rush the cut or force the saw through the material. Let the blade do the cutting work while maintaining proper control and balance.
- Smooth and Continuous Motion: Keep the circular saw moving in a smooth and continuous motion throughout the cut. Avoid stopping or hesitating midway, as this can lead to uneven scratches or marks on the material.
- Support Longer Materials: For longer or heavier materials, have a helper support the material near the cut line to prevent it from sagging or causing instability. This helps maintain a smooth and accurate cut.
- Complete the Cut: Continue cutting along the marked line until you reach the end of the material. Allow the blade to exit the material completely before releasing the power trigger. Wait to lift the saw until the blade has completely stopped.
- Inspect the Cut: After completing the cut, inspect the result for accuracy and quality. Ensure the angle cut matches the intended measurement and that the edges are clean and free from splintering.
You can achieve precise, clean, and safe angle cuts with a circular saw by employing the proper cutting techniques. Remember to maintain a steady pace, position and align the saw correctly, support longer materials, and follow through with the cut with a smooth and continuous motion.
Always prioritize safety, use caution, and wear appropriate PPE throughout cutting. With practice and attention to detail, you can master the cutting techniques and achieve professional results when cutting angles with a circular saw.
Troubleshooting and Tips
When cutting angles with a circular saw, it’s common to encounter certain issues or challenges. Troubleshooting these problems and following useful tips can help overcome obstacles and ensure successful angle cuts.
Blade Binding or Stalling:
Problem: The saw blade gets stuck or stalls during the cut.
Solution
- Ensure the cutting depth is set appropriately. Adjust the cutting depth to allow the blade to cut through the material smoothly.
- Check the blade for damage or dullness. A damaged or dull knife can cause binding. Replace the blade if necessary.
- Slow down the cutting speed. Moving the saw too quickly through the material can lead to binding. Take your time and allow the blade to cut at a comfortable pace.
Splintering or Tear-Out:
Problem: The material splinters or tears along the cut line, resulting in an uneven or rough edge.
Solution
- Use a sharp and fine-toothed blade designed for smooth cuts. Blades with more teeth tend to produce cleaner amounts with minimal tear-out.
- Apply masking tape over the cut line before cutting. This can help reduce splintering and tear-out.
- Place a sacrificial backing board underneath the material being cut. The backing board supports the fibers of the fabric, minimizing tear-out.
Inaccurate Angle Cuts:
Problem: The cut angles do not match the intended measurements.
Solution
- Double-check the angle measurements and markings on the material. Ensure the bevel angle of the saw matches the desired angle.
- Use a reliable and accurate angle measuring tool, such as a protractor, to confirm the bevel angle of the saw before cutting.
- Practice on scrap pieces of material to refine your technique and ensure accuracy before cutting the actual workpiece.
Kickbacks:
Problem: The saw blade binds or catches, suddenly causing the saw to jerk back.
Solution
- Maintain a firm grip on the saw with both hands, keeping your fingers away from the blade’s path.
- Position yourself correctly, ensuring a stable and balanced stance during the cut.
- Do not force the saw through the material. Allow the blade to cut at its own pace without applying excessive pressure.
General Tips
- Keep the saw blade clean and debris-free to maintain optimal cutting performance.
- Use a straightedge or guide to help ensure straight and accurate cuts.
- Regularly inspect and tighten the blade and other components of the circular saw to prevent any issues during cutting.
- Follow the manufacturer’s instructions and recommendations for your specific circular saw model.
By troubleshooting common problems and applying helpful tips, you can overcome challenges and achieve successful angle cuts with a circular saw. Address issues such as blade binding, splintering, inaccurate cuts, and kickbacks by adjusting the cutting depth, using the appropriate blade, practicing accurate measurements, and employing proper cutting techniques.