
Are you interested in the proper technique for cutting a precise 45-degree angle using a circular saw? If so, you’ve come to the right place.
Whether you’re an experienced woodworker or a passionate DIYer, familiarizing yourself with this skill will significantly enhance your ability to tackle various projects. So this guide will help you understand how do you cut 45 degree angle with Circular Saw?
Step by Step guide to cut 45 Degree angle with Circular Saw
To achieve a 45-degree angle cut using a circular saw, there are specific steps that you should follow meticulously:
Workpiece Preparation: Begin by accurately measuring and marking the desired point on the workpiece where the cut will be made. To ensure precision, employ a straightedge or a combination square to draw a clear line across the surface, indicating the exact path of the intended cut.
Adjust the Saw: Most circular saws are equipped with an adjustable base plate that permits the creation of angled cuts. Locate the lever or knob near the front of the saw, which enables the adjustment of the base plate angle. Loosen the lever or knob and proceed to tilt the base plate to a 45-degree angle. Once the desired angle is achieved, securely tighten the lever or knob to lock the base plate in place firmly.
Align the Saw: Position the blade along the previously marked line on the workpiece. Ensuring that the blade aligns precisely with the marked line is crucial. Take the time to make any necessary adjustments until the alignment is accurate.
Secure the Workpiece: To prevent movement during the cutting process and ensure a clean and precise cut, employ clamps or a vice to fasten the workpiece in place securely.
Safety Precautions: Before initiating the cutting process, it is imperative to prioritize safety measures. Be sure to don appropriate safety gear, including safety goggles and ear protection, to safeguard against potential hazards. Circular saws can emit a loud noise and generate wood chips or dust, making it essential to take these precautions seriously.
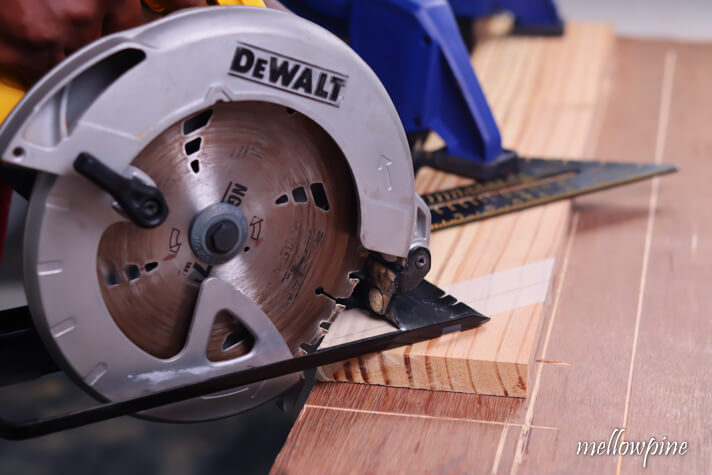
Execute the Cut: Grasp the circular saw firmly with both hands and power it on. Gradually lower the blade onto the workpiece, allowing the teeth to engage with the material. Maintain a controlled and steady motion as you guide the saw along the previously marked line, ensuring the blade consistently aligns with the intended cut.

Completion of the Cut: Upon reaching the end of the cut, release the trigger to turn off the saw. Exercise caution by waiting for the blade to come to a complete stop before lifting it away from the workpiece.
Always bear in mind the importance of exercising caution and adhering to proper safety procedures when operating power tools. Additionally, practicing scrap material before attempting precision cuts on your workpiece is advisable.
Potential applications of 45-degree angle cuts in various woodworking projects
Developing proficiency in making precise cuts is indispensable in woodworking projects. Among the frequently employed angles, the 45-degree rise holds significant importance, imparting structural robustness and aesthetic allure to numerous woodworking endeavors.
Whether you are engaged in furniture construction, frame assembly, or trim installation, the knowledge of cutting a 45-degree angle with a circular saw is invaluable. This comprehensive guide will delineate a systematic approach, step by step, to ensure accurate and immaculate 45-degree angle cuts using a circular saw.
Opting for the Suitable Circular Saw
Carefully select a circular saw with adjustable bevel and miter settings. Ensure the saw is equipped with a sharp and appropriate blade to ensure clean cuts in the chosen material.
Marking the Cutting Line
Measure the workpiece accurately and mark the desired angle precisely. Utilize a combination square or a miter gauge to ascertain meticulous markings. Consider the employment of a straightedge or a carpenter’s square for elongated cuts.
Adjusting the Circular Saw
Loosen the bevel and miter adjustments on the saw. Configure the bevel angle precisely to 45 degrees.
Set the miter angle to 0 degrees or make necessary adjustments based on the intended angle.
Preparing for the Cut
Secure the workpiece firmly on a stable surface or a dedicated workbench. Prevent material displacement during the cut by employing clamps or a non-slip mat. Verify that the saw blade is free from any obstructions or debris.
Executing the Cut
Initiate the circular saw and allow it to reach its maximum speed. Position the saw blade on the side of the marked cutting line that will be discarded.
Align the cutting guide of the saw accurately with the marked line.
Emphasizing Safety Precautions
Don appropriate safety gear, including safety goggles, ear protection, and gloves. Maintain a firm grip on the saw, utilizing both hands to control the tool effectively. Adhere strictly to the manufacturer’s instructions and guidelines to ensure safe operation.

Proficiency in achieving precise 45-degree angle cuts with a circular saw opens up an expansive realm of possibilities in woodworking. Whether focusing on intricate furniture joints, creating ornamental frames, or engaging in trim installation, possessing the requisite knowledge to execute accurate cuts is paramount.
By diligently following the systematic process elucidated in this guide, you can confidently incorporate 45-degree angle cuts into your woodworking projects, augmenting their structural integrity and visual appeal. Through practice and unwavering commitment to safety, you will master the art of producing clean and professional-looking results in your future woodworking pursuits.
Required Tools and Materials
It is crucial to have the necessary tools and materials to accomplish precise 45-degree angle cuts with a circular saw.
This section will provide an overview of the essential items required to ensure accurate cuts and optimize the results of your woodworking projects.
Equipping yourself with the appropriate tools and materials can streamline the cutting process, enhance efficiency, and produce high-quality work.
Circular Saw
Select a reliable circular saw with adjustable bevel and miter settings.
Choose a model that offers sufficient power and stability.
Ensure the saw is equipped with a sharp and suitable blade suitable for your material of choice.
Measuring and Marking Tools
Combination square: An indispensable tool for precise measurements and accurate angle markings.
Miter gauge: Ideal for guiding the saw and ensuring consistent angles.
Carpenter’s square: Useful for maintaining straight and square cuts, particularly for longer pieces.
Tape measure or ruler: Essential for measuring and marking the desired cut length.
Clamps or Non-Slip Mat
Utilize clamps to fasten the workpiece to a stable surface or workbench securely.
Alternatively, use a non-slip mat to prevent material movement during the cutting process.
This guarantees stability and reduces the risk of errors or accidents.
Safety Equipment
Gloves: Improve grip and safeguard your hands against potential injuries.
Additional Considerations:
Workbench or sturdy surface: Provides a solid foundation for supporting the workpiece during cutting.
Sawhorses: Ideal for supporting longer pieces and maintaining stability.
Dust collection system or vacuum: Removing sawdust helps maintain a clean and safe work environment.
The necessary tools and materials are paramount for achieving accurate and clean 45-degree angle cuts with a circular saw. Choosing a reliable circular saw, utilizing appropriate measuring and marking tools, securing the workpiece with clamps or a non-slip mat, and employing essential safety equipment are all fundamental steps in ensuring successful cutting operations.
Preparing for Precise 45-Degree Angle Cuts with a Circular Saw
Before making accurate 45-degree angle cuts with a circular saw, thorough preparation is vital to ensure optimal results. This section will outline the essential steps and considerations for adequate preparation before the cut. By following these guidelines, you can establish an ideal setup, minimize errors, and achieve precise angles in your woodworking projects.

Securing the Workpiece
Select a stable work surface or a dedicated workbench to provide adequate support for the workpiece.
Ensure that the surface is level and free from any obstacles.
Consider utilizing sawhorses to enhance stability and prevent sagging if working with longer pieces.
Marking the Cutting Line
Measure the desired 45-degree angle carefully and mark it accurately on the workpiece.
Employ a combination square, miter gauge, or carpenter’s square to ensure precise markings.
Double-check the accuracy of the markings to avoid any inaccuracies during the cutting process.
Setting Up Clamps or Non-Slip Mat
Utilize clamps to fasten the workpiece to the work surface securely.
Strategically position the clamps to prevent any movement or shifting during the cut.
Alternatively, place a non-slip mat beneath the workpiece to provide stability and minimize any potential slippage.
Clearing the Cutting Area
Thoroughly remove any debris or obstructions from the cutting area.
Ensure ample space for the circular saw to move freely and smoothly during the cut.
Create an unobstructed path to prevent interference and maintain a safe working environment.
Verifying Blade Alignment and Clearance
Verify that the circular saw blade aligns correctly with the marked cutting line.
Ensure sufficient blade clearance to avoid any unintended contact with surrounding objects.
Adjust to guarantee the blade is poised for a clean and accurate cut.
Wearing Personal Protective Equipment (PPE)
Prioritize safety by donning appropriate personal protective equipment (PPE).
Protect your eyes with safety goggles to shield them from potential flying debris.
Minimize the noise impact by wearing ear protection, such as earmuffs or earplugs.
Safeguard your hands with gloves that offer grip and protection against injuries.
Adequate preparation is integral to achieving precise 45-degree angle cuts with a circular saw. By securing the workpiece, marking the cutting line accurately, utilizing clamps or a non-slip mat, clearing the cutting area, verifying blade alignment and clearance, and wearing the necessary personal protective equipment, you can establish an optimal setup for successful cuts.
Thorough preparation minimizes errors, ensures safety, and significantly contributes to the overall quality of your woodworking projects.
Techniques for Accurate Marking and Measuring in 45-Degree Angle Cuts with a Circular Saw
Accurate marking and measuring are pivotal in achieving precise 45-degree angle cuts with a circular saw. This section will explore essential techniques and considerations for marking and measuring before initiating the cut.
Gathering the Necessary Tools
Acquire the essential tools, such as a combination square, miter gauge, or carpenter’s square, for precise measurements and angle markings. Utilize a reliable tape measure or ruler to measure the desired cut length accurately. Verify the condition and calibration of all measuring tools to ensure their accuracy.
Marking the Cutting Line
Exercise caution and precision during the marking process, as accurate markings directly impact the final cut’s quality.
Verifying the Accuracy of the Markings
Double-check the markings using the measuring tool to ensure precise alignment with the desired angle. Employ a light pencil or scribe to make clear and distinct markings, adjusting them to achieve optimal accuracy.
Considering Supporting Tools
For longer cuts, employ a straightedge or carpenter’s square as a guide, ensuring a straight and accurate cutting line. Securely clamp the straightedge to the workpiece to prevent accidental movement during the marking process.
Employing Layout Techniques
Utilize a pencil or marking knife to create minor reference marks along the cutting line. These reference marks serve as helpful guides for aligning the circular saw precisely before initiating the cut.
Taking Precautions for Visibility
Ensure proper illumination in the workspace to discern the markings and maintain accuracy. Avoid excessive shadows or glare that may impede visibility during the cutting process.
Accurate marking and measuring are paramount when aiming for precise 45-degree angle cuts with a circular saw.
By employing the necessary tools, making exact markings, verifying the accuracy, considering supporting tools, employing layout techniques, and ensuring optimal visibility, you establish a solid foundation for successful cuts.
Meticulous marking and measuring result in precise angles and minimize errors, ultimately enhancing the overall quality of your woodworking projects.
Proper Adjustment Techniques for 45-Degree Angle Cuts with a Circular Saw
Accurately adjusting the circular saw is pivotal in achieving precise 45-degree angle cuts. This section will overview the essential steps and considerations for changing the circular saw to ensure accurate cutting angles.
Adhering to these guidelines can optimize the saw’s settings, enhance cutting precision, and produce outstanding results in your woodworking projects.
Verify Bevel and Miter Settings
- Thoroughly inspect the bevel adjustment mechanism located near the saw’s base.
- Set the bevel angle to 45 degrees using the provided bevel adjustment scale or locking lever.
- Confirm the accuracy of the bevel angle by utilizing a protractor or a digital angle finder.
Align the Saw Blade
- Assess the alignment of the saw blade with the circular saw’s base.
- Ensure that the blade is parallel to the base for precise cuts.
- Consult the manufacturer’s instructions for specific adjustments required to align the blade accurately.
Adjust Cutting Depth
- Determine the optimal cutting depth based on the workpiece’s thickness.
- Utilize the circular saw’s depth adjustment mechanism to modify the cutting depth accordingly.
- Set the depth slightly more profound than the workpiece’s thickness to avoid incomplete cuts.
Test Blade Clearance
- Validate that the blade maintains adequate clearance around the cutting area.
- Prevent any contact with neighboring objects or potential obstructions during the cutting process.
- Make any necessary adjustments to ensure safe clearance around the blade.
Secure the Adjustments
- Once the adjustments are made, securely tighten the bevel locking lever and any other relevant adjustment mechanisms.
- Double-check that all adjustments are locked in place before proceeding with the cut.
Perform Test Cuts
- Conduct several test cuts on scrap material before executing the final cut on your workpiece.
- Assess the accuracy and quality of the test cuts to verify the desired outcomes.
- Make additional adjustments, if necessary, based on the results of the test cuts.
Proper adjustment of the circular saw is fundamental for precise 45-degree angle cuts. By verifying the bevel and miter settings, aligning the saw blade, adjusting the cutting depth, testing blade clearance, securing the adjustments, and performing test cuts, you can optimize the circular saw’s settings for accurate cutting angles.
Techniques for Making Precise 45-Degree Angle Cuts with a Circular Saw
Executing the cut accurately is crucial for achieving precise 45-degree angle cuts with a circular saw. This section will comprehensively overview the essential steps and techniques for making clean and accurate cuts.
Positioning and Stabilizing the Workpiece
- Place the workpiece with the marked cutting line aligned directly beneath the circular saw’s blade.
- Ensure the workpiece is securely positioned against the fence or guide to prevent movement during the cut.
- Utilize clamps or other suitable methods to stabilize the workpiece in place firmly.
Activating the Circular Saw
- Confirm that the circular saw is adequately powered and in proper working condition.
- Maintain a firm grip on the saw’s handle, positioning your hands comfortably and ensuring control.
- Engage the power switch, allowing the blade to reach full speed before initiating the cut.
Guiding the Circular Saw
- Position the circular saw’s blade just above the marked cutting line.
- Lower the blade onto the workpiece smoothly and with controlled movement.
- Guide the saw along the cutting line steadily and accurately, following the marked 45-degree angle.
Maintaining a Consistent Speed
- Maintain a consistent and moderate cutting speed throughout the cut.
- Avoid abrupt speed changes, as they can result in uneven cuts or blade deflection.
- Allow the saw’s blade to cut, applying gentle pressure without excessive force.
Supporting the Workpiece
- Provide proper support to the workpiece as the cut nears completion to prevent tear-out or splintering.
- Utilize a sacrificial backing board or support block to stabilize the workpiece and maintain the integrity of the cut.
Completing the Cut
- Inspect the cut for accuracy, ensuring it aligns with the intended 45-degree angle.
- Make any necessary adjustments or refinements to achieve the desired results.
Achieving precise 45-degree angle cuts with a circular saw requires careful execution of the cut itself. You can achieve clean and accurate results by adequately positioning and stabilizing the workpiece, activating the circular saw correctly, guiding the saw along the cutting line, maintaining a consistent speed, supporting the workpiece, and inspecting the cut for accuracy.