
Are you eager to learn how to cut a 45-degree angle with table saw? Look no further! Understanding the art of making accurate angled cuts with a table saw is a valuable skill for any woodworking enthusiast.
Whether you’re embarking on furniture construction or engaging in various woodworking projects, the ability to create clean and flawless 45-degree cuts is essential.
Importance of cutting 45-degree angles
Understanding the intent behind the query, let’s explore the significance of cutting 45-degree angles with a table saw. Whether you’re an avid woodworker, a DIY enthusiast, or a professional carpenter, mastering the technique of cutting precise 45-degree angles is paramount.
These angled cuts find widespread application in various woodworking projects, such as constructing frames, creating miter joints, adding trim work, and more. This comprehensive guide will delve into a detailed explanation of the importance of cutting 45-degree angles and how to achieve accurate results using a table saw.
Cutting 45-degree angles with a table saw is an indispensable skill for individuals engaged in woodworking projects. This angle, commonly called a miter cut, offers many benefits, including creating strong and aesthetically pleasing joints, attaining clean and seamless corners, and facilitating versatile and precise project construction.
By comprehending the importance of 45-degree angles and honing the necessary technique, you can elevate the quality and professionalism of your woodworking endeavors.
Creating Strong and Aesthetically Pleasing Joints
Cutting 45-degree angles enables the formation of sturdy and visually appealing joints. The angled cuts provide a larger surface area for glue or fasteners, resulting in a more secure bond than butt joints.
This is particularly advantageous when constructing frames, cabinet corners, picture frames, or any project requiring secure and durable connections. The 45-degree angle bestows exceptional structural stability and mitigates the risk of joints separating over time.
Achieving Clean and Seamless Corners
The mitered corners offer a clean and snug fit, eliminating visible gaps between the pieces. This is especially beneficial for projects like crown molding installation, baseboard attachment, or creating decorative trims, where precise and well-finished corners are imperative for a polished appearance.
Versatility and Precision in Project Construction
Proficiency in cutting accurate 45-degree angles opens up a realm of possibilities in woodworking. By employing a table saw to achieve these angled cuts, you gain the advantages of precision and repeatability.
This enables the consistent creation of miters, bevels, chamfers, and other angled cuts throughout your project. Whether you’re constructing furniture, cabinetry, or intricate woodworking designs, the flexibility offered by 45-degree angles ensures precise and professional outcomes.
Mastering the art of cutting 45-degree angles with a table saw is a valuable skill for woodworkers at any level of expertise. The importance of these angled cuts lies in their ability to forge strong joints, produce clean and seamless corners, and provide versatility and precision in project construction.
By comprehending the significance of 45-degree angles and employing proper techniques, you can elevate the quality of your woodworking projects and achieve results akin to those of professionals.
Using a table saw for precision cuts
Understanding the intent behind the query, let’s explore the advantages and techniques of utilizing a table saw for achieving precision cuts. A table saw is an indispensable tool in woodworking, offering accuracy, versatility, and efficiency when making precise cuts.
In this comprehensive overview, we will delve into the key components of a table saw, the importance of safety measures, and the techniques required to achieve accurate and clean cuts in various woodworking applications.
Utilizing a table saw for precision cuts is an essential skill for woodworkers aiming to achieve accuracy and efficiency in their projects. The table saws capability to make straight, angled, and intricate cuts with precision renders it an invaluable tool in woodworking workshops.
This overview will provide an in-depth understanding of utilizing a table saw, including the crucial components of the tool, the significance of safety considerations, and the techniques necessary for ensuring precise and clean cuts across a range of woodworking applications.

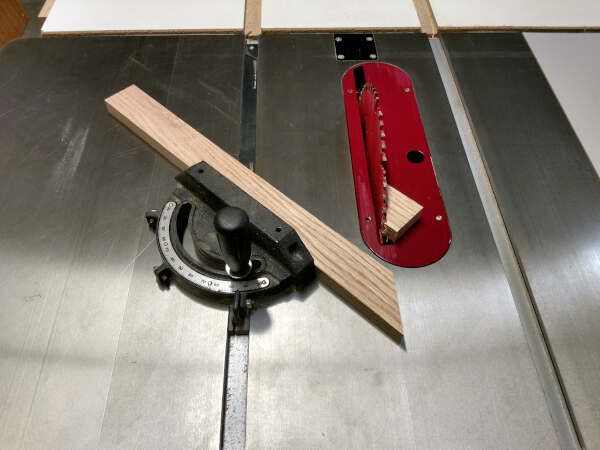
Key Components of a Table Saw
To effectively use a table saw, it is vital to comprehend its key components. These include the tabletop or work surface, the blade, the fence, the miter gauge, the bevel gauge, and the controls. Acquainting yourself with these components and their respective functions will empower you to operate the table saw with confidence and precision.
Safety Measures
Prioritizing safety is of utmost importance when working with a table saw. Ensure the table saw is on a stable surface and maintain a clean, uncluttered work area. Proper techniques, such as maintaining control over the workpiece and utilizing a push stick or push block for small or narrow cuts, are vital for safe operation.
Techniques for Precision Cuts
Achieving precision cuts with a table saw demands attention to detail and the implementation of proper techniques. Begin by selecting the appropriate blade for the specific material and cut you intend to make.
Ensure the blade is properly aligned and adjusted to the desired height and angle. The fence or miter gauge is used to guide the workpiece accurately, ensuring it remains in contact with the appropriate reference surface.
Consider using auxiliary jigs or sleds for specialized cuts or when working with smaller pieces. Practice feeding the workpiece steadily and smoothly through the blade, maintaining a firm grip, and exercising proper control throughout the cut.
Employing a table saw for precision cuts empowers woodworkers to achieve accurate and clean project results. By comprehending the key components, adhering to safety measures, and implementing proper techniques, you can harness the full potential of a table saw.
Whether you’re making straight cuts, angled cuts, or intricate joinery, the versatility and precision offered by a table saw will significantly enhance your woodworking endeavors. Remember to exercise caution, prioritize safety at all times, and continuously refine your technique to master the art of utilizing a table saw for precise cuts.
Safety Precautions
Understanding the importance of safety when operating a table saw, let’s explore the essential precautions that should be taken. By understanding and implementing proper safety measures, you can ensure a secure working environment and minimize the potential for accidents or injuries.
The potential dangers associated with this robust tool necessitate a thorough understanding of safety precautions to protect yourself and others. This overview will cover crucial safety precautions that should be followed when operating a table saw, ensuring a secure woodworking experience.
Familiarize Yourself with the Table Saw
Thoroughly read and understand the table saw’s user manual and instructions. Acquaint yourself with your table saw model’s specific features, controls, and safety mechanisms. This knowledge will enable you to operate the tool safely and effectively.
Proper Set-up and Maintenance
Set up the table saw on a stable and level surface to ensure stability during operation. Regularly inspect the saw for damaged or worn-out parts and promptly replace them. Keep the saw clean and free from debris to maintain optimal functionality.
Blade Guard and Anti-Kickback Devices
Always use the provided blade guard. The blade guard helps protect your hands and fingers from accidental contact with the spinning blade
. Additionally, ensure that anti-kickback devices, such as pawls or riving knives, are properly installed and functioning. These devices prevent the workpiece from being thrown back toward you, reducing the risk of injuries.
Push Sticks and Push Blocks
Use push sticks or blocks when feeding small, narrow, or short workpieces through the blade. These tools help maintain a safe distance between your hands and the blade, reducing the chance of accidental contact.
Proper Technique and Focus
Maintain a firm grip on the workpiece and feed it steadily and smoothly through the blade. Avoid rushing or forcing the material, as this can lead to kickback or loss of control. Concentrate on the task and avoid distractions while operating the table saw.
Setting Up the Table Saw
Understanding the importance of proper set-up when using a table saw, let’s explore the essential steps to get your table saw ready for use. Setting up a table saw correctly is crucial for safety, accuracy, and optimal performance.
Following the recommended procedures ensures that your table saw is stable, the components are aligned correctly, and the necessary adjustments are made.
Properly setting up a table saw is essential to ensure safe and effective operation. A well-adjusted and properly aligned table saw enhances the accuracy of your cuts and minimizes the risk of accidents. You can create a stable and reliable working platform by following the correct set-up procedures.
This overview will cover the key steps involved in setting up a table saw, including assembling the components, aligning the blade, adjusting the fence, and checking for proper functionality.
Assembling the Components
Begin by assembling the various components of the table saw according to the manufacturer’s instructions. This typically involves attaching the tabletop, installing the blade, securing the fence, and setting up the miter gauge. Ensure that all components are tightly secured and aligned correctly.
Aligning the Blade
Check the alignment of the saw blade with the miter gauge slots or the fence. Adjust the blade alignment if necessary using the provided adjustment mechanisms.

Adjusting the Fence
Set the fence parallel to the blade for accurate and consistent rip cuts. Use the adjustment controls or locking mechanisms to align the fence parallel to the blade’s cutting path. Ensure the fence is securely locked in place to prevent movement during operation.
Checking Safety Features and Functionality
Test the functionality of the on/off switch, the emergency stop button, and any other safety mechanisms to ensure they are in proper working order.
Calibration and Testing
Before making any cuts
- Double-check the accuracy of the blade’s angle settings using a reliable measuring tool, such as a precision square or digital angle gauge.
- Ensure the blade is set to the desired angles for bevel cuts or other angled operations.
- Perform test cuts on scrap wood to verify the accuracy of the set-up and make any necessary adjustments.
Setting up a table saw is crucial for safety, accuracy, and optimal performance. You can ensure a stable and reliable working platform by carefully following the recommended procedures, including assembling the components, aligning the blade, adjusting the fence, and checking for proper functionality.
A well-calibrated table saw enhances the quality of your cuts and provides a safe woodworking experience. Set up your table saw correctly, and regularly inspect and maintain it to ensure ongoing performance. With a properly set table saw you’ll be equipped to tackle your woodworking projects confidently and precisely.
Checking the alignment and calibration of the blade
Ensuring the proper alignment and calibration of the blade is crucial for achieving accurate and precise cuts with a table saw. Misalignment or incorrect calibration can lead to subpar results, potential safety hazards, and inefficient woodworking.
Woodworkers can ensure optimal performance and safe operation of their table saws by understanding the importance of blade alignment and calibration.
Checking the alignment and calibration of the blade is essential for maintaining a table saw’s accuracy and safety. When the blade is not aligned correctly or calibrated accurately, it can result in uneven cuts, burning, or even kickback.
Calibration ensures that the blade is set to the correct angles, allowing for precise bevel cuts and angled operations. Woodworkers can achieve consistent and high-quality cuts by following the correct procedures for checking the alignment and calibration of the blade.
Blade Alignment
Begin by turning off and unplugging the table saw for safety. Inspect the blade’s alignment with the miter gauge slots or the fence. Look for any visible deviations or misalignments. Consult the table saw’s manual to adjust the alignment, as adjustment mechanisms can vary.
Common methods include adjusting the trunnion bolts or realigning the blade carriage. Make incremental adjustments, testing the alignment after each adjustment until the blade is parallel to the miter gauge slots or the fence.
Blade Calibration
Calibration ensures that the blade is set to the desired angles for bevel cuts or other angled operations. Adjust the bevel angle or the tilt mechanism of the saw according to the desired angle, referring to the table saw’s manual for specific instructions. Double-check the calibration using the measuring tool to ensure accuracy.
Test Cuts and Fine-Tuning
After aligning and calibrating the blade
- Perform test cuts on scrap wood to evaluate the accuracy of the set-up.
- Examine the quality of the cuts, ensuring they are clean, straight, and free from burning or binding.
- Make fine adjustments to the alignment or calibration based on the test cuts if necessary.
- Always turn off and unplug the table saw before making any adjustments.
Checking the alignment and calibration of the blade is a critical step in maintaining a table saw’s accuracy, performance, and safety. By following the proper procedures for aligning and calibrating the blade, woodworkers can achieve precise and reliable cuts in their woodworking projects.
Proper alignment minimizes the risk of binding or kickback, while accurate calibration ensures precise bevel cuts and angled operations.
Regularly checking the alignment and calibration of the blade, along with routine maintenance, will help maximize the performance and longevity of the table saw.
With a properly aligned and calibrated blade, woodworkers can confidently tackle their woodworking tasks, knowing that their cuts will be accurate and high-quality.
Adjusting the table saw fence for accurate cuts
Achieving precise and accurate cuts on a table saw relies heavily on properly adjusting the fence. The fence serves as a guide, ensuring the workpiece remains parallel to the blade during cutting. By correctly adjusting the table saw fence, woodworkers can achieve consistent and accurate results in their woodworking projects.
The table saw fence plays a vital role in maintaining the accuracy and consistency of cuts on a table saw. An improperly adjusted fence can result in crooked cuts, uneven edges, or safety hazards. By understanding the significance of adjusting the table saw fence correctly, woodworkers can achieve clean, precise, and accurate cuts.
This overview will cover the essential steps in adjusting the table saw fence to ensure accuracy and improve the quality of your woodworking projects.
Fence Alignment
Begin by turning off and unplugging the table saw for safety. Place a reliable straightedge, such as a long level or a precision straightedge, against the fence and parallel to the saw blade.
Check for any gaps or misalignments between the fence and the straightedge. Adjustments are typically made using alignment screws or bolts on the fence assembly.
Squaring the Fence to the Blade
To ensure square cuts, it is crucial to square the fence to the saw blade. Ensure that the square is in contact with both the blade and the fence simultaneously. Adjust the fence position until it is perfectly square to the blade. Double-check the alignment after making adjustments to ensure accuracy.
Locking Mechanism
Once the fence is properly aligned and squared, securely lock it in position using the locking mechanism provided on your table saw. This ensures that the fence remains stable and does not shift during cutting.
Test Cuts and Fine-Tuning
After adjusting and locking the fence
- Perform test cuts on scrap wood to verify the accuracy of your set-up.
- Evaluate the quality of the cuts, ensuring they are straight, parallel, and free from any irregularities.
- Make minor adjustments to the fence alignment or squareness based on the test cuts if necessary.
- Repeat the test cuts until you achieve the desired accuracy and precision.
Properly adjusting the table saw fence is essential for achieving accurate and precise cuts in woodworking projects. Woodworkers can improve the accuracy and quality of their cuts by following the steps outlined above, including aligning the fence, squaring it to the blade, and securely locking it in position.
Regularly checking and adjusting the fence alignment will ensure consistent results and enhance overall safety. With a properly adjusted fence, woodworkers can confidently tackle their projects, knowing their cuts will be precise and high-quality.
Selecting the appropriate blade for the cut
Selecting the appropriate blade for your table saw is critical in achieving successful and precise cuts. Each blade type is designed for specific materials and cutting applications, and using the wrong blade can lead to poor results, including splintering, burning, or even blade damage.
Woodworkers can ensure clean cuts and enhance their overall woodworking experience by understanding the factors involved in selecting the right blade. This overview will cover the key considerations when choosing a blade and provide guidance on selecting the appropriate blade for different cutting tasks.
Blade Types and Teeth Configurations
Familiarize yourself with the different blade types available for table saws, such as rip-cut, crosscut, combination, and specialized blades for specific materials. Each blade type has its own tooth configuration designed for optimal performance in specific cutting applications.
Rip-cut blades typically have fewer teeth and larger gullets for fast and efficient ripping, while crosscut blades have more teeth and smaller gullets for clean crosscuts.
Combination blades are versatile and suitable for a variety of cuts. Select a blade with the appropriate tooth count and configuration based on the type of cut you need to make.
Material Compatibility
Blades with carbide-tipped teeth are suitable for cutting hardwoods, while blades with high-speed steel (HSS) teeth are better suited for cutting softer woods or non-ferrous metals.
Specialized blades are also available for cutting materials like plywood, laminates, plastics, or composite materials. Choose a blade specifically designed for the material you are working with to achieve optimal results.
Tooth Configuration and Grind
Consider the tooth configuration and grind of the blade. Alternate-top bevel (ATB) teeth are versatile and suitable for most woodworking applications, while flat-top grind (FTG) teeth are more aggressive and better suited for ripping.
Additionally, some blades feature specialty grinds like triple-chip grind (TCG) or combination tooth configurations for specific cutting needs. Choose the tooth configuration and grind that best matches your cutting requirements.
Safety Considerations
Ensure the selected blade is appropriate for the table saw’s maximum RPM rating and arbor size. Using a blade with incorrect specifications can lead to safety hazards and potential damage to the saw.
Selecting the appropriate blade for your table saw is critical to achieving clean, accurate, and efficient cuts in woodworking projects. By considering factors such as blade type, tooth configuration, material compatibility, blade diameter, and safety specifications, woodworkers can choose the right blade for their specific cutting applications.
Measuring and marking the desired 45-degree angle on the workpiece
Accurately measuring and marking a 45-degree angle on a workpiece is crucial for achieving precise and symmetrical cuts in woodworking projects. Whether you’re creating bevels, mitered corners, or angled joints, properly marking the desired angle ensures consistency and enhances the overall aesthetics of the finished piece.
Measuring and marking the desired 45-degree angle on the workpiece is essential in woodworking, particularly when creating bevels, mitered corners, or angled joints. Your markings’ accuracy directly affects the final product’s quality and fit.
Woodworkers can achieve precise and symmetrical cuts by understanding the techniques involved in measuring and marking a 45-degree angle. This overview will cover the key steps in the process, ensuring that your workpieces are marked correctly and ready for accurate cutting.
Determine the Reference Edge
Identify the reference edge of your workpiece. This is the edge against which you will measure and mark the 45-degree angle. Ensure the reference edge is straight and smooth to facilitate accurate measurements.
Use a Combination Square or Protractor
If you have a combination square with a protractor head, set it to a 45-degree angle. Place the combination square’s reference edge against the reference edge of the workpiece, aligning it with the desired starting point of the angle.
Ensure the square blade rests flat against the workpiece, then mark the desired angle along the blade. If you don’t have a combination square, a protractor can be used similarly to measure and mark the angle accurately.

Employ a Bevel Gauge
Another tool you can use is a bevel gauge. Set the bevel gauge to a 45-degree angle. Place the gauge’s reference face against the reference edge of the workpiece, aligning it with the starting point of the angle. Slide the gauge along the edge, allowing the blade to follow the contour of the workpiece while marking the desired angle with a pencil or a marking knife.
Use a Miter Saw or Miter Gauge
If you have a miter or table saw equipped with a miter gauge, you can set them to a 45-degree angle and make the cut directly. Ensure that the workpiece is securely held against the fence or miter gauge, aligning the reference edge with the appropriate guide. Once the angle is set, cut according to the marked line.
Double-Check the Markings
Before proceeding with cutting, double-check the accuracy of your markings by visually inspecting them. Ensure that the marked line is straight and aligned with the desired 45-degree angle. It’s always better to be cautious and verify the markings to avoid errors.
Measuring and marking the desired 45-degree angle on the workpiece is critical in achieving accurate and symmetrical cuts in woodworking projects. Using tools like combination squares, protractors, bevel gauges, or miter saws, woodworkers can accurately mark the angle and prepare the workpiece for precise cutting.
Remember to double-check your markings before proceeding with the cuts to ensure accuracy. By mastering this skill, you’ll be able to create clean, well-fitting bevels, mitered corners, or angled joints, resulting in professional-looking woodworking projects.
Using a protractor or a bevel gauge for accuracy
When it comes to achieving precise and accurate angles in woodworking, using the right tools is essential. Protractors and bevel gauges are valuable instruments for measuring and replicating angles precisely.
Woodworkers can ensure accuracy in their angle measurements and achieve consistent results by understanding how to use a protractor or a bevel gauge effectively.
When aiming for accuracy in woodworking, it’s important to have reliable tools at your disposal. Protractors and bevel gauges are valuable tools that enable woodworkers to measure and reproduce angles precisely.
These instruments play a crucial role in achieving consistency and accuracy in angle measurements. Woodworkers can confidently measure angles and replicate them accurately in their woodworking projects by understanding the proper techniques for using a protractor or a bevel gauge.
Understanding Protractors
Protractors are semi-circular tools typically made of plastic or metal, marked with degree graduations from 0 to 180 degrees. They allow for measuring and replicating angles. Align one of the protractor’s arms with one side of the angle and read the degree measurement where the other side of the angle intersects the protractor’s graduations.
For replicating angles, position the protractor as before, align the desired degree measurement on the protractor with the reference line, and trace along the other arm to mark the angle accurately.
Utilizing Bevel Gauges
Bevel gauges are versatile tools commonly used for measuring and transferring angles. They consist of an adjustable blade or stock set to various angles. To measure an angle using a bevel gauge, set the blade to the desired angle by loosening the locking mechanism and adjusting it accordingly.
Place the bevel gauge against the angle you want to measure, aligning the blade with one side and the stock with the other. Tighten the locking mechanism to secure the blade in place. Read the angle measurement indicated on the bevel gauge for the desired angle.
For transferring an angle, set the bevel gauge to the measured angle and trace along the blade or stock onto the workpiece to mark the angle accurately.
Verifying Accuracy
When using either a protractor or a bevel gauge, it is crucial to verify the accuracy of your measurements. Double-check the alignment of the tool with the reference lines or sides of the angle.
Ensure the tool is firmly in place and the measurements align with your desired angle. Make adjustments to achieve the desired accuracy before marking or cutting.
Considerations for Accuracy
When using protractors or bevel gauges, ensure you have good lighting to see the angle graduations clearly. Keep the tools clean and free from debris that may hinder accurate measurements.
Additionally, when transferring angles, use a sharp pencil or marking knife to ensure precise and visible markings on the workpiece.
Using a protractor or a bevel gauge is essential for achieving accurate angle measurements in woodworking. ‘
Woodworkers can ensure precision and consistency in their angle markings and achieve accurate cuts and joints in their projects by understanding the steps involved in using these tools.
Remember to verify the accuracy of your measurements and consider the lighting and cleanliness of the tools for optimal results.
Knowing how to effectively use a protractor or a bevel gauge, you can confidently tackle your woodworking tasks, knowing that your angle measurements will be accurate and your projects will turn out with precision.