

If you’ve ever tackled a home improvement project that involved adding a touch of elegance to your living space, you’ve likely come across trim. Whether framing a door window or beautifying the corners of a room, trim is the finishing touch that can make a significant difference.
This step-by-step tutorial will explore the basics of using a miter saw to cut trim with precision and finesse. So, if you’re ready to enhance your DIY skills and give your home a polished look, let’s dive into the world of “how to cut trim with a miter saw.”
Understanding Trim and Miter Saws
Trim Saw:
- Small and Lightweight: Trim saws are typically reduced and lightweight, making them simple to move and ideal for delicate woodworking tasks.
- Fine-Toothed Blade: These saws often come with fine-toothed blades, which produce smooth and splinter-free cuts on delicate trim and molding.
- Miter Cutting: Trim saws can make miter cuts at various angles, allowing for precise joinery in corners and angled trim work.
- Straight Cuts: They excel at making straight, accurate cuts in narrow and small workpieces, such as door casing, baseboards, and crown molding.
- Portability: Due to their size and weight, trim saws are highly portable and suitable for both job site and workshop use.
Miter Saw:
- Larger Cutting Capacity: Miter saws are available in various sizes, with larger cutting capacities than trim saws. This makes them suitable for cutting more extensive stock, such as 2x4s and lumber.
- Miter and Bevel Adjustments: Miter saws can make precise miter cuts by rotating the blade left or right and bevel cuts by tilting the blade. This versatility allows for various angled cuts.
- Accurate and Quick Crosscuts: They excel at accurate crosscuts, making them ideal for tasks like framing, cabinetry, and furniture. The inclusion of positive stops at joint angles simplifies the setup.
- Compound Cuts: Some miter saws can make compound cuts, combining miter and bevel angles. This is useful for intricate joinery and crown molding installation.
- Dust Collection: Many miter saws feature effective dust collection systems to clean the workspace.
Trim saws are designed for precision and detail work, often used for trimming and molding applications where accuracy and finesse are paramount. On the other hand, miter saws offer larger cutting capacities, versatility in making various angled cuts, and are suitable for both crosscuts and miter cuts in more extensive materials. The choice between the two depends on the tasks and materials you work with in your woodworking or construction projects.
Safety Precautions while Cutting Trim with a Miter Saw
Cutting trim with a miter saw requires careful attention to safety to prevent accidents and ensure precise, clean cuts. Here are essential safety precautions to follow:

- Read the Manual: Get to know the client manual of your miter saw to understand its specific safety features and guidelines.
- Inspect the Saw: Before use, inspect the miter saw for any visible damage, loose parts, or worn-out components. Ensure that all safety features, including blade guards, are correctly working.
- Secure the Workpiece: Always firmly secure the trim piece against the saw’s fence and table using clamps or other appropriate methods. This prevents the trim from moving during the cut.
- Maintain Proper Clearance: Ensure ample space around the miter saw to maneuver the trim and avoid obstacles. Clear the work area of any loose objects, cords, or debris that may interfere with the cutting process.
- Position Yourself Correctly: Stand to the side of the miter saw, never directly in line with the blade’s path. This minimizes the risk of injury if the trim piece were to kick back.
- Use a Push Stick: When making cuts on shorter trim pieces or when your hand might get too close to the blade, employ a push stick or push block to direct the workpiece. Maintain a safe distance between your hand and the blade.
- Avoid Loose Clothing and Jewelry: Wear fitted clothing to prevent it from getting caught in the saw’s moving parts. Remove jewelry or accessories that could pose a safety hazard.
- Keep Hands Clear: Never place your hands in the blade’s path while it’s in motion. Wait for the blade to come to a complete stop before making any adjustments or removing cut pieces.
- Use a Blade Guard: Ensure the blade guard is in place and functioning correctly. The guard should retract as you lower the blade and cover the blade when it’s in an upright position.
- Miter and Bevel Locks: Double-check that the miter and bevel locks are securely placed before making cuts. Loose locks can result in accurate and safe cuts.
- Proper Lighting: Adequate lighting is crucial to see the trim piece’s markings and the cutting path. More lighting can lead to accurate cuts and accidents.
- Support Long Trim Pieces: For longer trim pieces, use supports, such as roller stands or sawhorses, to prevent the trim from sagging or falling during the cut.
- Unplug After Use: Unplug the miter saw or turn off the power source once you finish your work. This prevents accidental startups when not in use.
By following these safety precautions and using your miter saw carefully, you can ensure safe and accurate trim cutting for your woodworking projects. Always prioritize safety in your workshop to prevent accidents and injuries.
Choosing the Right Trim and Materials
Selecting the proper trim and materials is crucial for achieving the desired look and durability in your woodworking or construction project. Here’s a guide to help you make informed choices:
Trim Types:
- Baseboard Trim: Used at the base of walls where they meet the floor, baseboard trim adds a finished look and covers gaps.
- Casing Trim: Casing is applied around doors and windows to frame and finish the openings.
- Crown Molding: Crown molding is used at the junction between walls and ceilings to add elegance and detail.
- Chair Rail: Chair rail trim is installed horizontally on walls to protect them from chair backs and to add visual interest.
- Picture Rail: Picture rail trim is mounted higher on walls and is used to hang pictures and artwork without damaging the wall.
Materials:
- Wood: Commonly used for trim due to its versatility, ease of customization, and traditional appearance. Woods like pine, oak, and poplar are popular choices.
- MDF (Medium-Density Fiberboard): MDF is a cost-effective and smooth option that can be painted to achieve a seamless finish. Solid wood is more durable than solid wood but works well for interior trim.
- Polyurethane: Polyurethane trim is lightweight, durable, and moisture-resistant, making it suitable for exterior use. It’s often molded to mimic the appearance of wood.
- PVC (Polyvinyl Chloride): PVC trim is a low-maintenance, rot-resistant option for exterior applications. It’s available in various profiles and can be painted.
- Composite: Composite trim combines wood fibers and resins for durability and resistance to moisture. It tends to be painted or finished to look like wood.
Considerations:
- Style and Aesthetic: Choose trim profiles and materials that complement your project’s architectural style and design. Different trim styles can evoke a traditional, modern, or ornate appearance.
- Budget: Consider your budget when selecting trim materials. Solid wood tends to be more expensive, while MDF and PVC are more budget-friendly.
- Durability: Assess the location of the trim. Interior trim may require a different level of durability than exterior trim, which needs to withstand weather conditions.
- Ease of Maintenance: Consider how much maintenance you will commit to. PVC and composite trim require less maintenance than wood.
- Painting and Finishing: Some materials, like MDF and PVC, are excellent for paint finishes, while wood offers the flexibility of staining or painting.
- Moisture Resistance: For areas prone to moisture exposure, such as bathrooms or kitchens, choose materials resistant to rot and swelling, like PVC or composite.
- Environmental Impact: If sustainability is a concern, research eco-friendly trim materials and those with low VOC (volatile organic compound) emissions.
- Installation Ease: Some materials, like PVC and MDF, are more accessible to work with due to their uniformity and ease of cutting.
Before making a final decision, consider your project’s specific requirements and aesthetics. Balancing your budget, style preferences, and functional needs will help you choose the proper trim and materials for a successful and visually appealing outcome.
Setting Up Your Miter Saw for Cutting Trim
Setting up your miter saw for cutting trim involves several steps to ensure accurate and precise cuts. Here’s a step-by-step guide to help you get your miter saw ready for trim work:
Tools and Materials:
- Miter saw
- Safety glasses and hearing protection
- Trim pieces
- Measuring tape
- Pencil or marking tool
- Miter saw stand or workbench
- Clamps (optional but helpful)
Steps:
Safety First:
- Begin by putting on safety glasses and hearing protection.
- Continuously focus on well-being while working with power instruments.
Select the Right Blade:
- Install the appropriate blade in your miter saw. A fine-toothed crosscutting blade or a finish blade is ideal for trim work. Make sure that the cutting edge is sharp and in great shape.
Set Up Your Work Area:
- Place your miter saw on a stable work surface, such as a miter saw stand or a sturdy workbench.
- Ensure there’s adequate lighting to see your cut lines.
Adjust the Miter Angle:
- If you need to make angled cuts (miter cuts), adjust the miter angle on the saw to the desired degree. Use a protractor or the built-in angle gauge on the saw for accuracy.
- Many miter saws have positive stops at joint angles like 45 degrees for standard miter cuts.
Adjust the Bevel Angle (if necessary):
- If your trim work requires bevel cuts (angled cuts along the thickness of the trim), adjust the bevel angle on the saw to the desired degree.
- Secure the bevel lock after adjusting.
Mark Your Trim Pieces:
- Measure and mark the trim pieces where you want to make your cuts. Use a measuring tape, pencil, and a square to ensure precise measurements and angles.
- Make sure your marks are clear and accurate, especially for angled cuts.
Position and Secure the Trim:
- Place the marked trim piece flat on the miter saw’s base or fence, depending on your saw’s design.
- Use clamps to secure the trim to prevent it from moving during the cut if needed.
Safety Checks:
- Double-check that the trim is securely positioned and aligned with your cut marks.
- Ensure that your hands and fingers are clear of the blade path.
Make the Cut:
- Start the miter saw and allow the blade to reach full speed.
- Slowly and steadily lower the blade onto the trim piece, following your marked cut line.
- Keep your hands on the saw’s handles and maintain control throughout the cut.
- After the cut is complete, release the trigger and allow the blade to come to a complete stop before raising it.
Inspect Your Cut:
- Examine the cut edge to ensure it’s clean, straight, and accurate. Make any necessary adjustments and recut if needed.
Repeat for Additional Cuts:
- Continue the process for all the trim pieces, measuring and marking each one accurately.
Clean Up:
- Clear the work area of any trim scraps and sawdust.
Following these steps, you can set up your miter saw for cutting trim precisely and confidently. Proper setup and careful measurements are vital to achieving clean, professional-looking trim installations.
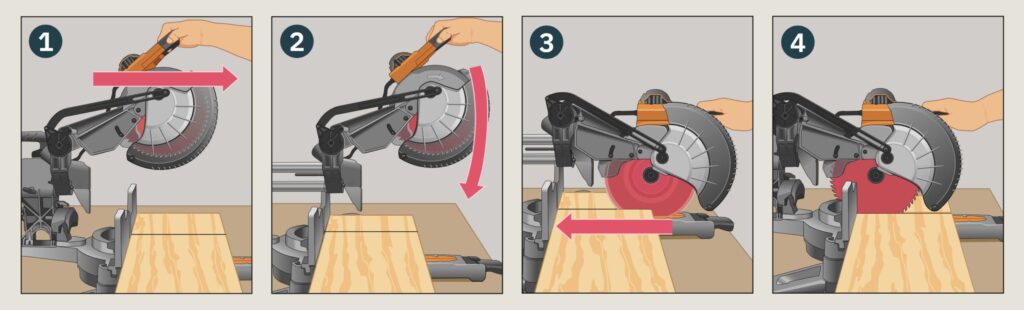
Making Basic Trim Cuts
Making basic trim cuts using a miter saw is a fundamental skill in finish carpentry and woodworking. To begin, prioritize safety by wearing safety glasses and hearing protection.
Ensure your miter saw is equipped with the right blade—a fine-toothed crosscutting blade or finish blade suitable for trim work—and confirm its sharpness.
Set up your work area on a stable surface with good lighting for clear visibility. Measure and mark the trim pieces precisely where you intend to cut, using a measuring tape, pencil, and square for accuracy.
Position the trim on the saw’s base or fence, aligning it with your marks. Double-check the security of the trim and the clearance of your hands from the blade path.
Start the saw, gently lower the blade onto the trim following your marked line, and maintain a controlled motion throughout the cut. Inspect the cut edge for cleanliness and alignment, making any necessary adjustments for perfection.
Repeat these steps for all trim pieces, maintaining precise measurements and attention to detail, and finally, clear your workspace of trim scraps and sawdust for safety and tidiness.
Cutting Angles for Corners
Cutting angles for corners, whether they are inside or outside corners, is a critical skill for achieving polished and precise joints when working with trim or molding.
To begin, measure the angle between the two walls where the trim will meet, halving it to find the angle for each piece. For inside corners, typically measuring less than 90 degrees, the calculated angle is marked on the trim and cut accordingly.
The pieces should fit snugly when joined at the inside corner. Conversely, outside corners, typically exceeding 90 degrees, require halving the angle, marking the trim, and making precise cuts to ensure a tight fit at the corner.
Whether inside or outside, the key is accurate measurement, marking, and precise cutting, ensuring a seamless and professional finish in your woodworking or home improvement projects.
Creating Compound Miter Cuts
Creating compound miter cuts in woodworking allows for intricate joints and decorative moldings, making it a valuable skill in the craft. Start by ensuring safety with appropriate gear, such as safety glasses and hearing protection. Determine the compound angles required for your project, including the miter (horizontal) and bevel (vertical) angles.
Mark these angles precisely on your trim or molding pieces using measuring tools and an angle finder. Set up your miter saw accordingly, adjusting the miter and bevel angles as marked. Secure the trim piece in place and make the compound cut, maintaining a steady and controlled motion throughout. Test the fit of the cut pieces to ensure they align perfectly with the intended joint or molding profile.
Repeat the process for all pieces needing compound miter cuts, and keep your workspace tidy by cleaning up trim scraps and sawdust. This skill is essential for advanced woodworking projects, where precise measurement, marking, and cutting are crucial for achieving seamless and intricate compound miter joints and decorative elements.
Techniques for Sanding and Finishing Your Trim Pieces
Sanding:
- Inspect the Trim: Begin by inspecting your trim pieces for any imperfections, such as rough spots, knots, or gaps.
- Select the Right Grit: Choose the appropriate grit of sandpaper based on the condition of the trim:
- Coarse grit (60-80) for heavy sanding to remove imperfections.
- Medium grit (120-150) for general sanding and smoothing.
- Fine grit (180-220) for final smoothing and preparation for finishing.
- Sand with the Grain: Always sand toward the wood grain to keep away from scratches or cross-grain marks. Utilize a sanding block or wipe to guarantee even pressure and prevent uneven sanding.
- Progressive Sanding: Start with a coarse grit and work to finer grits. For example, begin with 80-grit, then move to 120-grit, and finish with 180-grit or higher. This gradual progression ensures a smoother surface.
- Focus on Imperfections: Pay extra attention to imperfections, such as knots or nail holes. Use wood filler and a clay blade to fill gaps and holes, and sand these areas once the filler has dried.
- Remove Dust: Wipe the trim pieces with an attached material to eliminate any residue or garbage after sanding.
Finishing:
- Choose Your Finish: Decide whether to paint or stain your trim pieces. Paint provides a solid color, while stain enhances the natural wood grain.
- Apply Primer (if painting): If you plan to paint the trim, apply a primer coat to ensure better paint adhesion and a smoother finish. Permit it to dry as indicated by the producer’s guidelines.
- Paint or Stain: Apply your chosen paint or stain evenly using paintbrushes or foam brushes. Work toward the wood grain and apply multiple thin coats for better coverage and durability.
- Allow Drying Time: Follow the recommended drying times between coats, which can vary depending on the type of paint or stain you’re using.
- Apply Protective Finish: Consider applying a protective finish such as polyurethane or clear coat once the paint or stain is dry. This helps protect the trim and gives it a glossy or satin sheen.
- Follow Manufacturer Instructions: Follow the manufacturer’s recommendations for the specific finish you’re using, including drying times and application methods.
- Inspect and Touch-Up: After finishing, inspect your trim for imperfections or uneven areas. Touch up as needed and allow for final drying time.
Following these sanding and finishing techniques ensures that your trim pieces are smooth, uniform, and visually appealing. Whether you paint or stain, the proper preparation and attention to detail will result in a professional-looking finish for your woodworking or home improvement project.
Conclusion
Cutting trim with a miter saw is fundamental for achieving clean, precise, and professional-looking finishes in various woodworking and home improvement projects. By following the steps outlined in this guide, from selecting the right miter saw and blade to measuring and setting the correct angles, woodworkers and DIY enthusiasts can achieve accurate trim cuts that enhance the aesthetics and value of their work.
Remember to prioritize safety by wearing the appropriate protective gear and following best practices for the miter saw operation. With practice and attention to detail, mastering the art of cutting trim with a miter saw can elevate the quality of your projects and provide the satisfaction of achieving flawless, seamless trim installations.