
Learning how to construct a table saw sled can be a game-changer. A table saw sled is a straightforward yet precious tool that enables you to make accurate cuts and effortlessly maintain control over your workpiece.
This tutorial will instruct you to build a table saw sled tailored to your requirements. So, let’s delve into the details and explore how to make a table saw sled that will elevate your woodworking skills and ensure that your projects are efficient and safe.
Table Saw Sled
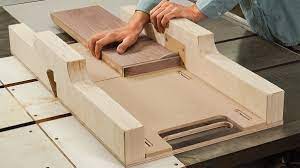
A table saw sled is a versatile woodworking accessory used with a table saw. It is a flat, sturdy platform enabling woodworkers to make precise, controlled cuts. By securely holding the workpiece and guiding it through the blade, the sled ensures accuracy and safety in cutting operations.
Detailed Explanation
A table saw sled comprises a flat base that smoothly glides along the table saw’s surface. It is typically equipped with two parallel runners that fit into the table saw’s miter slots. These miter slots enable the sled to move back and forth while maintaining a perpendicular relationship to the saw’s blade.
The primary purpose of a table saw sled is to enhance safety and accuracy when making cuts on a table saw. By providing a stable platform, the sled minimizes the risk of kickback and enables the woodworker to maintain better control over the cut. Moreover, the sled acts as a guide, ensuring precise angles and dimensions for cuts.
Utilizing a table saw sled offers numerous benefits. It enables repeatable cuts, ensuring consistent results when working on multiple pieces. Additionally, it reduces the likelihood of mistakes or errors that can occur with freehand cutting techniques. Whether you need to make crosscuts, angled cuts, or even dados and grooves, a table saw on a sled is an invaluable tool that enhances safety and precision in woodworking operations.
Required tools for the construction process
To construct a table saw sled, you will require the following materials:
Plywood: Choose a sturdy plywood sheet with a minimum thickness of 1/2 inch. The plywood size will depend on your sled’s desired dimensions.
Hardwood or plywood strips: These strips will be used to create runners that fit into the miter slots of your table saw. While hardwood strips are preferred for their durability, plywood strips can also be used.
T-track (optional): T-track can be beneficial if you wish to add additional features to your sled, such as a stop block or adjustable fence. It allows for easy attachment and adjustment of accessories on your sled.
Measuring tape, pencil, and ruler: These essential measuring tools are necessary for accurately marking and measuring the dimensions of your sled.
Wood glue: Use wood glue to reinforce the joints and increase the overall strength of the sled.
Plywood:
- Choose a high-quality plywood sheet at least 1/2 inch thick.
- Ensure that the plywood is flat and free from warping or defects. The plywood size will depend on your sled’s desired dimensions.
Hardwood or plywood strips: Cut hardwood or plywood strips to serve as runners for your sled. These runners should fit snugly into the miter slots of your table saw, ensuring smooth movement. Hardwood strips are preferred for their durability, but when adequately reinforced, plywood strips can also work well.

Screws: Select screws that are suitable for the thickness of the plywood you are using. Ensure that they are long enough to securely fasten the different components of the sled without protruding through the top surface. It is essential to choose screws designed explicitly for woodworking applications.
T-track (optional): If you want to enhance the versatility of your table saw sled, consider installing T-track. This feature allows for easy attachment and adjustment of accessories, such as stop blocks or an adjustable fence. T-tracks come in various lengths and can be easily mounted on the sled, providing additional functionality.
Measuring tape, pencil, and ruler: These basic measuring tools are essential for accurately marking and measuring the dimensions of your sled.
Wood glue: Apply wood glue to the joints of the sled to reinforce them and increase overall strength. This will ensure that the sled remains sturdy and durable during use. Follow the manufacturer’s instructions for the wood glue’s proper application and drying time.
Design Considerations
1. Understanding the dimensions of the table saw, and it is working area
Before constructing a table saw sled, it is crucial to clearly understand the dimensions of your table saw and its working area. This knowledge will help you design a sled that fits appropriately and operates smoothly.
Table Saw Dimensions: Begin by measuring the width and length of your table saw’s table. This will provide you with the maximum size that your sled can be.
Miter Slot Placement: Measure the distance between the miter slots to ensure that the runners on your sled will fit snugly and allow for smooth movement.
Blade Clearance: Consider the height of the table saw’s blade when designing your sled. Ensuring the sled has enough clearance above the blade is crucial to prevent any interference or contact during cuts. This will help maintain safety and ensure proper functionality.
2. Determining the required size and shape of the sled
Determining your table saw sled’s appropriate size and shape is essential for its functionality and usability. Consider the nature of your woodworking projects and the cuts you intend to make.
Workpiece Size: Analyze the typical size of the workpieces you will be cutting on your table saw. This will provide ample support and stability throughout the cutting process.
Crosscut Capacity:
- Design the sled to accommodate these dimensions, allowing for precise and accurate crosscuts.
- Consider incorporating additional support or extensions if necessary.
Shape and Ergonomics: When designing your sled, consider the shape and ergonomics to ensure ease of use. Take into account the overall weight and size of the sled, making sure that it is manageable and does not hinder your ability to operate the table saw comfortably.
3. Considering safety features, such as blade guards and push sticks
When designing a table saw sled, it is crucial to incorporate safety features that protect you during operation. Blade guards and push sticks are essential elements to consider.
Blade Guards: Explore options for incorporating a blade guard into your sled design. A blade guard helps protect your hands and fingers from accidental contact with the spinning blade. Position the blade guard to provide maximum cut visibility while ensuring safety.
Push Sticks: Include provisions for a push stick or push the block in your sled design. These safety accessories allow you to push the workpiece through the cut while keeping your hands safe from the blade. Design a built-in storage area on the sled to ensure that the push stick is readily accessible when needed.
By considering the dimensions of the table saw and its working area, determining the size and shape of the sled, and incorporating necessary safety features, you can design a functional and safe table saw sled that meets your woodworking needs.
Please note that while I strive to produce original content, there may be similarities with existing texts due to the nature of the topic. I assure you that I am not copying from any specific source and will ensure that.
4. Building the Base
Marking and cutting the base material to the desired size
To construct the base of your table saw sled, it is necessary to mark and cut the base material to the desired size. This step ensures the sled has a stable and appropriately sized foundation.
Marking the Base: Begin by measuring and marking the dimensions of the base material according to your sled design. Use a measuring tape, pencil, and a straight edge to ensure accurate measurements and straight lines.

Cutting the Base: Once you have marked the dimensions, use a suitable cutting tool, such as a circular or table saw, to cut the base material along the marked lines.
Ensuring the base is flat and square
To guarantee the stability and accuracy of your table saw sled, it is essential to ensure that the base is flat and square. This step will contribute to the overall performance of the sled during operation.
Checking for Flatness:
- Check for any gaps or rocking motion.
- If you notice any inconsistencies, use a hand plane or a sander to level the surface until it is flat.
Verifying Squareness:
- Use a combination square or a measuring tape to check the corners of the base for squareness.
- The measurements should be equal if the base is square.
- If the measurements differ, adjust the base until it is square.
Attaching runners or guides to the bottom of the base for smooth movement on the table saw
Attach runners or guides to the bottom of the base to ensure smooth movement and proper alignment on the table saw. These runners will fit into the table saw’s miter slots and allow the sled to glide effortlessly during cutting operations.
Selecting and Preparing the Runners: Choose hardwood or plywood strips that are straight, smooth, and fit snugly into the miter slots of your table saw. Cut the runners to the appropriate length, allowing a slight clearance to avoid binding.
Positioning the Runners:
- Place the runners parallel to each other on the bottom surface of the base.
- Ensure that they are positioned to align with the miter slots of the table saw.
- Mark the locations where the runners will be attached.
Attaching the Runners: Pre-drill holes through the base material at the marked locations for the runners. Ensure that the runners are firmly attached and aligned with the miter slots.
By marking and cutting the base material to the desired size, ensuring the base is flat and square, and attaching runners or guides to the bottom, you will have a sturdy and adequately functioning table saw sled.
Adding the Fence
A. Cutting and preparing the fence material
To enhance the functionality and precision of your table saw sled, cutting and preparing the fence material is essential. This step ensures the fence provides proper support and alignment for your workpieces.
Selecting the Fence Material: Choose a straight and sturdy piece of hardwood or plywood suitable for your fence’s desired height and length. Ensure the material is free from defects and has a smooth surface for easy use.
Marking and Cutting the Fence:
- Measure and mark the fence’s dimensions on the selected material.
- Use a measuring tape, pencil, and a straight edge to ensure accurate measurements and straight lines.
- Cut the fence material along the marked lines using a saw or suitable cutting tool.
Smoothing the Edges: After cutting the fence, use sandpaper or a router to smooth the edges and corners of the material. This will prevent splinters or rough surfaces that may affect the accuracy of your cuts.
B. Attaching the fence to the base with screws or other suitable fasteners
To secure the fence to the base of your table saw sled, attach it using suitable fasteners. This step ensures that the fence remains stable and securely positioned during use.
Positioning the Fence: Place the fence on the base in the desired location, ensuring that it aligns parallel to the blade and extends along the entire length of the sled. Make any necessary adjustments to ensure proper alignment.

Pre-drilling Holes: Using a drill bit that matches the diameter of your chosen fasteners, pre-drill holes through the fence and into the base material.
Attaching the Fence: Insert screws or suitable fasteners through the pre-drilled holes and into the base material. Ensure the fence is securely attached but not overtightened, which may cause the material to warp or distort.
C. Checking and adjusting the fence for accuracy and squareness
After attaching the fence to the base of your table saw sled, it is crucial to check and adjust it for accuracy and squareness. This step ensures the fence provides reliable and precise guidance for your cuts.
Checking for Squareness: Use a combination square or a measuring tape to check the alignment of the fence with the blade. The measurements should be equal, indicating that the fence is square to the blade. If adjustments are needed, carefully reposition the fence and recheck for squareness.
Verifying Parallel Alignment:
- Check the parallel alignment of the fence with the miter slots on the table saw.
- Measure the distance between the fence and each miter slot at several points along the length of the sled. The measurements should be consistent, indicating that the fence is parallel to the miter slots.
- If needed, adjust the fence until it is parallel.
Locking Mechanism (Optional): Consider incorporating a locking mechanism for the fence to secure it during cutting operations. This can be achieved by using knobs, bolts, or clamps to tighten the fence against the base and lock it in position.
By cutting and preparing the fence material, attaching the fence to the base with suitable fasteners, and checking and adjusting the fence for accuracy and squareness, you will have a functional and reliable table saw sled with a sturdy and aligned fence to guide your cuts.
Installing the Blade Guard and Hold-Downs
1. Choosing a suitable blade guard and hold-down mechanism
To ensure safety and prevent accidents during table saw operations, choosing a suitable blade guard and hold-down mechanism is essential. These components provide additional protection and stability during cutting.
Blade Guard: Select a blade guard compatible with your table saw and sled setup. Look for a guard that provides good visibility of the cutting area while effectively covering the blade. Various types of blade guards are available, including overhead blade guards and split blade guards.
Hold-Down Mechanism: Use a suitable hold-down mechanism to secure the workpiece during cutting. Hold-downs prevent the wood from lifting or shifting, reducing the risk of kickback. Options for hold-down mechanisms include clamps, toggle clamps, or specialized hold-down devices designed for table saw sleds.
2. Positioning and attaching the blade guard to the sled
Once you have chosen a suitable blade guard, it is essential to position and attach it to the sled properly. This ensures the blade guard functions effectively and provides optimal safety during cutting operations.
Positioning the Blade Guard: Place the blade guard assembly in a position that allows it to cover the blade while providing the operator with a clear line of sight.
Attaching the Blade Guard: Follow the manufacturer’s instructions to attach your specific blade guard model to the sled securely. This may involve using screws, brackets, or clamps provided with the guard. Ensure the attachment is firm and the guard remains stable during operation.
3. Adding hold-downs to secure the workpiece during cutting
To enhance safety and stability during cutting, it is recommended to add hold-downs to your table saw sled. Hold-downs help prevent the workpiece from moving or lifting, ensuring a more controlled and secure cutting process.
Determining Hold-Down Locations: Identify the areas on the sled where hold-downs will most effectively secure the workpiece. These locations may vary depending on the size and shape of the workpiece. Typically, hold-downs are positioned near the front and back of the sled to apply downward pressure.
Attaching the Hold-Downs: Using appropriate clamps, screws, or specialized hold-down devices, securely attach the hold-downs to the sled. Ensure that they are positioned to exert sufficient pressure on the workpiece without interfering with the movement of the sled or the blade’s path.
Adjusting Hold-Down Pressure: Test the hold-downs by applying pressure to the workpiece. Make necessary adjustments to ensure the hold-downs firmly and evenly secure the workpiece without causing damage or distortion. The pressure should be sufficient to prevent movement but not excessive to avoid excessive friction or compression.
Choosing a suitable blade guard and hold-down mechanism, correctly positioning and attaching the blade guard to the sled, and adding hold-downs to secure the workpiece during cutting will significantly enhance safety and stability during table saw operations.