
How to make a table saw? This will never be boring next time. Building a table saw from scratch can be a rewarding and cost-effective option if you’re a woodworking enthusiast looking to expand your tool collection.
Table saws are essential for woodworking projects, allowing you to make precise cuts and achieve professional results. While many tables saw models are available on the market, constructing your own can offer a unique sense of accomplishment and customization.
This guide will cover the components, tools, and techniques needed to build your table saw. We’ll discuss selecting the appropriate materials, assembling the various parts, and ensuring safety precautions are in place.
Whether an experienced woodworker or a beginner, learning how to make a table saw opens up a world of possibilities. By understanding the construction process and having a hands-on approach, you’ll gain a deeper appreciation for this versatile tool. So, let’s delve into the fascinating world of table saws and discover how you can create your very own.
Definition and purpose of a table saw
Understanding the definition and purpose of a table saw is essential for individuals interested in woodworking or contemplating using this versatile tool. In this section, we will clearly define a table saw and elucidate its primary purpose in woodworking projects.
A table saw is a potent and extensively employed woodworking tool comprising a flat surface, commonly referred to as the table, and a circular saw blade that extends through an opening in the table.
Its main objective is to facilitate precise and accurate cuts in various types of wood, enabling woodworkers to create straight cuts, angles, slopes, and more intricate shapes.
A table saw, also known as a sawbench or bench saw, represents a stationary power tool employed for cutting wood and other materials.
Typically, it consists of a horizontal work surface, the table, where the workpiece is positioned. The table saw incorporates a circular saw blade that extends above the table through an aperture known as the throat plate or insert.
Purpose of a Table Saw
The primary purpose of a table saw is to furnish woodworkers with a versatile and precise cutting apparatus. It empowers them to execute a broad spectrum of cuts, including rip cuts (cuts executed parallel to the wood grain), crosscuts (cuts executed perpendicular to the wood grain), mitre cuts (angled cuts), bevel cuts (cuts executed at an angle other than 90 degrees), and dado cuts (cuts that generate wide grooves or slots in the wood).
Table saws offer several advantages over other saw types
Accuracy: Table saws yield precise and consistent cuts through their stable work surface and ability to adjust cutting depth, angle, and fence position.
Versatility: Woodworkers can accomplish various cutting tasks with a table saw by adjusting the blade height, angle, and fence. This adaptability facilitates the creation of different joint types, shapes, and angles.
Efficiency: Table saws are engineered for efficiency and productivity. They effortlessly handle large workpieces and expedite repetitive cuts, economizing time and effort.
Safety: Modern table saws incorporate safety features such as blade guards, riving knives, and anti-kickback mechanisms, ensuring minimal risk of accidents and injuries. Strict adherence to proper safety practices is imperative when operating a table saw.
A table saw is a robust and versatile woodworking tool employed to execute precise cuts in wood and other materials. It aims to furnish woodworkers with an efficient and accurate cutting instrument for various woodworking projects.
Acquiring an understanding of the definition and purpose of a table saw is indispensable for individuals intrigued by woodworking or contemplating utilizing this tool in their projects.
Overview of the essential components
To successfully construct a table saw or comprehend its inner workings, it is crucial to have an overview of its essential components.
A table saw consists of several vital components that work together to ensure its functionality and safety. Understanding these components is essential for anyone interested in building or using a table saw effectively.
Table: The table is the flat surface of the table saw on which the workpiece is placed for cutting. It provides stability and support during the cutting process. Tables are typically made of materials like cast iron, aluminium, or steel, and they may have slots or mitre gauge channels to guide the workpiece.
Blade: A circular disc with sharp teeth is designed for cutting wood, plastic, or other materials. Choosing the right Blade for specific woodworking needs is essential.
Motor: Table saws commonly use electric motors, which vary in power and voltage based on the size and intended use of the saw. The Motor should be appropriately sized to ensure smooth and efficient cutting.
Fence: The fence is a critical component that acts as a guide for the workpiece during cutting. It provides a straight reference edge and ensures accurate and parallel cuts. Fences can be adjustable or fixed, allowing for different cutting widths and angles.
Miter Gauge: The mitre gauge is another guiding device that helps make angled cuts. It consists of a gauge head and a bar that fits into the mitre gauge slot on the table. The mitre gauge can be adjusted to various angles, allowing for precise crosscutting or mitring of the workpiece.
Arbor and Trunnions: The arbour is the shaft upon which the saw blade is mounted. The Motor drives it and is responsible for the Blade’s rotation. Trunnions secure the arbour and allow for adjustments in the Blade’s height and angle.
Safety Features: Modern table saws incorporate various safety features to protect the user during operation. These features may include blade guards, riving knives, anti-kickback pawls, and emergency stop switches. It is essential to prioritize safety when building or using a table saw.
Understanding the essential components of a table saw is crucial for building and using one effectively. The table, Blade, Motor, fence, mitre gauge, arbour, trunnions, and safety features are key elements that contribute to the functionality and safety of a table saw.

Required tools for construction
Knowing the essential tools required for constructing a table saw is crucial for individuals interested in building their own. This section will provide a comprehensive list of the necessary tools for the construction process.
Constructing a table saw requires a specific set of tools to ensure accuracy, efficiency, and safety throughout construction. You can work effectively and achieve the desired results with the appropriate tools.
Tools required for constructing a table saw
Circular Saw: It is a powerful tool that will be utilized for cutting various materials, including plywood or other materials employed for the table and other components.
Power Drill: A power drill equipped with drill bits is necessary to drill holes for screws, attach components, and create precise openings for various table saw parts.
Screwdriver Set: A set of screwdrivers, encompassing both flathead and Phillips head screwdrivers, will be needed to assemble various table saw components.
Wrench Set: Wrenches will be indispensable for tightening and adjusting nuts, bolts, and other fasteners utilized in the construction process.
Measuring Tools: Accurate measurements are critical in building a table saw. Tools such as a tape measure, a combination square, and a straightedge will ensure precise dimensions and alignment.
Clamps: Clamps are essential for securing components in place during assembly, guaranteeing stability and precise alignment.
Safety Equipment: Prioritizing safety is paramount during the construction process.
Workbench or Sawhorses: A sturdy workbench or a set of sawhorses will provide a stable surface to work on and support the weight of the table saw components during construction.
Level: A level will help ensure that the table and other components are correctly aligned, providing stability and accurate cuts.
Additional Tools: Depending on the specific design and features incorporated into the table saw, additional tools such as a router, chisels, files, or sandpaper may be necessary for fine-tuning and finishing touches.
Constructing a table saw requires specific tools to ensure precision, efficiency, and safety. A circular saw, power drill, screwdriver set, wrench set, measuring tools, clamps, safety equipment, workbench or sawhorses, level, and other specialized tools will enable successful construction. You can ensure a smooth construction process and achieve a functional and reliable table saw by possessing the necessary tools.
Determining the size and specifications
Determining the size and specifications of a table saw is a crucial step in the construction process. By understanding the factors involved in selecting the appropriate size and specifications; you can ensure that your table saw meets your specific needs.
Selecting the right size and specifications for your table saw is essential for achieving optimal performance and meeting your woodworking requirements.
Workspace Considerations: Begin by assessing the available space in your workshop or designated area for the table saw.
Types of Projects: Consider the woodworking projects you typically undertake or plan to undertake. A compact or portable table saw may suffice if you primarily work on smaller projects. However, if you frequently handle larger materials or need to cut large sheets of plywood, a larger table size and a more powerful motor may be necessary.
Cutting Capacity: Evaluate the maximum cutting capacity you require. This involves determining the maximum width and depth of the materials you need to cut. Ensure that the table saw can accommodate the size of the workpieces you typically work with.
Motor Power: Determine the required motor power based on the materials you will be cutting and your cutting techniques. Thicker and denser materials and certain cutting techniques like dado cuts or bevel cuts may require a more powerful motor. Consider the horsepower (HP) rating of the Motor and match it to your specific needs.
Blade Size and Adjustability: Choose an appropriate blade size for your table saw. Common blade sizes for table saws range from 8 to 12 inches in diameter. Additionally, consider the Blade’s adjustability for height and angle to ensure versatility in your cutting tasks.
Additional Features: Consider any additional features you may require based on your woodworking needs. This may include a rip fence for accurate rip cuts, a mitre gauge for angled cuts, a dust collection system for improved cleanliness, or a mobile base for portability.
Budget: Establish a budget for your table saw construction project. Balancing your budget with the desired size and specifications is important to ensure a cost-effective build.
Determining the size and specifications of a table saw involves considering factors such as available workspace, the types of projects you undertake, cutting capacity, motor power, blade size and adjustability, additional features, and your budget.
Understanding the functionality and features
Understanding the functionality and features of a table saw is essential for individuals interested in building or using this versatile woodworking tool. In this section, we will explain the functionality and key features of a table saw, enabling you to make informed decisions and utilize its capabilities effectively.
By understanding its functionality and features, you can harness the full potential of a table saw for various cutting tasks.
Cutting Capabilities: The primary functionality of a table saw is to make precise and accurate cuts in different types of wood and materials. It excels in various cutting techniques, including rip cuts (cuts made parallel to the wood grain), crosscuts (cuts made perpendicular to the wood grain), mitre cuts (angled cuts), and bevel cuts.
Adjustable Blade Height and Angle: This adjustability enables you to make cuts of different depths and angles, providing versatility and precision in your woodworking projects.
Fence System: A table saw often incorporates a fence system, a guiding device that runs parallel to the Blade and ensures straight and accurate cuts. The fence can be adjusted to different distances from the Blade, allowing you to achieve consistent and parallel cuts.
Miter Gauge: Another essential feature is the mitre gauge, which aids in making angled cuts. The mitre gauge consists of a head and a bar that fit into slots on the table saw. It can be adjusted to specific angles, facilitating precise crosscuts and mitred cuts.
Safety Features: Modern table saws have various safety features to protect users during operations. These features may include blade guards to cover the spinning blade, riving knives to prevent kickback, anti-kickback pawls from preventing the wood from being thrown back, and emergency stop switches for immediate shutdown in an emergency. Adhering to proper safety practices is crucial when using a table saw.
Dust Collection System: Many table saws have built-in dust collection systems or ports that allow you to connect a vacuum or dust collector. This feature helps to capture and remove sawdust and debris, keeping your workspace cleaner and improving visibility during cutting.
Accessory Compatibility: Table saws often have compatibility with various accessories and attachments, such as dado blade sets, moulding heads, and sledges, which expand the capabilities and functionality of the tool.
Table Extensions and Supports: Some table saw models feature extensions or supports that can be attached to increase the size of the table, providing additional support for larger workpieces.
Understanding the functionality and features of a table saw is crucial for effectively utilizing this woodworking tool. The cutting capabilities, adjustable blade height and angle, fence system, mitre gauge, safety features, dust collection system, accessory compatibility, table extensions and supports are key aspects that contribute to a table saw’s versatility, precision, and safety.

Incorporating support and stability features
Incorporating support and stability features is crucial when constructing a table saw. These features enhance safety, accuracy, and overall performance. In this section, we will explain the support and stability features that should be considered during the construction process.
Support and stability features play a vital role in ensuring a table saw’s safe and efficient operation. Incorporating these features into your table saw design can enhance its functionality, minimize vibrations, and improve the overall cutting experience.
Rugged and Stable Base
- Build a solid and stable base for your table saw.
- Use sturdy materials like heavy-duty steel or hardwood to construct a robust foundation.
- Ensure the base is properly levelled to prevent any wobbling or instability during operation.
Table Extension Wings: Consider incorporating table extension wings into your design. These different surfaces extend the table’s size and provide extra support for larger workpieces, enhancing stability and control during cutting. Depending on your specific needs, table extension wings can be fixed or removable.
Outfeed Support: Incorporate an outfeed support system to support longer workpieces as they exit the table saw. This can be in the form of adjustable rollers, support arms, or a dedicated outfeed table. The outfeed support prevents the workpiece from tipping or falling, ensuring safe and accurate cutting.
Rip Fence System: The rip fence is a critical component that enhances support and accuracy in rip cuts. Choose a sturdy and precise rip fence system that locks securely and maintains parallel alignment with the Blade. A well-designed rip fence ensures straight cuts and reduces the risk of kickback.
Anti-Vibration Features: Minimize vibrations in your table saw by incorporating anti-vibration features. This can include adding vibration-dampening materials, such as rubber pads or foam, between the table saw components and the base. Additionally, ensure that all connections and fasteners are secure to reduce potential vibration.
Stabilizing Braces and Supports: Consider adding stabilizing braces and supports to reinforce the structure of your table saw. These additional supports can be strategically placed to minimize flexing or bending during heavy cutting operations, enhancing stability and accuracy.
Mobile Base or Locking Casters: If mobility is a requirement, incorporate a mobile base or locking casters into your design. This allows you to move the table saw within your workshop or lock it in place when needed. A stable and manoeuvrable table saw is beneficial for workflow efficiency.
Non-Slip Surface and Handles: Ensure that the table saw surface and handles have a non-slip texture or grip. This enhances user safety by providing better control and preventing accidental slips or mishandling of the workpiece.
Incorporating support and stability features into your table saw design is essential for safe and accurate operation. A rugged and stable base, table extension wings, outfeed support, a reliable rip fence system, anti-vibration features, stabilizing braces and supports, a mobile base or locking casters, and a non-slip surface and handles all contribute to the support, stability, and overall performance of the table saw.
Ensuring proper alignment and levelling
Ensuring proper alignment and levelling of a table saw is crucial for achieving accurate cuts and optimal performance. Proper alignment and levelling are essential for a table saw to operate at its best.
Misalignment can lead to inaccurate cuts, safety hazards, and decreased performance. By following the steps to align and level your table saw you can ensure precise cuts and a reliable woodworking experience.
Check the Tabletop Alignment
- Begin by checking the alignment of the tabletop.
- Place a straightedge, such as a long metal ruler or a level, across the table, saw’s surface.
- Look for any gaps or unevenness between the straightedge and the tabletop. If there are irregularities, adjust the table using levelling screws or shims to achieve a flat and even surface.
Align the Rip Fence: The rip fence should parallel the Blade to ensure accurate and consistent cuts. Start by measuring the distance between the Blade and the rip fence at the front and rear ends. If the measurements differ, adjust the fence until it is equidistant from the Blade at both ends. Consult the table saw’s manual for specific instructions on aligning the rip fence.
Square the Blade to the Tabletop: Ensuring that the Blade is square to the tabletop is crucial for accurate cuts. Use a combination square or a specialized square gauge to check the alignment. Adjust the blade tilt mechanism or the trunnion assembly to square the Blade to the tabletop. Confirm the squareness by measuring the distance between the Blade and the mitre slot at the front and rear ends of the table. The measurements should be the same.
Check the Blade Parallelism to the Miter Slot: The Blade should be parallel to the mitre slot to ensure precise crosscuts. Use a dial indicator or a specialized blade alignment tool to check the parallelism. Adjust the trunnion assembly to align the blade parallel to the mitre slot if necessary.
Level the Table Saw: Use a bubble level to check the overall levelness of the table saw. Place the level on different table areas, including the tabletop and extensions. Adjust the levelling screws or add shims to achieve a level surface. A level table saw promotes stability and accuracy in your cutting operations.
Repeat the Alignment Process: After making adjustments, repeat the alignment checks to ensure the table saw remains properly aligned and levelled. Regularly inspect and maintain the alignment to keep the table saw in optimal condition.
Ensuring proper alignment and levelling of a table saw is crucial for achieving accurate cuts and optimal performance. By checking and adjusting the tabletop alignment, aligning the rip fence, squaring the Blade to the tabletop, checking the blade parallelism to the mitre slot, and levelling the table saw, you can maintain precision and stability in your woodworking tasks. Regularly inspect and maintain the alignment to ensure consistent and reliable performance from your table saw.
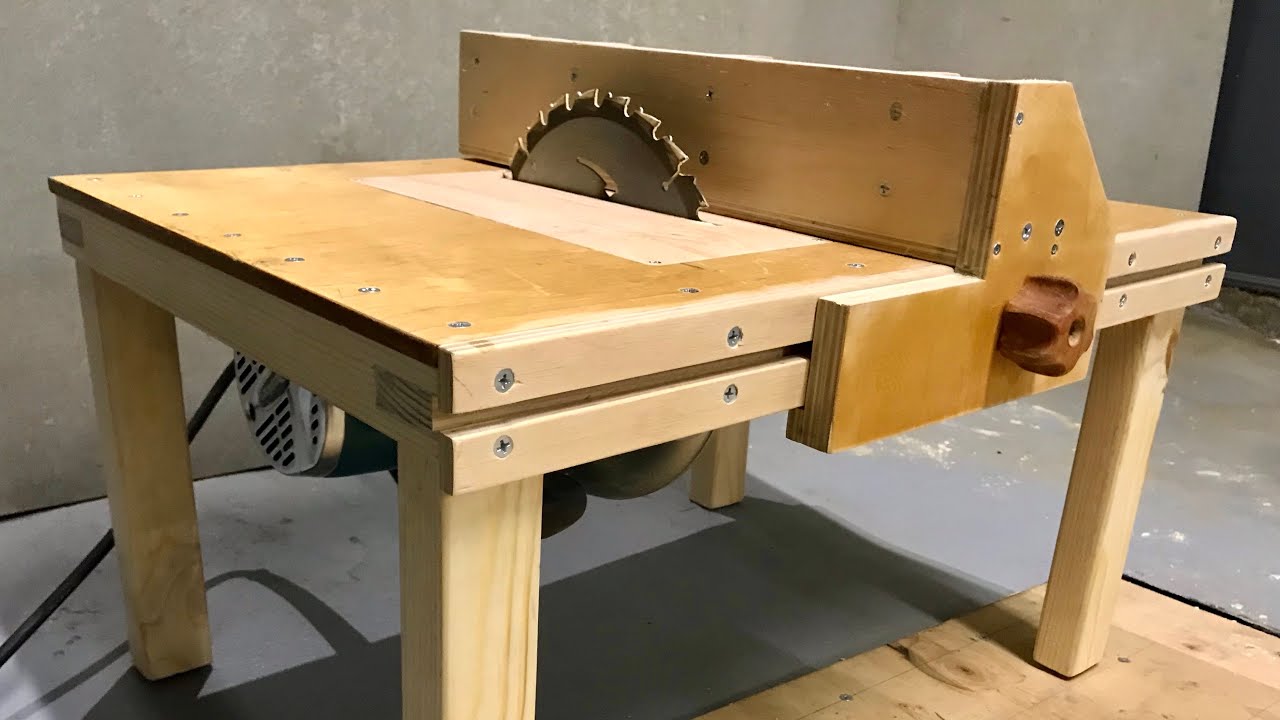
Constructing the Tabletop and Fence
Constructing the tabletop and fence is critical to building a table saw.
Building a solid tabletop and a reliable fence is crucial for achieving precise cuts and ensuring the safety of your woodworking projects.
Selecting the Tabletop Material: Begin by selecting a durable and flat material for the tabletop, such as high-quality plywood, medium-density fiberboard (MDF), or solid hardwood like maple or birch.
Cutting the Tabletop Material: Use a circular or table saw to cut the tabletop material to the desired dimensions. Take accurate measurements and mark the dimensions carefully, considering the size of your table saw and any extensions or additional features you plan to incorporate.

Building the Tabletop Frame: Construct a sturdy frame to support the tabletop. To build the frame, use dimension lumber, such as 2×4 or 2×6 boards. Ensure the frame is square and securely fastened using screws or nails. This frame will provide structural stability and rigidity to the tabletop.
Attaching the Tabletop Material
- Secure the cut tabletop material on top of the frame using screws or appropriate fasteners.
- Space the screws evenly across the tabletop to prevent warping or sagging.
- Ensure the tabletop material is flush with the edges of the frame and securely attached.
Installing the Fence Rails
- Determine the desired height and position of the fence rails along the front and back edges of the tabletop.
- Use dimension lumber or aluminium extrusions to construct the fence rails.
- Attach the rails securely to the tabletop using screws or bolts.
Building the Fence: Construct the fence using a combination of dimension lumber, plywood, or other suitable materials. The fence should be straight, sturdy, and of sufficient height to provide support and guidance during cutting operations. Ensure the fence is square to the tabletop and can be securely locked in place.
Adding Measurement and Alignment Features: Consider incorporating measurement scales, T-tracks, or other alignment features on the tabletop and fence to enhance accuracy and ease of use. These features can facilitate precise positioning of the workpiece and help align the fence accurately.
Fine-Tuning and Testing
- Once the tabletop and fence are constructed, perform thorough checks for alignment, squareness, and stability.
- Ensure the fence moves smoothly along the rails and locks securely in position.
- Make any necessary adjustments or refinements to achieve optimal performance.
Installing the Blade and Motor
Installing the Blade and Motor correctly is vital for a table saw’s proper functioning and safety.
Proper installation of the Blade and Motor is essential to ensure a table saw’s smooth operation and cutting performance. Following the correct procedures ensures a secure and reliable setup that maximizes safety and efficiency.
Preparing for Installation: Before installing the Blade and Motor, ensure the table saw is unplugged and the power switch is turned off. This precautionary step prevents any accidental start-ups during the installation process.
Choosing the Right Blade
- Select a blade suitable for the intended woodworking tasks.
- Refer to the table saws manual for the recommended blade size and type.
Removing the Blade Insert: In most table saws, a removable insert is located around the Blade. Carefully remove the insert by following the instructions provided by the manufacturer. This allows access to the area where the Blade will be installed.
Mounting the Blade: Place the selected Blade onto the arbour shaft, ensuring that the blade teeth face in the correct direction (typically pointing down toward the table). Ensure the Blade is seated fully onto the arbour shaft and spins freely without any wobbling or resistance.
Tightening the Blade Nut: Use the provided wrench or a suitable tool to tighten the blade nut securely. Follow the manufacturer’s instructions for the proper tightening torque. This step ensures that the Blade remains securely attached to the arbour during operation.
Installing the Motor
- Position the Motor onto the designated mounting location on the table saw.
- Align the Motor’s mounting holes with the corresponding holes on the saw’s body.
- Insert and tighten the mounting bolts or screws according to the manufacturer’s specifications.
Connecting the Motor to the Power Supply: Depending on the type of Motor and table saw, you may need to connect the Motor to a power supply.
This typically involves connecting the Motor’s power cord to an electrical outlet or wiring it to the appropriate power source. Consult the table saw’s manual for detailed instructions on motor connection.
Testing the Blade and Motor
- Once the Blade and Motor are installed, perform a test run to ensure proper operation.
- Check for abnormal noises, vibrations, or issues with the Blade or Motor.
- If problems are detected, refer to the table saw’s manual or consult a professional.
Installing the Blade and Motor correctly is crucial for a table saw’s safe and efficient operation. You can ensure a reliable and functional setup by carefully selecting the appropriate Blade, securely mounting it onto the arbour, properly installing the Motor, and connecting it to the power supply.
Adhering to the manufacturer’s instructions and safety guidelines throughout the installation process is essential for successfully operating your table saw.