
Welcome to this step-by-step guide on how to put a drill bit in a DeWalt drill. Whether you’re a seasoned DIY enthusiast or a beginner looking to tackle your first project, correctly inserting a drill bit into your DeWalt drill is a fundamental skill.
This simple-to-follow instructional exercise will walk you through the cycle, ensuring you can confidently and safely attach a drill bit to your DeWalt drill for various drilling and fastening tasks. So, if you’ve ever wondered “How to put a drill bit in a DeWalt drill?” – you’ve come to the right place. Let’s get started!
Safety Precautions
Working with power tools can significantly enhance productivity and efficiency but also carries inherent risks. It’s critical to underscore the paramount importance of safety in all power tool operations.
Safety should always be the top priority, and every user must be fully aware of the potential hazards and how to mitigate them. This includes proper training, adhering to manufacturer guidelines, and staying focused on tasks without distractions. Failure to prioritize safety can lead to accidents and injuries that are entirely preventable.
Essential safety gear and precautions
Safety Glasses: Protecting your eyes is a non-negotiable safety measure. Always wear ANSI Z87.1-rated safety glasses to shield your eyes from flying debris, dust, and potential splinters.
Ear Protection: The noise generated by power tools can damage hearing over time. Safeguard your hearing by using ear protection, such as earmuffs or earplugs.
Work Gloves: Choose gloves to shield your hands from sharp edges, splinters, and hot surfaces. Select gloves that provide both protection and a firm grip.
Disconnect Power: Before making any adjustments, changing accessories, or performing maintenance on your power tool, disconnect it from the power source. Wait for the device to come to a complete stop to prevent accidental starts.
Proper Ventilation: When working with materials that generate dust or fumes, ensure adequate ventilation in your workspace. A well-ventilated area helps reduce respiratory risks.
Secure Workpiece: To prevent accidents, firmly secure the workpiece using clamps or a vise. This minimizes the risk of it moving unexpectedly during the operation.
Follow Procedures: Only use the power tool for its intended purpose, and strictly adhere to recommended operating procedures. Deviating from guidelines can result in dangerous situations.
Emergency Preparedness: Dive deeper into emergency shut-offs and first-aid kits in your workspace. Have a clear plan for how to respond in case of an accident.
Inspect Tools: Before each use, inspect the power device for any indications of harm, wear, or defects. Never use a device that is damaged or malfunctioning.
No Distractions: Avoid distractions like phone calls or unrelated conversations when operating power tools. Maintaining focus on your task is essential for safety.
By reinforcing these safety precautions and ensuring appropriate safety gear, you reduce the risk of accidents and injuries and create a harmonious work environment where productivity and safety coexist. Always remember that safety is a responsibility that should never be compromised when working with power tools.
Gather Your Materials
Tools and materials needed for the task:
Before embarking on any project, gathering the fundamental instruments and materials is pivotal to guarantee a smooth and proficient workflow. The specific tools and materials required may vary depending on the project, but here is a general list of items to consider:
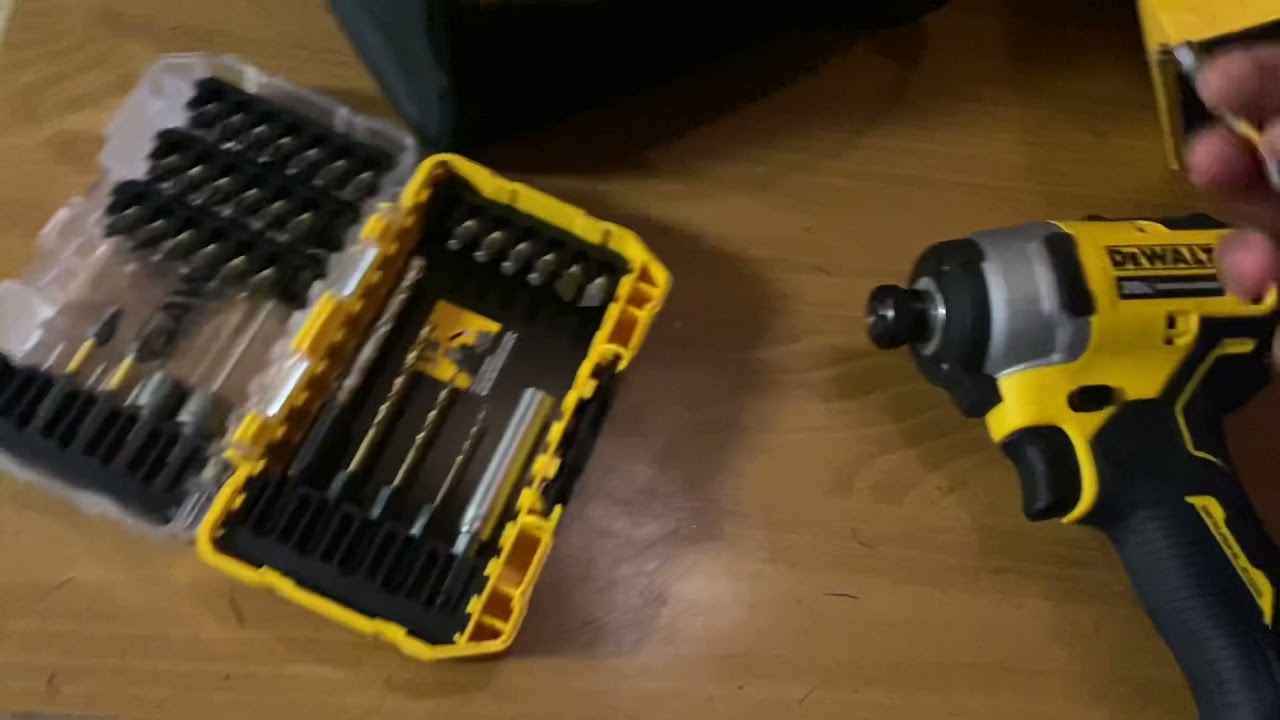
Power Drill: Select a DeWalt drill appropriate for your project. DeWalt offers a variety of drill models suitable for different tasks, so choose one that matches your needs.
Drill Bits: You’ll need the right drill bits, depending on your project. Common types include twist bits for general drilling, spade bits for more giant holes in wood, masonry bits for concrete and brick, and specialty bits for tasks like driving screws or creating countersink holes.
Chuck Key (if applicable): If your DeWalt drill has a keyed chuck (requiring a chuck key to tighten and loosen), ensure you have the chuck key on hand.
Workbench or Stable Work Surface: Ensure you have a stable work surface, such as a workbench or table, where you can secure your workpiece. A durable surface is crucial for precise and safe drilling.
Clamps or Vise: Use clamps or a vise to firmly secure the workpiece, preventing it from moving during drilling.
Measuring Tools: Depending on your project, you may need measuring tools like a tape measure, square, or level to ensure accurate drilling.
Dust Mask or Respirator (if needed): If your project involves materials that produce dust or fumes, wear a residue cover or respirator to safeguard your respiratory system.
Fasteners and Accessories: If installing or fastening something, have the appropriate pins (screws, nails, anchors, etc.) and accessories ready.
Extension Cord (if using a corded drill): Ensure you have an extension cord of sufficient length if your work area lacks a nearby power outlet.
Types of drill bits compatible with dewalt drills:
DeWalt drills are compatible with various drill bits, allowing you to tackle multiple tasks. The compatibility depends on the type of DeWalt drill you have and the chuck it uses (keyless or keyed). Common drill bit types compatible with DeWalt drills include:
Twist Drill Bits: These are versatile and compatible with most DeWalt drills. They are suitable for drilling holes in wood, metal, and plastic.
Spade Bits: Ideal for drilling larger holes in wood quickly and efficiently, especially when using DeWalt corded drills.
Masonry Bits: DeWalt offers masonry drill bits designed for drilling into concrete, brick, and stone, making them compatible with DeWalt hammer drills.
Auger Bits: Compatible with DeWalt drills, drill pieces are utilized for penetrating profound openings in wood, making them suitable for woodworking tasks.
Hole Saw Bits: DeWalt drills can accommodate hole saw bits for cutting larger-diameter holes in wood, plastic, and metal.
Countersink Bits: These are compatible with DeWalt drills and create conical recesses for screw heads, ensuring a flush finish when fastening.
It is essential to select the appropriate drill bits for your specific project and ensure they are compatible with your DeWalt drill model and chuck type. Having the right tools and materials ensures your project proceeds smoothly and safely.
Steps to Put a Drill Bit in a DeWalt Drill
Putting a drill bit in a DeWalt drill is a straightforward process. Here are the steps to follow:
Safety First: Before you begin, make sure the DeWalt drill is powered off and, if applicable, disconnected from the power source. Wearing appropriate safety gear, including safety glasses, is essential to protect your eyes from debris.
Locate the Chuck: The chuck is the drill part that holds the drill bit. It’s typically located at the front end of the drill.
Open the Chuck:
- For Keyless Chuck: Grasp the chuck firmly with one hand and rotate it counterclockwise (left) to open the jaws. Continue turning until the jaws are wide enough to accommodate the drill bit.
For Keyed Chuck:
- If your DeWalt drill has a keyed chuck (requiring a chuck key to tighten and loosen), insert the chuck key into one of the holes on the side of the chuck.
- Turn the key counterclockwise (left) to open the jaws.
- Continue turning until the chuck opens wide enough to fit the drill bit.
Select the Drill Bit: Choose the appropriate drill bit for your project. Ensure that the bit is compatible with your DeWalt drill and the chuck type you have.
Insert the Drill Bit:
- Hold the drill bit by the smooth shank end (the end without cutting edges).
- Align the bit with the jaws of the open chuck.
- Insert the drill bit into the chuck, ensuring it goes as far as possible while keeping the smooth shank outside.
Tighten the Chuck:
- For Keyless Chuck:
- Hold the chuck with one hand while gripping the drill’s handle with the other.
- Rotate the chuck clockwise (right) to tighten it.
- Continue turning until the chuck is securely tightened around the drill bit. You should feel resistance when it’s appropriately drawn.
- For Keyed Chuck: Use the chuck key to tighten the chuck. Insert the key into one of the holes on the side of the chuck and turn it clockwise (right) until the jaws firmly grip the drill bit.
Check Tightness:
After tightening, give the drill bit a slight tug to ensure the chuck securely holds it. It should not wobble or come loose.
Power On the Drill:
When the boring apparatus is safely set up, you can power the DeWalt drill and proceed with your drilling or driving task.
By following these steps, you can ensure that the drill bit is correctly and securely installed in your DeWalt drill, allowing you to work safely and effectively. Always remember to prioritize safety and proper tool handling in all your tasks.
Testing the Setup
Testing the drill bit’s installation is a crucial step in the preparation process before you begin your drilling or driving task. It ensures that the drill bit is securely and properly held in the chuck, minimizing the risk of accidents, wobbling, or the drill bit coming loose during operation.
An open or improperly installed drill bit can result in inaccurate holes, damage the workpiece, or pose safety hazards. By testing the setup, you verify everything is in order, enhancing your work’s safety and effectiveness.
Safe way to test the drill’s functionality:
A safe way to test the drill’s functionality and the stability of the drill bit installation is as follows:
Ensure Safety Gear: Before proceeding, wear the appropriate safety gear, including safety glasses and other equipment recommended for your specific task.
Secure the Workpiece: If drilling into a workpiece, ensure it is securely clamped or firmly held to prevent unintended movement during the test.
Select a Scrap Material: For testing purposes, using a scrap piece of the same material you plan to work on is advisable. This allows you to verify the drill’s performance without risking damage to your project.
Start with Low Speed: Set the drill to a low-speed setting initially. This is especially important if you’re testing a new setup or need to determine how the training will behave.
Engage the trigger Gently:
- Slowly and gently engage the drill’s motivation to start the motor.
- Observe the behavior of the training and the stability of the drill bit.
- Tune in for any strange commotions that could demonstrate an issue.
Gradually Increase Speed: If everything appears stable at low speed, gradually increase the speed to the level required for your task. Keep a close eye on the drill bit and workpiece to ensure they remain secure.
Watch for Wobbling: Pay attention to the drill bit for any signs of wobbling or movement during the test. If you notice any issues, stop the drill immediately and recheck the drill bit installation.
Complete a Test Hole (Optional): If you’re comfortable with the initial test, you can complete a test hole in the scrap material to ensure the drill performs as expected. Make sure to keep steady pressure on the training and maintain control.
Evaluate the Results: After the test, evaluate the results. If the drill bit remains stable and the test hole is accurate and clean, your setup is likely in good working order.
By following this safe testing procedure, you can confirm the functionality and stability of your drill bit installation, ensuring that you can proceed with your project confidently and with minimized risks. Always prioritize safety and precision when using power tools.
Maintenance and Tips
Tips on maintaining the drill bit and chuck:
Keep Drill Bits Clean: After each use, clean drill bits to remove any debris or material buildup. This prevents the accumulation of residue that can affect their cutting ability.
Inspect Drill Bits: Regularly inspect drill bits for signs of wear, damage, or dullness. Replace worn or damaged bits promptly to maintain efficient drilling performance.
Lubricate the chuck (if applicable): For drills with keyed chucks, apply a small amount of lubricating oil to the chuck’s threads and moving parts to keep them operating smoothly.
Store Drill Bits Properly: Store your drill bits in a dedicated container or organizer to prevent them from getting lost or damaged. Proper storage also helps maintain their sharpness.
Avoid Excessive Pressure: Excessive pressure can lead to overheating, premature wear, and reduced drill bit lifespan.
Advice on extending the lifespan of your dewalt drill:
Regular Cleaning: Clean the exterior of your DeWalt drill regularly to remove dust and debris. Use a soft cloth to wipe it down, and avoid abrasive cleaners.
Keep Air Vents Clear: Ensure that the air vents on the drill are free from obstructions. Blocked ducts can lead to overheating and reduced performance.
Store Properly: When not in use, store your DeWalt drill in a dry, calm, and clean environment. Please protect it from extreme temperatures and moisture, which can damage the tool.
Battery Care: If you have a cordless DeWalt drill, follow the manufacturer’s guidelines for battery maintenance. Charge and store batteries according to their recommendations to prolong their lifespan.
Regular Inspections: Periodically inspect the drill for loose screws, damaged cords, or worn parts.
Use the Right Accessories: Ensure you use compatible accessories, such as drill bits and attachments, designed for your DeWalt drill model. Using the wrong supplements can strain the tool and reduce its lifespan.
Common issues and troubleshooting tips:
Overheating: If your DeWalt drill overheats during use, stop and allow it to cool down. Overheating can be caused by excessive pressure or a dull drill bit. Ensure proper drilling technique and use sharp bits.
Chuck Slippage: If the chuck is slipping and not securely holding the drill bit, ensure it is adequately tightened. If the problem persists, inspect the chuck jaws for wear or debris and clean or replace them.
Loss of Power: If your DeWalt drill is losing power or not operating at total capacity, check the battery charge (for cordless drills) or ensure a stable power supply (for corded drills). Weak batteries or inadequate power sources can cause this issue.
Strange Noises or Vibrations: Unusual noises or vibrations can indicate a problem. Inspect the drill for loose parts or damaged components. If the issue persists, consult the manufacturer or a professional for repairs.
Battery Not Charging:
- Check the charger and battery connections to see if the battery is not charging correctly for cordless drills.
- Ensure they are clean and properly aligned.
- If the issue persists, consider replacing the battery or charger.
Conclusion
Learning to put a drill bit in a dewalt drill is fundamental for anyone looking to tackle DIY projects or professional tasks. It’s a straightforward process that, when done correctly, ensures safety, efficiency, and the successful completion of your drilling tasks.
Following these steps in this guide, you can confidently and easily insert a drill bit into your dewalt drill, allowing you to take on a wide range of drilling applications with precision and ease.
Remember to prioritize safety, follow the manufacturer’s instructions, and wear appropriate protective gear when operating power tools.