
Welcome to our Guide on “How to Release a Drill Bit.” Whether you’re a seasoned DIY enthusiast or just starting your journey in home improvement, knowing how to release a drill bit is a fundamental skill.
The process may seem simple, but doing it correctly ensures both your safety and the longevity of your tools. In this easy-to-follow tutorial, we’ll walk you through the steps to properly release a drill bit from your drill, making your future DIY projects a breeze.
Understanding the Problem
Drill bits can become stuck due to various factors, and understanding these reasons is essential. The type of material being drilled plays a significant role; hard materials like metal or concrete are more prone to causing drill bits to get stuck, especially if the bit isn’t suited for that specific material.
The type of drill bit is also crucial; using the wrong bit for a particular material can lead to binding, overheating, and premature wear.
User-related factors, such as improper drilling technique (like applying excessive force or failing to maintain a straight drilling angle), lack of lubrication in metalworking applications, dull or worn-out bits, and overheating due to continuous drilling without breaks, can all contribute to a bit getting stuck.
Highlighting Potential Consequences:
It takes time to promptly address a stuck drill bit to bring about a scope of unfortunate results. The bit itself may become damaged, mainly if excessive force is applied during removal, potentially necessitating sharpening or replacement. The workpiece being drilled is also at risk of damage, including cracks, splintering, or deformations.
Furthermore, the drill itself may suffer damage, such as problems with the chuck or motor, which can be costly to repair or replace. Safety is a critical concern, as forcing a stuck bit can lead to accidents, including kickbacks or loss of control, potentially causing harm to the user or bystanders.
Efficiency and productivity may be reduced as the drill struggles to perform its intended function, causing project delays and frustration. To mitigate these issues, addressing a stuck drill bit promptly and safely is paramount, and preventative measures, such as using the correct bit and drilling techniques, should be employed to reduce the likelihood of this occurrence.
Safety Precautions
Security is fundamental while working with power devices, including drills. Safety’s critical role in preventing accidents, injuries, and property damage is emphasized. Stress the importance of adhering to safety guidelines, even during routine tasks. Remind individuals to be vigilant, exercise caution, and never compromise safety for expediency.
List of Necessary Safety Gear and Equipment:
You must wear fitting well-being when using power tools like drills to safeguard yourself from potential hazards. Here is a list of necessary safety gear and equipment:
Safety Glasses or Goggles: Safeguard your eyes from flying debris and jetsam, wood chips, metal shavings, or dust. Ensure that the eyewear provides a secure fit and adequate coverage.
Hearing Protection: If working with loud power tools for extended periods, such as hammer drills, wear hearing assurance like earplugs or ear protectors to forestall hearing harm.
Dust Mask or Respirator: When drilling materials that generate dust or fine particles, like wood or concrete, use a dust mask or respirator to safeguard your respiratory health.
Work Gloves: Depending on the task, wear appropriate work gloves to shield your hands from sharp edges, heat, or vibrations.
Appropriate Footwear: Choose closed-toe shoes with non-slip soles to protect your feet from falling objects and provide stability.
Hair and Lose Clothing: Tie back long hair also abstain from wearing accessible attire or gems that could get found out in the drill.
Respiratory Ventilation: Ensure adequate ventilation in the workspace, especially when working with materials that produce fumes or dust. Use fans or open windows and doors as needed.
First Aid Kit: Have a well-equipped kit in case of minor injuries. Know how to use it and be prepared to seek professional medical help for more severe injuries.
Fire Extinguisher: Keep a fire extinguisher nearby when working with power tools, especially when sparks or flammable materials are present.
Safety Training: Ensure that all users have received proper training in the safe operation of power tools, including drills. Familiarize yourself with the tool’s user manual and safety guidelines provided by the manufacturer.
Promoting a safety culture and using the necessary safety gear and equipment is essential for preventing accidents and ensuring a secure working environment when using power tools like drills. Always prioritize safety to protect yourself and those around you.
Tools and Materials
When preparing to use a drill, having suitable devices and materials is fundamental to guarantee a smooth and efficient drilling process. Here is a rundown of fundamental instruments and materials you may need:
Tools:
- Drill: The primary tool, whether corded or cordless, with the appropriate chuck to hold your drill bits.
- Chuck Key (if applicable): If you’re using a keyed drill chuck, ensure you have the throw key to fix and slacken the bore.
- Drill Bits: Select the appropriate drill bits for your specific drilling needs, such as twist bits, spade bits, masonry bits, or specialty bits like Forstner bits or hole saws.
- Screwdriver Bits (if applicable): If your drill has a screwdriver function, have the appropriate screwdriver bits for driving screws.
- Extension Cord (if corded): If using a corded drill, ensure you have an extension cord of sufficient length to reach your work area.
- Clamps or Vise: For securing the workpiece, especially when drilling precise holes or working on more extensive materials.
- Speed and Depth Guides: Some drills come with speed and depth guides to help accurately control drilling speed and depth.
- Dust Collection or Vacuum Attachment (if needed): When drilling materials that produce dust or debris, use a dust collection attachment or a vacuum to maintain a clean work area and protect your health.
Materials:
Workpiece: The material you plan to drill, whether it’s wood, metal, plastic, concrete, or another substance. Ensure it’s appropriately sized and securely clamped or held in place.
Fasteners (if applicable): Screws, bolts, anchors, or other fasteners you intend to use in conjunction with the drilled holes.
Lubricant (if drilling metal): If you’re drilling metal, significantly harder metals like stainless steel, consider using cutting oil or a lubricant to reduce friction and heat during drilling.
Masking Tape or Painter’s Tape: Useful for marking drill locations on the workpiece and preventing the bit from slipping when you start drilling.
Pencil or Center Punch: For marking the exact spot where you want to drill the hole. Center punches are especially handy for creating a slight indentation that helps guide the drill bit.
Safety Gear: As mentioned in the safety precautions section, ensure you have the necessary safety gear, including safety glasses or goggles, hearing protection, dust masks, gloves, and appropriate footwear.
First Aid Kit: Have a very much-supplied emergency treatment unit nearby in case of minor injuries.
Fire Extinguisher (if needed): If you’re working in an environment where sparks or flammable materials are present, keep a fire extinguisher readily accessible.
Preparing the right tools and materials before starting your drilling project can save you time, improve safety, and help you achieve accurate and clean results. Always double-check that you have everything you need for the specific task to ensure a successful drilling operation.
Step-by-Step Guide to Release Drill Bit
Releasing a drill bit from a drill chuck is a straightforward process. Here’s a step-by-step guide on how to do it safely:
Step 1: Power Off the Drill
Ensure that the drill is turned off and not connected to a power source. Safety should always be the first consideration when working with tools.
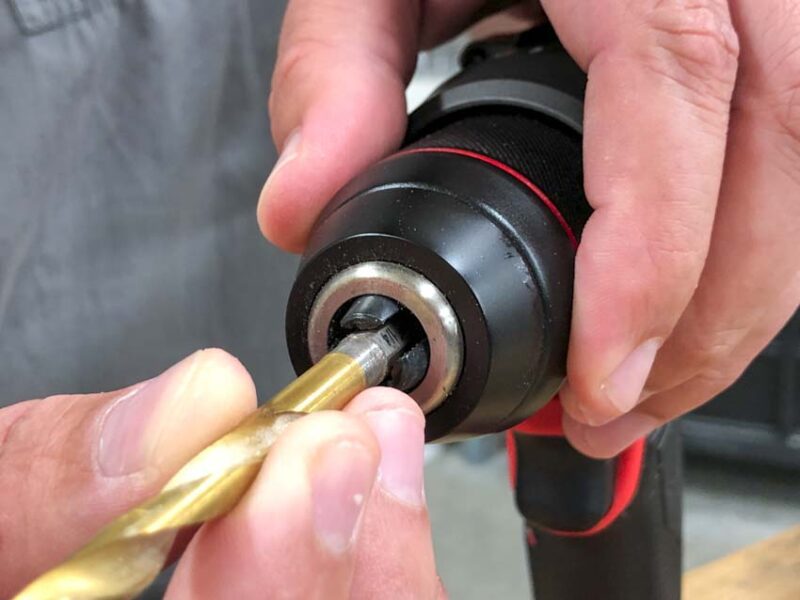
Step 2: Locate the Chuck
Identify the chuck on your drill. The toss is the drill part that holds the dull tool set up. It typically consists of three jaws that grip the bit.
Step 3: Determine Chuck Type
Check whether your drill has a keyless chuck or a keyed chuck. Keyless chucks are tightened by hand, while keyed chucks require a chuck key to loosen or tighten.
Step 4: For Keyless Chuck:
If your drill has a keyless throw, you can release the bit by turning the chuck counterclockwise (anti-clockwise). To do this, firmly grasp the chuck with one hand and rotate it counterclockwise. Keep turning until the jaws of the chuck release the bit.
Step 5: For Keyed Chuck:
If your drill has a keyed chuck, locate the chuck key, a small wrench designed for this purpose. Embed the toss key into the opening on the side of the chuck.
Turn the chuck key counterclockwise (usually lefty loosey) to loosen the jaws. You may need to rotate it several times to release the bit fully.
Once the jaws are loose, you can hand-pull the drill bit out of the chuck.
Step 6: Remove the Bit
Pull the piece straight out of the hurl after releasing the chuck’s grip on the drill bit. Be careful not to touch the bit’s sharp or hot surfaces, mainly if used recently.
Step 7: Store or Replace the Bit
Depending on your next step, either store the drill bit in a designated storage container or replace it with another bit if needed for your project.
Step 8: Secure the Chuck (Keyed Chuck Only):
If you have a keyed chuck, remember to secure the jaws by turning the chuck key clockwise (righty tighty) until they are tight. This ensures that the chuck is ready for the subsequent use.
Always follow safety precautions and double-check that the drill is powered off and disconnected from a power source before releasing the drill bit. Properly releasing the bit ensures safety and helps maintain the longevity of your drill and its components.
Troubleshooting
Common Issues and How to Overcome Them:
While drilling, several common issues may arise, and knowing how to troubleshoot them can save time and frustration. Here are some common problems and solutions:
Bit Stuck in Material: Avoid applying excessive force if the bit becomes stuck. Instead, gently reverse the drill in the opposite direction to release the bit. If this doesn’t work, you may need to carefully pry the material away from the bit using pliers or a screwdriver.
Bit Overheating: Overheating can occur when drilling through hard materials. To prevent this, use cutting oil or lubrication when drilling metal. Take breaks to allow the bit to cool down, and reduce the drill’s speed if necessary.
Bit Wandering or Drifting: If the bit wanders off course while drilling, ensure you’ve marked the drilling spot with a pencil or center punch. Additionally, maintain a firm grip on the drill and keep it perpendicular to the material.
Uneven Holes: Uneven holes may result from a misaligned or wobbling drill bit. Check that the drill bit is securely seated in the chuck. If wobbling persists, the bit may be damaged and should be replaced.
Excessive Vibration: Excessive vibration can occur if the bit is unbalanced or the material is too hard for the drill’s capabilities. Check that the bit is installed correctly and balanced. If vibration continues, consider using a different bit or tool better suited for the material.
Seeking Professional Help:
While many drilling issues can be resolved using the troubleshooting steps outlined above, there are situations where professional assistance is necessary. If you encounter any of the following scenarios, it’s advisable to seek the help of a qualified technician or repair service:
Severe Bit Damage: If the drill bit is severely damaged or broken within the chuck, do not attempt to remove it yourself. An experienced technician can safely address the issue.
Motor or Tool Malfunction: If the drill’s motor malfunctions, it may require professional repair or replacement. Signs of motor issues include unusual noises, loss of power, or erratic operation.
Chuck Problems: If the drill’s chuck becomes damaged or doesn’t hold bits securely, a professional should inspect and repair it to ensure safe and reliable operation.
Safety Concerns: If a situation poses a safety risk, such as electrical issues, exposed wires, or overheating, that the user cannot resolve, immediately discontinue use and seek professional assistance.
Complex Repairs: It’s best to consult with the manufacturer’s authorized service center or a skilled technician specializing in power tool repair for complex issues beyond essential maintenance or troubleshooting.
Remember that safety should always be a priority. Suppose you’re uncertain how to address a problem or suspect a more significant issue with your drill or bit. In that case, it’s wise to err on caution and seek professional help to avoid accidents or further damage.
Preventing Future Issues
Avoiding Drill Bit Stuck Situations
One of the most effective ways to deal with stuck drill bits is to prevent them from getting stuck in the first place. Choose the right drill bit for your task to avoid this frustrating situation. Different materials require specific bit types, so match the bit to the material you’re drilling.
When working with more rigid materials like metal, consider using lubrication such as cutting oil to reduce friction and heat buildup, extending the life of the bit and minimizing the risk of binding. Beginning with a pilot hole in more rigid materials is also an intelligent strategy; it reduces strain on the bit and minimizes the likelihood of it becoming stuck.
Maintain proper drilling technique, including steady hand control, a perpendicular angle, and avoiding excessive pressure. Finally, inspect your drill bits regularly for wear, damage, or dullness, and replace worn-out or damaged bits promptly to ensure efficient drilling.
Proper Maintenance of Drill Bits and Power Tools
Beyond prevention, proper maintenance of your drill bits and power tools is essential for their performance and longevity. Start by cleaning drill bits immediately after use to remove debris, dust, or residue using a wire brush or specialized cleaning tools.
Store your bits in a dedicated organizer or toolbox to protect them from damage and maintain organization. Inspect and maintain your power drill regularly, checking for wear, damage, or malfunction.
Follow the manufacturer’s maintenance recommendations for your specific drill model in the user manual. Keep any moving parts or gears in your drill well-lubricated to ensure smooth operation.
If any components show significant wear or damage, replace them promptly to prevent issues during use. Following these maintenance guidelines and best practices can significantly reduce the risk of drill bits getting stuck and ensure that your equipment remains in excellent working condition for years.
Conclusion
Knowing how to release a drill bit is fundamental for anyone who works with power tools and machinery. Whether you’re a diy enthusiast or a professional tradesperson, understanding the proper procedures for safely removing a drill bit from a drill chuck or a power tool is essential for your safety and the longevity of your equipment.
We’ve explored several methods for releasing a drill bit, including using a chuck key, keyless chuck systems, and various safety precautions. Each method has advantages and may be suitable for different situations, so choosing the one that best fits your needs is essential.