
If you own a chainsaw, you know the importance of maintaining a sharp cutting chain to ensure optimal performance and efficiency. Light chains can turn woodcutting challenging and time-consuming while posing potential safety hazards.
Fortunately, you can easily sharpen your chainsaw at home by utilizing a simple tool—a file. So get ready to get insights on How to sharpen a chainsaw with file.
Art of Setting the Chainsaw File
Setting the file correctly is crucial in achieving precise chainsaw sharpening results. Properly positioning the file ensures consistent and accurate sharpening of the chainsaw’s cutting teeth. These tools will assist you in achieving the desired sharpening outcome. Different chainsaws come with varying tooth sizes and pitches.
Identifying the correct file size and filing angle suitable for your specific chainsaw model is important. This information is typically available in the chainsaw’s manual or the file’s packaging. Safety should always be a priority. Secure the chainsaw in a stable position using a vice or clamp.
This will prevent accidental movement and ensure better control during sharpening. Locate the starting point on the chain for sharpening. Typically, this is where the shortest or most damaged cutting tooth is located.
Starting from this point will help maintain consistency throughout the sharpening procedure. Place the file into the filing guide or flat file holder. The filing guide ensures the file remains at the correct angle throughout sharpening. Align the file with the markings on the filing guide corresponding to the recommended filing angle for your chainsaw.
Take note of the depth gauge, which controls the chainsaw tooth’s cut depth. Ensure the file is aligned correctly with the depth gauge to maintain the proper cutting depth during sharpening. Make any necessary adjustments to the file’s position.
Push the file forward with smooth and even strokes across the cutting tooth. Maintain the same number of strokes for each tooth to achieve consistent results. Apply moderate pressure while filing for optimal sharpening.
Once you’ve sharpened one side of the chain, release the chainsaw from the vice or clamp, and rotate it to access the opposite side. Secure the chainsaw again and repeat the sharpening process for the other side. Remember to maintain the same filing angle and stroke count.
- Clamping the Chainsaw Bar for Safe Sharpening
- Tightening with the Tension-Adjusting Screw
- Marking the First Tooth for Chainsaw Sharpening
- Choosing the Right-Sized Round File for Chainsaw Teeth
- Setting the File in the Cutter’s Front Notch
- Setting the File Guide at the Cutter’s Factory Default Angle
1. Clamping the Chainsaw Bar for Safe Sharpening
This method prevents accidental movement or slippage, allowing you to focus on sharpening the chain effectively. Choose a sturdy work surface that provides enough space to accommodate the length of your chainsaw bar.
A workbench or table with a vice or clamping mechanism is ideal. Place the chainsaw bar on the selected work surface, aligning it parallel to the edge of the bench or table. Ensure the cutting teeth are facing away from you to minimize the risk of accidental contact.
Use a suitable clamp or vice to firmly secure the chainsaw bar to the work surface. Position the clamp appropriately from the cutting teeth, allowing you to work on the chain without obstruction. Tighten the clamp securely to ensure stability and prevent any movement during sharpening. Before proceeding, double-check the stability of the clamped chainsaw bar.
Ensuring stability is crucial for maintaining control and preventing accidents during sharpening.
While the chainsaw bar is clamped, take additional safety precautions. Removing the chainsaw’s spark plug wire is also advisable to prevent accidental starting.
2. Tightening with the Tension-Adjusting Screw
The proper tension in your chainsaw chain is crucial for safe and efficient operation. Tightening the chain using the tension-adjusting screw allows you to adjust the tension to the optimal level.
Identify the tension-adjusting screw on your chainsaw. It is usually near the guide bar and can be distinguished by its unique shape or markings. Refer to your chainsaw’s manual for precise information on the location of the tension-adjusting screw. Before tightening the chain, evaluate its current tension.
A well-tensioned chain should fit snugly against the guide bar without sagging or excessive tightness. If the chain appears loose or saggy, it requires tightening. Loosen the locking nut that secures the tension-adjusting screw using an appropriate wrench or tool. Turn the nut counterclockwise until it is loose enough to allow adjustment of the tension-adjusting screw.
Rotate the tension-adjusting screw clockwise to increase the tension of the chain. Make small adjustments and periodically check the chain tension as you go. The goal is to achieve a tension that allows the chain to fit snugly against the guide bar while maintaining smooth rotation.
After adjusting, regularly monitor the chain tension to ensure it remains within the appropriate range. Proper chain tension is vital for safe and efficient cutting. Check the tension periodically during extended use and readjust as needed. Once you have achieved the desired chain tension, turn the locking nut clockwise.
3. Marking the First Tooth for Chainsaw Sharpening
To maintain accuracy and consistency while sharpening your chainsaw, marking the first tooth with a permanent marker is a practical technique. This process helps you identify the starting point and ensures uniform sharpening across the entire chain. Follow these steps to mark the first tooth with a permanent marker:
Collect a permanent marker or a marker specifically designed for marking metal surfaces. Ensure the marker is in good condition and has a fine tip for precise marking. Take a moment to locate the first tooth of your chainsaw chain. Typically, it is positioned closest to the chainsaw’s body or housing. Observe the chain and identify the tooth that will be the starting point for your sharpening process.
With a steady hand, carefully apply the permanent marker to the top plate of the first tooth. Make a distinct and visible mark that stands out from the surrounding surface. You can draw a small line or create a dot—choose a marking method that is clear and easy to see.
Give the marker sufficient time to dry and set. This ensures the mark remains intact and does not smear or fade during sharpening.
With the first tooth marked, you can confidently begin the sharpening process. Follow the appropriate sharpening technique, such as using a file or a specialized sharpening tool, and maintain consistent strokes and angles for each tooth.
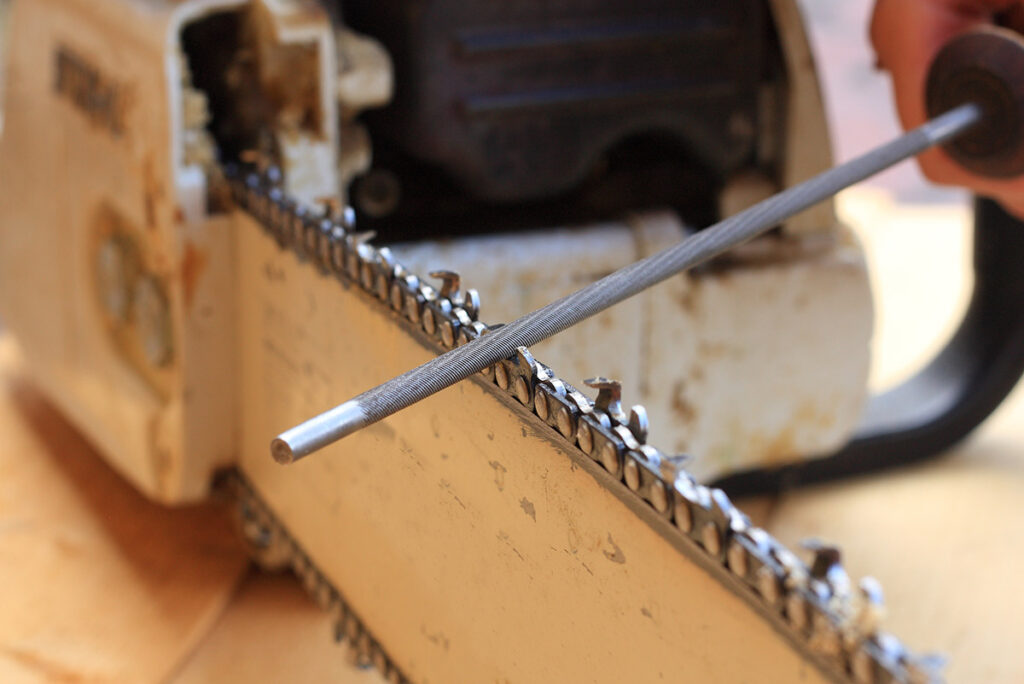
4. Choosing the Right-Sized Round File for Chainsaw Teeth
Choosing the correct round file diameter is crucial for achieving precise and effective chainsaw sharpening results. Matching the file diameter to the chainsaw’s teeth ensures proper shaping and maintenance of the cutting edges. Follow these steps to select the right-sized round file for your chainsaw’s teeth:
Start by identifying the specifications of your chainsaw. Consult the chainsaw’s manual or look for information on the manufacturer’s website to find the recommended file size.
Based on the specifications or measurements, determine the appropriate file size that matches the diameter of your chainsaw’s teeth. Choosing a round file that matches the tooth size is important to ensure accurate sharpening.
Visit a local hardware store or retailer that specializes in chainsaw accessories. Look for a section that offers a variety of chainsaw files, as they typically come in different sizes. If needed, seek assistance from the store staff to ensure you find the correct file size.
Carefully inspect the packaging of the round files available at the store. Look for file sizes that match the diameter of your chainsaw’s teeth. The packaging should indicate the file’s diameter, helping you choose the right size confidently.
While selecting a round file, consider both the quality and brand reputation. Opt for files made from high-quality materials that offer durability and longevity. Trusted brands often provide reliable and consistent performance, ensuring effective sharpening results.
Once you have identified the correct file size and considered the quality and brand, select. Choose the round file that precisely matches the diameter of your chainsaw’s teeth. If you are uncertain, consult the store staff or seek advice from professionals knowledgeable about chainsaw maintenance.
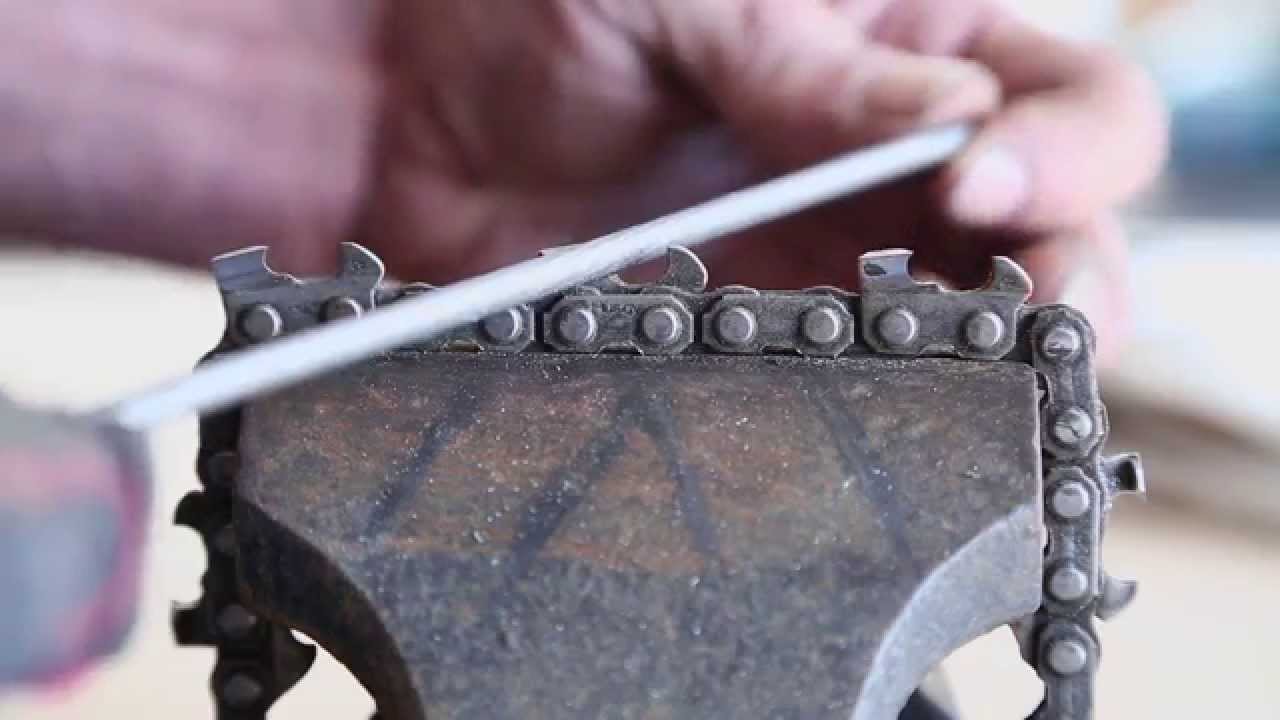
5. Setting the File in the Cutter’s Front Notch
Achieving precise chainsaw sharpening requires properly setting the file in the notch on the front of the cutter. This notch serves as a guide to maintaining the correct filing angle and file positioning.
Follow these steps to ensure accurate file placement: Before starting, securely clamp the chainsaw or place it on a stable surface to prevent accidental movement during sharpening. Ensuring your safety is paramount.
Locate the notch on the front of the cutter, which is the cutting part of the chainsaw tooth. This notch is designed to guide the file and maintain the proper filing angle. Carefully place the file into the notch on the front of the cutter, ensuring that it aligns with the angles of the notch. This alignment allows for a smooth and accurate filing motion. The file should fit securely within the notch, ready for sharpening.
While sharpening, maintain a steady and consistent pressure on the file. Once you have finished sharpening the current cutter, move on to the next one. Remove the file from the current notch and reposition it in the notch of the next cutter. Repeat the sharpening process, maintaining the same filing angle and consistent pressure.
Periodically inspect the filed teeth to ensure they are sharpened uniformly. If necessary, adjust the file’s positioning in the notch to maintain the desired filing angle. Regular inspection and adjustment will help achieve consistent sharpening across all cutters.
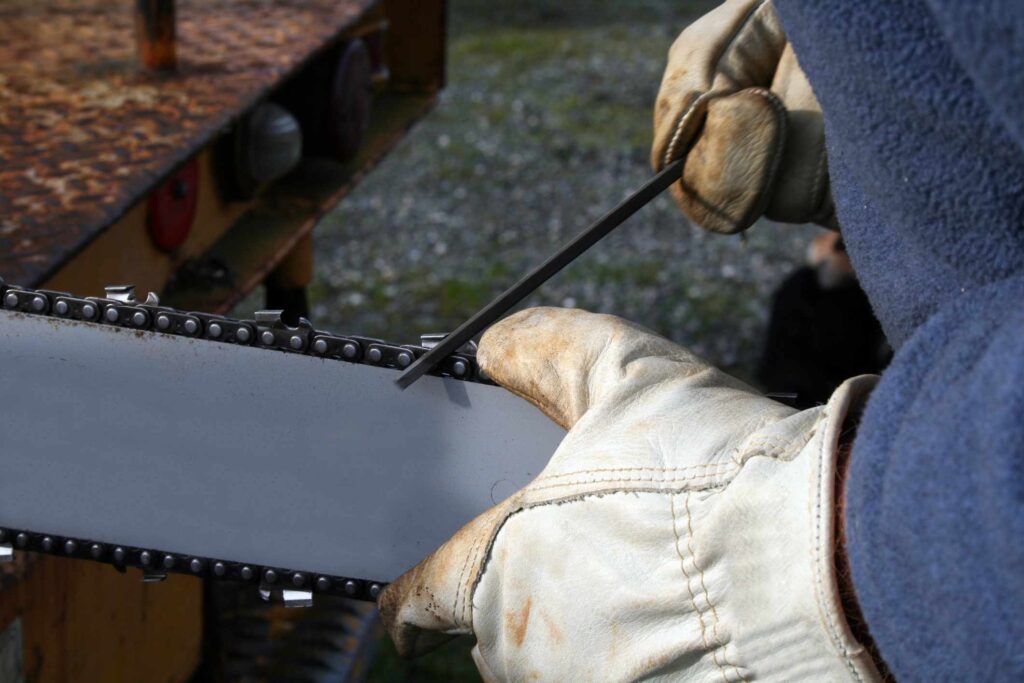
6. Setting the File Guide at the Cutter’s Factory Default Angle
Properly positioning the file guide at the factory default angle of the cutter is crucial for achieving accurate and consistent chainsaw sharpening results.
The factory default angle is designed to maximize cutting performance and should be maintained during sharpening. Follow these steps to correctly position the file guide:
Required tools:
- A file guide
- A round file suitable for your chainsaw model
- The chainsaw’s manual for reference
Having these tools ready will facilitate the proper positioning of the file guide.
Consult the chainsaw’s manual or manufacturer’s documentation to determine the factory default angle recommended for sharpening the cutter. This angle is specific to your chainsaw model and is vital for maintaining its cutting efficiency.
Securely attach the file guide to the cutter, aligning it with the factory default angle. The file guide guides consistent and accurate filing throughout the sharpening process. Ensure it is firmly attached and positioned parallel to the chainsaw bar.
Double-check that the file guide is aligned correctly with the factory default angle. Use a level or visual reference to verify its positioning. This step is crucial to ensure your sharpening follows the manufacturer’s recommendations.
You can start sharpening the cutter with the file guide positioned at the factory default angle. Insert the round file into the file guide and carefully file the tooth’s cutting edge. Use smooth and even strokes, applying moderate pressure for effective sharpening.
As you progress, ensure each tooth receives the same file strokes. Consistency is key to achieving uniform, sharpening results across the entire chain. Pay attention to the pressure applied and the angle of the file to maintain accuracy.
Sharpening the Cutters
- The Art of Sliding the File
- Filing the Cutter with Precision
- Strategic Sharpening of Every Second Tooth from the Starting Point
- Rotating the Chainsaw 180 Degrees
- Sharpening Every Other Tooth with the Same Motion
The Art of Sliding the File
To keep cutters sharp and efficient, learning the proper technique for sharpening them is essential. One crucial step in this process is sliding the file across the cutter’s face. This topic will explain the correct technique and its significance, ensuring your cutters stay in top shape.
When sharpening cutters, using a file is a widely adopted and effective method. Choose a file that matches the size and shape of the cutter. It should be wider than the cutting edge to provide optimal coverage. Ensure the cutter is firmly held or mounted in a stable position. This stability is crucial for maintaining control during the sharpening process.
Examine the cutter to determine the sharpening angle. This angle is typically predetermined or provided in the manufacturer’s guidelines. Maintaining this angle while sliding the file is essential for consistent sharpening.
Place the file at the cutter’s base, closest to the handle, with the teeth facing away from you. This positioning allows for a smooth sliding motion.
Use light to moderate pressure as you push the file along the cutter’s face. Keep the file flat against the surface to achieve an even sharpening effect. Avoid applying excessive pressure, as it can cause damage or create an uneven cutting edge.
Slide the file across the cutter’s face consistently and with control. Repeat this motion several times, maintaining the same angle and pressure throughout. After each pass, pause and carefully inspect the cutting edge for signs of improvement.
Filing the Cutter with Precision
Before filing, carefully examine the cutter to identify any nicks, burrs, or dull areas on the cutting edge. This assessment will help you understand the extent of filing required.
Choose a file that is suitable for the cutter’s material and size. Consider the coarseness of the file’s teeth, as coarser files are better for removing larger imperfections, while finer files are ideal for refining the edge.
Ensure the cutter is securely held or mounted in a stable position. This stability will allow you to maintain control and apply consistent pressure during filing. You can use clamps or a vice to secure the cutter while ensuring your safety.

Find the recommended filing angle for the specific cutter you are working on. This angle is often pre-defined or provided in the manufacturer’s guidelines. Align the file with the cutting edge at the designated angle.
Apply consistent pressure and force in the same direction with each stroke. Start filing from the cutter’s base and work towards the tip.
After filing the cutter several times:
- Inspect the cutting edge for improvements.
- Look for the gradual removal of nicks or dull areas.
- Continuously check the sharpness and smoothness of the edge as you progress.
Ensure that you distribute the filing action evenly across the entire cutting edge. Avoid overfilling in specific areas, which can result in an uneven edge.
Once you have filed the cutter 3 to 10 times, perform a test to evaluate its sharpness. Gently run your finger or a piece of paper along the cutting edge to check for a clean and effortless cut. If the cutter is not yet sharp enough, continue filing similarly until the desired sharpness is achieved.
Strategic Sharpening of Every Second Tooth from the Starting Point
When it comes to sharpening cutters, employing a strategic approach can significantly enhance the efficiency and effectiveness of the process. One such technique involves sharpening every second tooth from the starting point.
Begin by carefully assessing the overall condition of the cutter. Look for any teeth that appear dull or damaged and require sharpening. Identifying the teeth that need attention will enable you to implement the technique effectively.
Gather the appropriate sharpening tools, such as a file or sharpening stone, based on the material and size of the cutter.
Select a tooth on the cutter that will serve as the starting point for the sharpening process. This tooth will act as a reference point, allowing you to maintain consistency throughout the sharpening procedure.
Identify the recommended filing angle for the particular cutter you are working on. The manufacturer usually provides this angle, which can be determined based on the tooth design. It is crucial to maintain a consistent filing angle while sharpening.
From the chosen reference tooth, carefully and systematically file every second tooth. Place the file or sharpening stone on the cutting edge of each tooth, aligning it with the predetermined filing angle. Apply steady pressure and stroke the file or stone across the tooth’s surface, moving in a single direction.
As you progress, maintain a consistent filing angle and pressure for each tooth. This consistency will help you achieve even sharpness across the cutter, enhancing its overall performance.
After filing every second tooth:
- Take a moment to evaluate the sharpness and smoothness of the sharpened teeth.
- Use your fingers or, if needed, a magnifying glass to check for any remaining burrs or imperfections.
- If required, make additional filing strokes to achieve the desired level of sharpness.
Continue to file every second tooth from the starting point, adhering to the established filing angle and pressure. Strategically sharpening every second tooth from the starting point ensures a consistent cutting edge across the entire cutter. This approach helps distribute the sharpening effort evenly, resulting in improved cutting performance and extended cutter longevity.
Rotating the Chainsaw 180 Degrees
To optimize the performance of a chainsaw, it is crucial to understand and employ proper techniques. One effective technique involves rotating the chainsaw 180 degrees during use.
Before rotating the chainsaw, ensure that it is properly positioned and stable. If necessary, release the throttle trigger and turn off the engine for safety. Familiarize yourself with the front handle and back handle of the chainsaw. The front handle is typically closer to the chainsaw’s cutting bar, while the back handle is positioned behind the engine.
With your dominant hand, firmly grasp the back handle of the chainsaw, ensuring a secure grip.
While maintaining a strong grip on both handles, rotate the chainsaw 180 degrees along its longitudinal axis. This involves flipping the chainsaw vertically so the front handle becomes the back handle and vice versa.
Once the chainsaw is rotated, readjust your hand positions on the handles to maintain a secure grip. Ensure that your fingers are comfortably wrapped around the handles, providing optimal control during operation.
Resume using the chainsaw in the new position, bearing in mind that the front handle is now the back handle, and the back handle is now the front handle. Follow appropriate cutting techniques while prioritizing safety and efficiency.
Rotating the chainsaw 180 degrees offers several benefits:
- Changing the orientation of the handles allows for better positioning of the chainsaw, enabling easier navigation through various materials and cutting angles.
- Rotating the chainsaw allows you to alternate your hand positions and distribute muscle strain, reducing fatigue during prolonged use.
- Adjusting the chainsaw’s orientation provides a clearer line of sight to the cutting area, enhancing precision and control.
Sharpening Every Other Tooth with the Same Motion
Maintaining a consistent technique is crucial when it comes to sharpening the teeth of a chainsaw or similar cutting tool. One effective approach involves using the same motion to sharpen every other tooth.
Here is how you can do it
Gather the necessary sharpening tools, such as a round file or a sharpening stone. Ensure that the tools are appropriate for the size and type of teeth on your cutting tool.
Select a tooth on the cutting tool as the sharpening starting point. This tooth will be a reference for maintaining consistency throughout the sharpening process.
Determine the recommended sharpening angle for the specific cutting tool you are working with. This angle is often found in the manufacturer’s guidelines or product documentation. It is crucial to maintain a consistent sharpening angle for every tooth.
Hold the sharpening tool securely and position it against the cutting edge of the starting tooth, aligning it with the established sharpening angle. Using a smooth and controlled motion, move the sharpening tool along the tooth’s cutting edge. Ensure that the motion is consistent and even for each stroke.
After sharpening the starting tooth, move on to the next tooth in line. However, instead of sharpening it immediately, skip over to the tooth following it. Continue alternating between sharpening and skipping every tooth, maintaining the same sharpening motion and angle throughout the process.
As you sharpen every other tooth, periodically inspect the sharpness and smoothness of the teeth. Adjust your technique if necessary to ensure consistency in the sharpening motion and angle. This consistency is crucial for achieving uniform sharpness across the cutting teeth.
Continue sharpening every other tooth until you have covered the entire cutting edge of the tool. Regularly check the sharpness and make adjustments to ensure optimal cutting performance.
Using the same motion to sharpen every other tooth, you maintain consistency and promote uniform sharpness across the cutting teeth. This approach allows for efficient sharpening while ensuring the cutting tool performs optimally.
Things to Keep in Mind
Sharpening a chainsaw with a file is vital to maintain its cutting efficiency. Before you begin, knowing a few key aspects is important to ensure successful sharpening. Let’s delve into these important points:
Evaluate Chain Condition:
- Assess the condition of your chainsaw chain before sharpening.
- Check for damaged, worn, or excessively dull teeth.
- If the chain is severely damaged, replace it instead of attempting to sharpen it.
Choose the Right File: Select the correct file size for your chainsaw chain. The file diameter should match the chain’s pitch, the distance between three consecutive rivets divided by two. Refer to the chainsaw’s manual or consult a professional to determine the appropriate file size.
Understand File Orientation: Understanding the correct file orientation is crucial. Each tooth’s cutting edge has a specific angle that needs to be maintained during sharpening. Most chainsaw chains have either a 25 or 30-degree filing angle. Make sure your file guide is set to the correct angle.
Identify Tooth Types: Familiarize yourself with the different types of teeth on a chainsaw chain. The most common ones are the cutter teeth, responsible for cutting, and the depth gauge teeth, which control the cut’s depth. Understanding their functions will help you perform more precise sharpening.
Maintain Depth Gauges: The depth gauge teeth should also be inspected and maintained during sharpening. Use a depth gauge tool to ensure they are properly set. Maintaining the correct depth gauge height is crucial for safe and efficient cutting.
Proper File Handling:
- Hold the file correctly while sharpening.
- Place it perpendicular to the chainsaw bar, maintaining the correct filing angle.
- Apply light pressure and use smooth, consistent strokes when filing each tooth.
Ensure Equal Tooth Length: Aim for equal tooth length during sharpening to ensure balanced cutting performance.
File in One Direction: Only in one direction, preferably away from your body. Avoid back-and-forth filing, as it can lead to an uneven edge. Filing in a single direction helps maintain a consistent cutting angle.
Maintain the File: Regularly clean and inspect your file to remove debris or metal filings that may affect its performance. A clean file ensures smooth and efficient sharpening.
Remember, mastering sharpening a chainsaw with a file requires practice. It’s always beneficial to consult the chainsaw’s manual or seek guidance from a professional if you’re unsure. By understanding these essential points, you’ll be well-prepared to effectively sharpen your chainsaw and keep it in optimal cutting condition.