
A bow is a versatile hand saw commonly used for cutting branches, logs, and other wood materials. It consists of a narrow, flexible blade attached to a bow-shaped frame. Here are the complete guide on how to use a bow saw effectively and safely.
Tools and Materials You Will Need:
- Bow saw
- Work gloves
- Safety goggles
- Wooden workbench or sawhorse (optional)
- Wood clamps (optional)
Safety Precautions:
- 1. Wear appropriate safety gear: Additionally, work gloves will help protect your hands.
- 2. Secure your workpiece: If possible, clamp the wood you are cutting to a wooden workbench or sawhorse. This will prevent the wood from moving while you are sawing.
Steps to Use a Bow Saw:
- 1. Determine your cutting line: Mark the area on the wood where you want to make your cut using a pencil or a carpenter’s pencil.
- 2. Position the bow saw: Place it perpendicular to the wood with the blade, aligning it with the cutting line you marked.
- 3. Tension the blade: Most bow saws have a tightening mechanism near the handle. Use this mechanism to tension the edge. The blade should be taut but not overly tight. Proper pressure allows for efficient cutting.
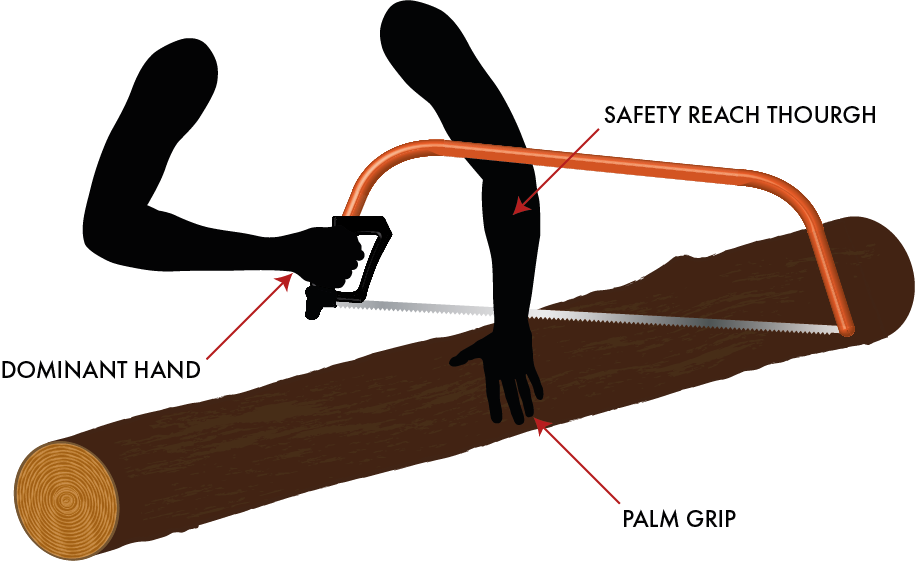
- 4. Start the cut: Hold the bow saw handle with one hand and place the other hand on the front of the bow frame for stability. Begin sawing by moving the blade back and forth in a controlled manner. Apply gentle downward pressure while sawing, letting the teeth of the blade do the cutting.
- 5. Maintain a steady pace: Continue sawing using a constant and even speed. Let the saw blade do the work; don’t force it. Keep the blade perpendicular to the wood to ensure a straight cut.
- 6. Watch your progress: As you saw, keep an eye on your cutting line. Make sure you are staying on track and following your marked line.
- 7. Complete the cut: Continue sawing until you have cut through the wood completely. Be cautious as you approach the end of the amount to prevent splintering or tearing out the wood.
- 8. Release tension: Once you’ve finished cutting, release the pressure on the blade using the saw’s tensioning mechanism. This helps prolong the life of the edge.
- 9. Safety first: When you’re done using the bow saw, hang it in a safe place, away from children or anyone who might accidentally come into contact with it.
Horizontal sawing
Horizontal sawing refers to cutting or sawing wood or other materials horizontally, typically parallel to the ground or work surface. This technique is commonly used in various woodworking, carpentry, and metalworking applications.
Flat sawing can be accomplished using different types of saws and machinery, depending on the specific task and material being cut. Here are some key considerations and steps for horizontal sawing:
Materials and Tools:
- Workpiece (wood, metal, plastic, etc.)
- Appropriate saw or cutting equipment (e.g., table saw, band saw, mitre saw, circular saw, horizontal bandsaw)
- Safety gear (safety glasses, hearing protection, dust mask, work gloves)
Steps for Horizontal Sawing
1. Safety Precautions:
- Always wear safety gear, including safety glasses to protect your eyes from debris and hearing protection if using loud machinery.
- Ensure the work area is well-ventilated and free of tripping hazards.
2. Select the Right Saw or Equipment:
- Choose the appropriate saw or cutting equipment based on the type of material you are cutting and the specific cut you need to make.
3. Set Up the Workpiece:
- Place your workpiece on a stable, flat surface, such as a workbench or sawhorse.
- Ensure the workpiece is adequately secured to prevent it from moving during cutting. You can use clamps or other suitable methods to secure it.
4. Adjust the Saw or Equipment:
- Set up the saw or equipment for horizontal cutting. This may involve adjusting the blade height, angle, or other settings to achieve the desired cut.
5. Measure and Mark:
- Measure and mark the cut line on the workpiece using a pencil or another suitable marking tool. Ensure your markings are accurate and visible.
6. Start the Cut:
- Position the workpiece so that the marked cut line aligns with the cutting edge of the saw blade.
- Depending on the type of saw or equipment you’re using, activate the machine or start the saw. Follow the manufacturer’s instructions for operation.
- Slowly and steadily guide the workpiece through the saw or equipment, keeping it parallel to the ground.
7. Maintain control:
- Keep a firm grip on the workpiece and ensure it stays flat and stable as it moves through the saw or equipment.
- Maintain a consistent feed rate and avoid forcing the material through the blade.
8. Complete the Cut:
- Continue cutting until you reach the end of the workpiece or achieve the desired length.
9. Inspect the Cut:
- Examine the cut to ensure it meets your specifications and is free of defects.
11. Clean Up:
- Remove any remaining debris from the work area, and properly store your tools and equipment.
Safety reach through
“Safety reach through” is not a recognized or standard term in safety procedures or practices. You may refer to a safety concept or technique specific to a particular industry or context. Still, with more context and details, providing a thorough explanation or guidance is easier.
In safety management and practices, various principles and techniques are designed to minimize or eliminate workplace hazards. These principles may include courses such as:
- 1. Lockout/Tagout (LOTO): It involves isolating energy sources and securing them with locks or tags to prevent accidental activation.
- 2. Confined Space Entry: Safety protocols for confined spaces, including proper ventilation, monitoring, and emergency procedures.
- 3. Fall Protection: Measures to prevent falls from heights, including the use of guardrails, safety nets, or personal protective equipment like harnesses and lanyards.
- 4. Hazard Communication: Communicating information about workplace hazards to employees, typically through labels, safety data sheets (SDS), and training programs.
- 5. Emergency Response Plans: Plans and procedures for responding to accidents, fires, chemical spills, or other emergencies in the workplace.
BURY THE BLADE
The phrase “bury the blade” is not a standard or widely recognized term in general safety or specific practices. However, in some contexts, it could refer to a particular action or technique related to using a tool or machine. With more context, it’s easier to provide a precise explanation.
If you could provide additional information or context about where and how you’ve encountered the phrase “bury the blade” or the specific situation in which it’s being used, I would happily offer more relevant guidance or information.
Use long strokes
The instruction to “use long strokes” can apply to various activities and tools, depending on the context. Here are a few everyday situations where using long strokes might be relevant:
- 1. Painting or Brushing: When applying paint, varnish, or any liquid coating with a brush, using long, smooth strokes can help achieve a more even and professional finish. This technique is often used in painting walls, furniture, or artwork.
- 2. Sawing: When using a saw, such as a hand saw, bow saw, or hacksaw, using long, controlled strokes can make your cutting more efficient and accurate. Long strokes provide better control and prevent the saw from binding or getting stuck.
- 3. Sandpaper or Sanding Blocks: In woodworking or finishing tasks, using long strokes with sandpaper or a sanding block helps ensure a uniform surface and minimizes the risk of creating uneven patches.
- 4. Swimming: Using long, fluid strokes is essential for efficiency and speed. Different swimming strokes, like freestyle and backstroke, emphasize long, powerful arm movements through the water.
- 5. Rowing: In rowing sports, athletes use long, powerful strokes with oars to propel a boat through the water effectively.
- 6. Archery: Long, smooth drawing and bowstring release are crucial for accuracy and consistency in archery.
Speed sawing
Speed sawing refers to using a saw, typically a power saw, to prioritize efficiency and speed while maintaining safety and accuracy. This technique is often used in woodworking, construction, and other industries where cutting through materials quickly is essential. Here are some tips and considerations for speed sawing:
- Safety First: Always follow safety guidelines and procedures for the specific saw you’re using.
- Select the Right Saw: Choose the appropriate one for the task. Circular, reciprocating, and jigsaws are standard power saws used for speed cutting in construction and woodworking.
- Blade Selection: Ensure you have the correct type of saw blade for the material you’re cutting. Knives are designed to cut wood, metal, plastic, or other materials.
- Mark Your Cut: Measure and mark your cut line accurately on the material using a pencil or another suitable marking tool. Having an explicit guide will help you make precise cuts quickly.
- Secure the Material: Ensure the material you’re cutting is adequately secured. If you’re using a workbench or sawhorse, clamp the fabric to prevent it from moving during the cut.
- Position Yourself: Stand comfortably and stable with your feet apart and firmly planted. Maintain a balanced stance to ensure you have control over the saw.
- Practice Controlled Movements: While speed is essential, it should not come at the expense of control and safety. Maintain a steady and controlled motion as you guide the saw through the material.
- Maintain a Straight Line: Keep the saw blade aligned with your cut line to ensure a straight and accurate cut. Many power saws have built-in or laser guides to help you maintain your cutting path.
- Use Proper Techniques: Different saws may require slightly different techniques. For example, circular saws benefit from a forward and backward motion along the cut line, while reciprocating saws use a push-pull motion.
- Cut in Stages: Consider making multiple passes rather than cutting through in a single motion if you’re cutting through thick material. This can help maintain control and prevent the saw from binding.
- Safety Shut-off: Be aware of any safety features on your saw, such as blade guards or electric brakes, and ensure they function correctly.
- Regular Maintenance: Keep your saw clean and well-maintained. Dull blades or poorly maintained equipment can slow you down and compromise safety.
When sawing large branches, always cut from above
When sawing large branches from a tree or shrub, following the correct cutting techniques is essential to ensure safety and prevent accidents. The advice to “always cut from above” is a guideline that relates to one specific method called “topping” or “crowning out” branches. This technique is used to remove branches without causing damage to the tree or posing a risk to the person doing the cutting. Here’s how it works:
1. Assess the Branch: Before cutting, evaluate the branch’s size, weight, and position in the tree. Determine if it’s feasible and safe to remove the branch.
2. Cutting from Above (Topping):
- Stand on a sturdy ladder or aerial work platform (if necessary) to gain access to the branch.
- Begin by making an initial cut on the underside of the branch, a few inches away from the main trunk or another major branch. This cut is called an “undercut” or “notch.”
- After making the undercut, move to the top side of the branch.
- Start cutting from above the branch, slightly farther away from the trunk than where you made the undercut. This cut is called the “top cut” or “overcut.”
- As you cut from above, the branch will start to separate from the tree. It should fall away cleanly without tearing the bark or causing damage to the trunk.
3. Safety Measures:
- Ensure there are no people or structures in the path of the falling branch.
- Have someone assist you, if possible, to ensure safety and help control the branch’s fall.
4. Dispose of the Branch: Once the branch is safely on the ground, cut it into smaller sections for easier removal or disposal.
Notably, “cutting from above” applies specifically to removing branches from a tree. When cutting large branches on the ground, such as for firewood or other purposes, the orientation of the cut may differ. The primary concern is to cut safely and effectively while minimizing the risk of accidents.
Transporting and passing
Transporting and passing can refer to moving objects or items from one location to another. The method and process you use for hauling and passing things can vary depending on the type of object, its size and weight, and the specific circumstances. Here are some general guidelines for safely transporting and passing things:
Transporting Objects:
1. Assess the Object: Before transporting an object, evaluate its size, weight, and shape. Determine if you can safely handle it or need assistance or equipment like dollies, carts, or straps.
2. Use Proper Lifting Techniques: If you need to lift and carry an object, use proper lifting techniques to prevent injuries.
3. Secure Loose Items: Ensure that any loose or protruding parts of the object are secured or tied down to prevent them from causing accidents or injuries during transportation.
4. Choose the Right Equipment: If the object is too heavy or awkward to carry, use appropriate equipment like a hand truck, forklift, or pallet jack to move it safely.
5. Clear Pathways: Before transporting an object, clear the pathways of any obstacles or hazards to ensure a smooth and safe journey.
6. Teamwork: For heavy or oversized objects, consider enlisting the help of others to assist with lifting and manoeuvring.
Passing Objects:
1. Communication: When passing an object to another person, communicate your intentions. Use verbal cues such as “I’m passing this to you” or “Here you go.”
2. Maintain Eye Contact: Make eye contact with the person passing the object. This helps ensure that they are ready to receive it.
3. Pass Object Safely: Pass the object smoothly and steadily. Avoid throwing, tossing, or making sudden movements that could cause the thing to fall or collide with the recipient.
4. Recipient’s Awareness: Ensure the person receiving the object is prepared to catch or take it. They should have their hands or equipment ready.
5. Use Caution with Fragile or Hazardous Items: If you pass fragile or hazardous objects, exercise extra caution and consider using appropriate containers or protective measures.
6. Direction of Pass: Be mindful of the direction in which you pass the object. Ensure it is passed in a way that aligns with the recipient’s position and intended use.
7. Secure and Confirm: After passing the object, confirm with the recipient that they have a secure grip or control over it before releasing your hold.
Using the tool
Using a tool effectively and safely involves following specific guidelines and techniques, often specific to your type of tool. Here are some general steps and considerations for using a tool:
1. Read the Instructions: Start by thoroughly reading and understanding the manufacturer’s instructions and safety guidelines for the specific tool you intend to use. This will provide essential information about proper usage, maintenance, and safety precautions.
2. Safety Gear: Always wear the appropriate safety gear for the task. This may include safety glasses, hearing protection, gloves, a dust mask, or other protective equipment, depending on the tool and the nature of the work.
3. Inspect the Tool: Inspect it for any visible damage or defects before using it.
4. Prepare the Work Area: Set up your work area to minimize hazards and allow you to work comfortably. Clear clutter, secure workpieces, and ensure the tool has a stable and level surface.
5. Follow Proper Techniques: Each tool has its own techniques and best practices. Be sure to follow these guidelines. For example:
- Use the proper grip and apply controlled force When using hand tools like hammers or screwdrivers.
- For power tools like drills or saws, maintain a secure grip, keep your hands and body away from moving parts, and follow the tool’s instructions for speed and pressure.
6. Use the Right Accessories: If the tool has accessories or attachments, use the appropriate ones for your task. Using the wrong supplement can be dangerous and lead to subpar results.
7. Stay Focused: Pay full attention to what you’re doing. Avoid distractions, and do not use tools if you are fatigued, impaired, or not in the right frame of mind.
8. Keep Hands Away: Keep your hands and body parts away from the tool’s moving parts. Never reach over or around the instrument while it is in operation.
9. Turn Off When Not in Use: If using a power tool, turn it off and unplug it when you are not actively using it. This prevents accidental activation.
10. Keep Work Area Clean: Maintain a clean area by removing debris, chips, or clutter.
11. Maintain Tools: Regularly inspect and maintain your tools. This includes cleaning, lubricating, and sharpening them as needed. Dull or damaged tools can be hazardous and less effective.
12. Proper Storage: Store your tools in a dry, clean, and secure location. Use proper storage solutions to prevent damage and keep them organized.
13. Dispose of Waste Safely: Dispose of any waste or materials produced during tool usage responsibly and safely.
14. Seek Training: If you are new to using a particular tool or technique, seek training from a qualified instructor or mentor to ensure you use it correctly and safely.
Conclusion
Using tools safely and effectively is essential for accomplishing tasks efficiently and minimizing the risk of accidents or injuries. Prioritize safety by wearing appropriate gear, understanding the tool’s instructions, and maintaining a clean workspace. Always follow proper techniques and keep tools regularly for optimal results and a safer work environment.