
Looking to elevate your woodworking game? Seeking a seamless solution to precision cutting without the hassle of a traditional table saw setup? Enter the world of woodworking innovation with a track saw alternative.
If you’re a seasoned craftsman or a DIY enthusiast, you’re likely familiar with the challenges of achieving straight, accurate cuts in various materials. The quest for precision often leads us to explore new tools and techniques, and that’s where the track saw alternative comes into play.
In this guide, we’ll delve into modern cutting solutions, revealing the secrets behind this versatile tool and how it can revolutionize your woodworking projects. Say goodbye to the limitations of conventional cutting methods and join us on a journey to discover the ultimate track saw alternative that will redefine the way you work with wood and other materials.
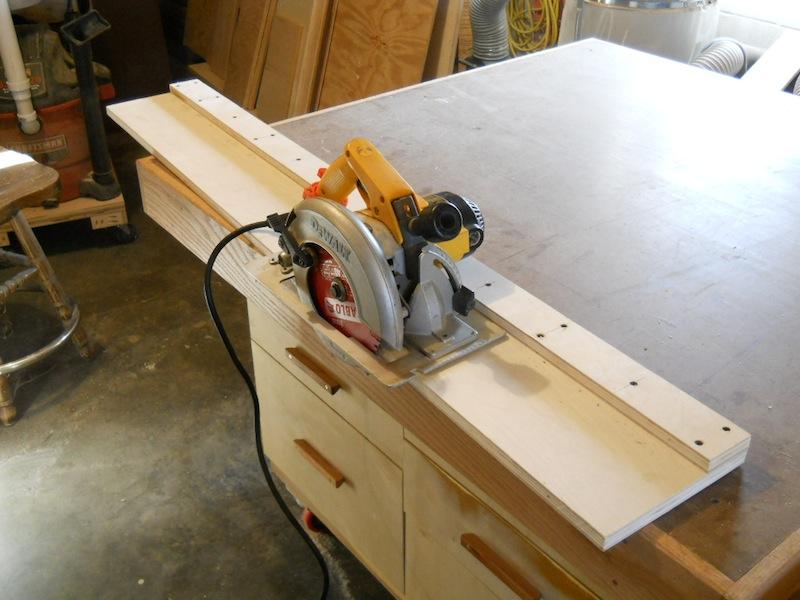
Circular Saw with Guide Rail: Achieving Precision and Straight Cuts
Unveiling the Circular Saw with Guide Rail
Understanding the Basics
Before we dive into the nitty-gritty details, let’s grasp the fundamental concept of a circular saw with a guide rail. Essentially, this setup involves attaching a straight edge or guide rail to your circular saw, allowing you to achieve precise and straight cuts with ease.
The Advantages
1. Laser-Like Precision
One of the standout advantages of using a circular saw with a guide rail is the unparalleled precision it offers. The guide rail serves as a fixed path for the saw, eliminating the risk of deviation during the cut. This level of accuracy is especially crucial for tasks like cutting plywood, where even a slight error can lead to wastage.
2. Straight as an Arrow
Achieving perfectly straight cuts is a breeze with a circular saw and guide rail combo. Unlike freehand cutting, which can be challenging even for experienced artisans, this setup guarantees a flawless, straight line every time. Whether working on a long piece of lumber or a delicate trim, the guide rail ensures your cuts are as straight as an arrow.
3. Enhanced Safety
Safety should always be a top priority in any woodworking project. Circular saws with guide rails offer improved stability, reducing the risk of kickback and accidental injuries.
Getting Started: How to Use a Circular Saw with Guide Rail
Step 1: Gather Your Tools
To begin, ensure you have the following items at your disposal:
- Circular saw with compatible guide rail
- Appropriate safety gear (safety glasses, ear protection, and a dust mask)
- Material to be cut
- Clamps (optional but recommended for added stability)
Step 2: Set Up the Guide Rail
Position the guide rail on your workpiece, aligning it precisely along the cut line. The guide rail should be firmly secured to prevent movement during the cut.
Step 3: Adjust the Circular Saw
Before starting the saw, adjust the cutting depth to match the material’s thickness. Most circular saws have a depth adjustment Don your safety gear, ensuring you’re protected against potential hazards.
Step 5: Make the Cut
Hold the circular saw firmly and align it with the guide rail. Start the saw and gently guide it along the rail, maintaining a steady pace. Let the saw’s blade do the work, and avoid applying excessive pressure.
Step 6: Complete the Cut
Continue cutting along the guide rail until you’ve reached the end of the material. Once done, please switch off the saw and allow the blade to come to a complete stop before lifting it from the workpiece.
Why Choose a Circular Saw with a Guide Rail over a Track Saw?
Track Saws: The Alternative
Track saws are undoubtedly excellent tools for precision cutting, much like circular saws with guide rails. However, the critical difference lies in their flexibility and cost. Track saws come with integrated tracks, making them a bit bulkier and more expensive. In contrast, circular saws with guide rails offer a cost-effective solution while providing exceptional accuracy.
Maintenance and Care Tips
To ensure your circular saw with a guide rail remains a reliable companion for your woodworking projects, follow these maintenance and care tips
- Regularly clean the guide rail to prevent sawdust buildup, which can affect the accuracy of your cuts.
- Keep the saw blade sharp for clean and efficient cuts. Dull blades can lead to splintering and rough edges.
- Lubricate the guide rail periodically to maintain smooth movement and reduce friction.
Table Saw: A Comprehensive Guide to Making Long and Accurate Rip Cuts
What Is a Table Saw?
A table saw, often referred to as a sawbench, is a stationary woodworking tool equipped with a circular saw blade that protrudes through the surface of a flat table. This configuration allows for controlled and precise cuts, making it an ideal choice for woodworking tasks, including rip cuts.
Types of Table Saws
- Contractor Table Saw: They offer a good balance between power and portability.
- Cabinet Table Saw: These heavy-duty saws are designed for professional woodworkers. They provide exceptional power, stability, and accuracy, making them perfect for demanding tasks.
- Hybrid Table Saw: Combining features of both contractor and cabinet saws, hybrids offer a middle-ground solution for woodworkers seeking power and convenience.
Making the Most of Your Table Saw
Preparing Your Workspace
Before diving into the world of rip cuts, it’s crucial to ensure your workspace is set up for success. Here are some key considerations
- Stable Surface: Ensure your table saw is set up on a stable and level surface to prevent wobbling during operation.
- Proper Lighting: Adequate lighting is essential for precision. Make sure your workspace is well-lit to see your cutting lines.
Choosing the Right Blad
Selecting the correct saw blade is pivotal to achieving clean and accurate rip cuts. Different blades are suited for various materials, so choose one that matches your project requirements. Common blade types include:
- Rip-Cut Blade: Designed specifically for rip cuts, these blades have fewer teeth and are optimized for speed and efficiency when cutting along the grain.
- Crosscut Blade: If you need to make cuts across the grain, a crosscut blade with more teeth will provide cleaner results.
Setting Up Your Table Saw
To achieve precise rip cuts, meticulous setup is vital:
- Fence Alignment: Align the rip fence parallel to the blade to maintain uniform width throughout your cut.
- Push Sticks: Always use push sticks or feather boards to keep your hands away from the blade while guiding the material.
Mastering the Rip Cut Technique
Positioning the Material
Place your workpiece on the table, firmly against the fence. This step is crucial for maintaining consistent width throughout the cut.
Starting the Cut
- Safety First: Stand to the side of the blade, not directly behind it, to minimize the risk of injury from kickback.
- Gentle Feeding: Begin pushing the material through the blade slowly and steadily, allowing the blade to do the work.
Troubleshooting and Tips
Even with meticulous preparation, woodworking can throw a curveball from time to time. Here are some troubleshooting tips
- Consider sharpening the blade and adjusting your feeding speed.
- Uneven Cuts: Inconsistent cuts can result from an improperly aligned fence. Double-check the alignment before making another cut.
- Safety Reminders: Always maintain focus and concentration when operating a table saw. Distractions can lead to accidents.
The Power of the Jigsaw
A jigsaw is a versatile and indispensable tool in any woodworker’s arsenal. However, when making straight cuts or following a precise line, a jigsaw alone may not always be the ideal choice.
Introducing the Straight Edge Guide
To achieve those flawless straight cuts or follow a specific curve with ease, a straightedge guide becomes your best friend. This simple yet ingenious accessory attaches to your jigsaw, providing a stable and straight path. It turns your jigsaw into a guided cutting machine, ensuring your cuts are as precise as possible.
When to Use a Straight Edge Guide
1. Straight Cuts
When your project calls for long, straight cuts, such as trimming a piece of plywood to size or creating a straight edge on a board, a jigsaw with a straightedge guide is a perfect choice. The guide keeps your tool on the desired path, resulting in a clean and accurate cut every time.
2. Curved Cuts
Despite its name, a straightedge guide is not limited to straight cuts. It excels at creating smooth, precise curves as well. Whether crafting intricate scrollwork or shaping a piece of wood for a custom design, the guide ensures your jigsaw follows the desired curve effortlessly.
3. Irregular Shapes
Woodworking often involves the creation of irregular shapes and patterns. With a straightedge guide, you can confidently tackle projects that require intricate irregular cuts, such as crafting a unique tabletop or making custom wooden decorations.
How to Use a Jigsaw with a Straight Edge Guide
Step 1: Select the Right Blade
Before you begin, choose a jigsaw blade appropriate for your material. Different blades are designed for cutting wood, metal, plastic, and more. Ensuring the correct blade is crucial for achieving clean cuts.
Step 2: Attach the Straight Edge Guide
Securely attach the straightedge guide to your jigsaw following the manufacturer’s instructions. Ensure it is aligned correctly for the cut you intend to make.
Step 3: Mark Your Cutting Line
Using a pencil or marking tool, carefully mark the line you want to cut. This step is essential for maintaining precision throughout the project.
Step 4: Start Cutting
Position your jigsaw at the starting point of your marked line. Please turn on the jigsaw and gently guide it along the straight edge guide. Keep a steady hand and a consistent pace to ensure a smooth and accurate cut.
Step 5: Finish with Precision
As you approach the end of your cut, pay close attention to maintain control and accuracy. Slow down if necessary to ensure a clean finish.
Advantages of Using a Jigsaw with a Straight Edge Guide
Unparalleled Precision: The straight edge guide eliminates the guesswork, allowing you to achieve precise cuts consistently.
Versatility: From straight cuts to intricate curves, a jigsaw with a straightedge guide can handle various cutting tasks.
Efficiency: With this setup, you can complete your projects faster and with fewer errors, saving you time and material.
Cost-Efficiency: Investing in a straightedge guide is a cost-effective way to improve the accuracy of your cuts without purchasing expensive specialized tools.
A miter saw is an essential tool for woodworking and other construction projects that require precise crosscuts and angled cuts.
Types of Miter Saws
- Standard Miter Saw: This primary type allows you to make crosscuts and miter cuts (angled) in various directions.
- Compound Miter Saw: Besides basic miter cuts, it also tilts in one direction for bevel cuts, making it ideal for projects that require both angled and beveled cuts.
- Sliding Compound Miter Saw: This type adds a sliding feature, which enables you to cut wider boards by moving the blade forward and backward.
Blade Size
Miter saws come in different blade sizes, typically 8, 10, or 12 inches. Larger blades allow you to cut wider and thicker materials, but they also require more space.
Motor Power
Consider the motor’s power, typically measured in amps or horsepower. A more powerful motor can handle more challenging materials and provide smoother cuts.
Cutting Capacity
Check the maximum width and depth the saw can cut at various angles. This is essential to ensure it meets your project’s requirements.
Accuracy and Precision
Look for a miter saw with positive stops or detents at standard angles (e.g., 45 degrees) for quick and accurate adjustments. Laser guides and LED work lights can also enhance precision.
Dust Collection
Woodworking generates a lot of sawdust.
Portability and Storage
Consider the weight and size of the miter saw, especially if you need to move it frequently or have limited storage space. Some models are more portable and compact than others.
Brand and Quality
Research reputable brands are known for producing durable and reliable miter saws. Reading reviews and getting recommendations from experienced woodworkers can be helpful.
Price
Set a budget based on your needs and the features you require. While high-end models offer advanced features, there are also quality mid-range options available.
Safety Features
Ensure the miter saw has essential safety features like a blade guard, electric brake, and a secure clamping system to hold the workpiece firmly in place.
Accessories and Compatibility
Check if the saw is compatible with accessories like extension wings, workbenches, and different types of blades for specific tasks.
The Ultimate Guide to Panel Saws: Precision Cutting for Large Sheets of Material
Panel saws, the unsung heroes of the woodworking world, have revolutionized how artisans and manufacturers cut large sheets of material like plywood and MDF. In this comprehensive guide, we delve into the world of panel saws, exploring their various types, features, and applications.
Whether you’re a seasoned woodworker or a novice DIY enthusiast, this article will provide invaluable insights into harnessing the power of a panel saw for precision cutting.
Understanding Panel Saws
What is a Panel Saw?
A panel saw is a specialized cutting tool designed to make precision cuts in large sheets of material, such as plywood, MDF (Medium-Density Fiberboard), particleboard, and more. This powerful machine enables woodworkers, carpenters, and manufacturers to achieve straight, accurate cuts quickly and efficiently.
Types of Panel Saws
1. Vertical Panel Saws
Vertical panel saws are versatile and space-saving machines that are perfect for small workshops. They consist of a vertical frame where the material is securely clamped vertically. The saw blade, mounted on a carriage, moves vertically to make precise cuts. Vertical panel saws are ideal for cutting smaller panels and are known for their ease of use.
2. Horizontal Panel Saws
Horizontal panel saws are the workhorses of industrial woodworking. They feature a horizontal cutting arrangement with flat material on a table. The saw blade moves horizontally across the material, ensuring clean and precise cuts. These machines are commonly used in larger woodworking shops and manufacturing facilities.
3. Sliding Table Panel Saws
Sliding table panel saws combine the advantages of both vertical and horizontal panel saws. They have a sliding table that allows the material to move horizontally while the saw blade remains stationary. This design provides exceptional accuracy and versatility, making it a popular choice for professional woodworkers.
Advantages of Using a Panel Saw
1. Precision Cutting
One of the primary advantages of using a panel saw is its ability to deliver precise cuts consistently. Whether you’re cutting straight lines, angles, or intricate designs, a panel saw ensures accuracy, reducing the need for additional finishing work.
2. Increased Productivity
Panel saws are designed for efficiency. They enable woodworkers to cut large sheets of material quickly, saving time and effort. This increased productivity is precious for businesses that require high-volume cutting.
3. Safety Features
Modern panel saws have safety features such as blade guards, emergency stop buttons, and automatic braking systems. These safety mechanisms protect operators from potential accidents, making panel saws a secure workshop option.
Choosing the Right Panel Saw
Selecting the right panel saw depends on various factors, including your needs and budget. Consider the following when making your decision:
1. Work Space
Evaluate the available space in your workshop. Vertical panel saws are ideal for smaller spaces, while horizontal and sliding table panel saws require more room.
2. Cutting Capacity
Determine the maximum size of material you’ll be working with. Ensure that the panel saw can accommodate the dimensions of your materials.
3. Budget
Panel saws come in a range of prices. Set a budget and explore options that fit within your financial constraints. Remember that quality should be a priority to ensure longevity and performance.
Tips for Optimal Panel Saw Usage
1. Blade Selection
Choose the appropriate saw blade for your material. Different materials require different blade types and tooth configurations for optimal results.
2. Maintenance
Regular maintenance is crucial to keep your panel saw in top condition.
Conclusion
Exploring track saw alternatives can be a wise choice for both professionals and DIY enthusiasts. While the track saw is a fantastic tool for precision cutting, several viable alternatives can offer similar results without breaking the bank.
From circular saw guides and straightedge clamps to homemade jigs and straight-cutting routers, the options are diverse and adaptable to various woodworking and construction projects.
The key to selecting the right track saw alternative is considering your needs, budget, and skill level. Each alternative has its own set of advantages and limitations, so it’s essential to weigh these factors carefully before making a decision.