
In the world of woodworking and construction, there’s a versatile tool that often flies under the radar but plays a crucial role in various projects. This tool, an oscillating saw, is a game-changer for skilled artisans and DIY enthusiasts. In this article, we’ll delve into the world of oscillating saws, exploring what they are and, more importantly, What is an Oscillating Saw Used For?
Plunge Cutting with Oscillating Saws
Plunge cutting is a fundamental technique in woodworking and construction, allowing artisans and DIY enthusiasts to make cuts into wood, metal, plastic, and more. Among the various tools available for plunge cutting, the oscillating saw has gained popularity for its versatility and accuracy.
In this article, we will explore the art of plunge cutting and how oscillating saws have become indispensable tools in achieving clean and efficient cuts.
Understanding Plunge Cutting
Plunge cutting refers to cutting directly into a material without needing pre-drilled holes or starting from an edge. This technique is commonly used for creating openings, notches, and detailed cuts requiring high precision. Whether you are working on a home improvement project or a professional construction site, plunge cutting is a valuable skill.
Oscillating Saws: The Swiss Army Knives of Cutting Tools
Oscillating saws, also known as multi-tools or oscillating multi-function power tools, have become a staple in the toolbox of many artisans.
These handheld devices employ a side-to-side oscillating motion to move their blades rapidly, allowing them to excel in plunge-cutting tasks. Oscillating saws come with various blade attachments, making them incredibly versatile and suitable for cutting through a wide range of materials.
Advantages of Plunge Cutting with Oscillating Saws
Precision: Oscillating saws offer exceptional accuracy when plunge cutting. The oscillating motion minimizes the risk of wandering or veering off course, ensuring that your cuts are accurate and clean. This level of precision is precious when working on intricate projects or making precise adjustments.
Versatility: Oscillating saws are compatible with various blades, including wood-cutting, metal-cutting, and flush-cutting blades. This versatility allows you to switch between materials and applications seamlessly. Whether you’re working on hardwood, PVC piping, or drywall, an oscillating saw can handle the task.
Accessibility: Plunge cutting is effortless with oscillating saws, even in tight or hard-to-reach spaces. These tools’ compact size and maneuverability make them ideal for tasks challenging for more extensive, bulkier cutting tools.
Reduced Material Waste: The precision of oscillating saws minimizes the amount of material waste, saving you time and money on materials.
Straight Cuts in Wood, Drywall, and Metal
Achieving precise and clean straight cuts in various materials is a fundamental skill for woodworkers, DIY enthusiasts, and construction professionals.
Traditional saws and cutting tools have their merits. Still, oscillating saws have emerged as versatile and indispensable tools for straight wood, drywall, and metal cuts. This article will delve into the art of making consecutive cuts using oscillating saws and explore their numerous advantages.
Straight Cuts with Oscillating Saws
An oscillating saw a multi-tool or multi-function power tool, utilizes a rapid side-to-side oscillating motion to drive its blades. This unique motion makes it highly effective for making straight cuts in a wide range of materials without requiring extensive setup or specialized skills.
Advantages of Straight Cuts with Oscillating Saws
Precision: Oscillating saws offer unparalleled accuracy when it comes to straight cuts. The controlled oscillating motion minimizes the chances of veering off course, resulting in refined, clean, and accurate cuts.
Versatility: These tools are incredibly versatile and have various blade attachments that cater to different materials. An oscillating saw can handle the task, whether working with wood, drywall, or metal.
Speed: Oscillating saws are known for their efficiency. They can make straight cuts quickly, saving you valuable time, especially on larger projects.
Accessibility: The compact size and maneuverability of oscillating saws make them accessible even in tight spaces or challenging angles.
Reduced Dust and Noise: Oscillating saws generate less dust and noise than other cutting tools, creating a cleaner and quieter working environment.
Applications of Straight Cuts with Oscillating Saws
Woodworking: Oscillating saws excel in making straight cuts in wood, making them indispensable for tasks such as cutting lumber, plywood, and trim. Whether crafting furniture, building cabinets, or tackling DIY projects, these tools can help you achieve precise and clean cuts.
Drywall Installation: When installing drywall, oscillating saws are perfect for cutting openings for electrical outlets, light switches, and recessed lighting fixtures. Their accuracy ensures a professional finish.
Metalworking: For metalworkers, oscillating saws can cut through various metals, including aluminum, copper, and steel. This makes them helpful in trimming metal sheets, pipes, and ductwork.
Home Renovations: Whether you’re renovating a bathroom, kitchen, or any other part of your home, oscillating saws can assist in making straight cuts for tile, flooring, and other materials.
Plumbing and Electrical Work: Plumbers and electricians often use oscillating saws to cut through pipes, conduit, and junction boxes accurately. This helps them maintain the integrity of plumbing and electrical systems.
Using an Oscillating Multi-Tool to Strip, Peel, and Scrape
Oscillating multi-tools have earned their reputation as versatile workhorses in DIY, home improvement, and professional trades. Beyond their cutting and sanding capabilities, these tools excel at precision tasks like stripping, peeling, and scraping. In this article, we’ll explore how you can harness the power of an oscillating multi-tool for these essential tasks.
Stripping Paint and Varnish
- Select the Right Blade: Choose an appropriate blade attachment for paint and varnish stripping. Flexible scraper blades and carbide-tipped blades are often ideal for this purpose.
- Prepare the Work Area: Ensure your workspace is well-ventilated and dust-free.
- Safety Gear: Remember safety gear.
- Setting the Speed: Most oscillating multi-tools have variable speed settings. Start with a lower speed to get a feel for the tool and gradually increase it as needed.
Scraping Technique:
- Hold the tool firmly, positioning the blade flat against the stripping surface.
- Begin at one edge and work systematically, moving the device back and forth.
- Apply moderate pressure, but be careful not to gouge the underlying material.
Patience is Key: Stripping paint or varnish can be time-consuming, so exercise patience. If the paint buildup is thick, you may need to make multiple passes.
Peeling Caulk and Sealant
Blade Selection: For removing caulk and sealant, choose a sharp, narrow scraper blade that can get into tight spaces.
Softening the Caulk: If the caulk is old and brittle, it’s a good idea to soften it first. You can do this by applying a caulk softener or using a heat gun (carefully!) to loosen it.
Starting the Removal: Insert the scraper blade into one end of the caulk or sealant bead. Begin gently scraping while maintaining a shallow angle to avoid damaging the surrounding surfaces.
Smooth and Steady: Keep the tool moving steadily along the caulk line, exerting consistent pressure. Stop and reposition the blade to avoid straining the device if you encounter resistance.
Cleanup: After removing the old caulk, thoroughly clean the area before applying the new caulk or sealant.
Scraping Adhesives and Residues
Blade Selection: For scraping adhesives, choose a rigid scraper blade that can handle stubborn residues.
Safety First: Wear safety gear to protect yourself from debris and fumes. Adequate ventilation is crucial when working with adhesives and solvents.
Solvent Application: Sometimes, you may need an adhesive solvent to soften and loosen the residue. Follow the manufacturer’s instructions for the specific solvent you’re using.
Scraping Technique: Insert the scraper blade under the adhesive or residue, then gently lift and squeeze it away. Maintain a low angle to minimize the risk of damaging the surface underneath.
Work Incrementally: Approach the task systematically, removing small sections at a time. This ensures better control and prevents excessive force on the tool.
Cleanup: Once the adhesive or residue is removed, clean the surface with an appropriate cleaner to ensure it’s ready for further work or refinishing.
Grout and Caulk Removal with an Oscillating Saw
While essential for sealing and finishing various surfaces, grout, and caulk can become an eyesore and a maintenance issue when they age or deteriorate. Traditional methods of grout and caulk removal can be labor-intensive and time-consuming.
Still, with the help of an oscillating saw, the task becomes significantly easier. This article will explore how an oscillating saw simplifies removing grout and caulk, making it a must-have tool for DIY enthusiasts and professionals.
Grout Removal
Removing old or damaged grout is a common requirement when revitalizing tiled surfaces in bathrooms, kitchens, and other areas. The oscillating saw, equipped with a grout removal blade, streamlines this process.
Select the Right Blade: Choose a carbide-grit or diamond-grit grout removal blade specifically designed for use with an oscillating saw. These blades are highly effective at cutting through grout.
Adjust the Speed: Many oscillating saws have variable speed settings. Begin with a lower speed and gradually increase it until you find the right balance of control and efficiency.
Blade Angle: Hold the oscillating saw at a slight angle (about 45 degrees) to the tile surface, ensuring you don’t damage the tiles themselves. Apply gentle, consistent pressure while working.
Working Progressively: Start at one end of the grout line and slowly move the oscillating saw along the grout, allowing the blade to cut through the material. Take your time and make multiple passes if necessary.
Cleaning Up: After removing the grout, vacuum or wipe away the debris to assess your progress and prepare the surface for regrouting.
Select the Right Blade: Choose a caulk removal blade or a flexible scraper blade, depending on the type of caulk and the surface. The flexible scraper blade is ideal for getting under the caulk to lift it.
Scoring the Caulk: Begin by making a shallow cut along the length of the caulk with the oscillating saw. This helps to weaken the caulk’s grip on the surface.
Insert the Blade: Carefully insert the blade beneath the scored caulk, angling it slightly upward to avoid damaging the surface underneath.
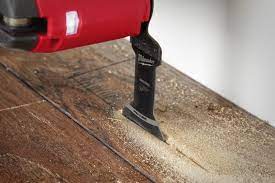
Undercut Doors for Tile & Flooring
When renovating or installing new flooring, one often overlooked challenge is ensuring a seamless transition beneath door jambs. To achieve a professional finish, it’s crucial to undercut doors, allowing your tile or flooring material to slide neatly underneath. Traditionally, this task has been labor-intensive and time-consuming.
Still, with the advent of oscillating saws, it has become remarkably efficient and precise. In this article, we’ll explore the art of undercutting doors for tile and flooring with an oscillating saw, showcasing the versatility and benefits of this indispensable tool.
Why Undercutting Doors is Essential?
Seamless Aesthetics: Undercutting ensures a flush transition between rooms, making your flooring project look polished and professional.
Preventing Tripping Hazards: An uneven floor transition can create tripping hazards, especially in high-traffic areas. Proper undercutting eliminates this risk.
Maintaining Door Functionality: Undercutting preserves the functionality of doors, allowing them to open and close smoothly without scraping against the new flooring.
The Role of an Oscillating Saw
An oscillating saw, also known as a multi-tool or oscillating multi-function power tool, is ideal for undercutting doors due to its precision and versatility. Equipped with the right blade, an oscillating saw can quickly work on this task.
Tools and Materials Needed
Before you begin, gather the tools
Oscillating Saw: Choose an oscillating saw with variable speed settings to match the material you’ll be cutting.
Flush-Cutting Blade: Select a flush-cutting blade with fine teeth to ensure clean, precise cuts.
Measuring Tape and Pencil: Accurate measurements are essential, so have a measuring tape and pencil on hand.
Wooden Block: A wooden block or guide can help maintain a consistent cut depth.
Steps for Undercutting Doors
Measure the gap between the bottom of the door jamb and the subfloor.
Mark the Cut Line: Use a pencil to mark the cut line on the door jamb, ensuring it aligns with the subfloor’s surface.
Safety Precautions: Put on your safety goggles and dust mask to protect yourself during cutting.
Select the Right Speed: Adjust your oscillating saw to an appropriate speed setting for the cutting material. Slower speeds are often better for hardwood door jambs, while higher rates may be suitable for softer materials.
Attach the Flush-Cutting Blade: Ensure your oscillating saw is fitted with a flush-cutting blade.
Begin Cutting: Cut along the marked line, keeping the blade flush against the door jamb. Use a steady and controlled motion, not forcing the edge or overheating it.
Test Fit: Periodically check the fit of your flooring material beneath the door jamb as you progress. This helps ensure that you achieve the desired clearance for a seamless transition.
Repeat as Needed: If the door jamb is thicker or needs to accommodate thicker flooring materials, you may need to make multiple passes. Be patient and make additional cuts as required.
Finish the Edges: Once the bulk of the material is removed, use the oscillating saw to clean up rough edges or corners for a smooth finish.
Additional Tips
Work Slowly and Precisely: Take your time to ensure accuracy. Rushing the process can lead to uneven cuts or damage to the door jamb.
Support the Door: Remove the door from its hinges to make undercutting easier and more precise. If you can’t remove the door, use wooden shims to support it during cutting.
Maintain a Consistent Depth: If you’re working with multiple doors, use a wooden block or guide to maintain a consistent cut depth throughout your project.
The Challenge of Sealant Removal
Sealants play a vital role in various industries and construction projects. They create a watertight and airtight barrier in joints, seams, and gaps. Over time, sealants can deteriorate, become discolored, or need replacement. This is where an oscillating saw comes into play as a valuable tool for sealant removal.
Efficient Sealant Removal
Sealant removal can be daunting, especially if it has aged and hardened. Traditional methods like scraping and cutting can be time-consuming and may damage the underlying surfaces. However, when equipped with the appropriate blade or attachment, an oscillating saw becomes a game-changer in the sealant removal process.
Precise and Controlled Cutting
The oscillating motion of the saw allows for precise and controlled cutting of the sealant. Unlike rotary tools that may generate excess heat and potentially damage the surrounding materials, an oscillating saw’s back-and-forth motion minimizes such risks. This precision removes only the sealant, leaving the adjacent surfaces unharmed.
Access to Tight Spaces
Sealants are often used in tight and hard-to-reach spaces, such as corners, edges, and around fixtures. With their compact design and precision, oscillating saws excel in accessing these confined areas. You can remove sealant from virtually any location without dismantling the entire structure.
Conclusion
The oscillating saw is a versatile and indispensable tool in various fields, including construction, woodworking, renovation, and DIY projects. Its ability to make precise, controlled cuts through a wide range of materials, coupled with the availability of various attachments, makes it an invaluable asset to both professionals and enthusiasts alike.
Whether it’s for plunge cutting, flush cutting, sanding, or scraping, the oscillating saw’s adaptability and precision make it a go-to choice for tasks that demand efficiency and accuracy. Its wide array of applications ensures that it remains a must-have tool in any toolkit, simplifying complex cutting and shaping challenges with ease.