
Welcome to this comprehensive guide on effectively utilizing the Ryobi Table Saw. Whether you’re an avid woodworker or a DIY enthusiast, this powerful tool can be a valuable asset in your workshop. In this tutorial, we will provide step-by-step instructions and important safety measures to ensure the smooth and secure operation of your Ryobi Table Saw.
So, if you’ve ever asked yourself, “How to use Ryobi Table Saw?” you’ve come to the right place. Let’s delve into the details and unlock the full potential of this versatile cutting tool.
A brief overview of the Ryobi Table Saw
Seeking a comprehensive overview of the Ryobi Table Saw? In this section, we will concisely summarise the Ryobi Table Saw, highlighting its key features, functionality, and advantages.
The Ryobi Table Saw is a highly regarded power tool widely utilized by woodworking enthusiasts and professionals. Renowned for its durability, versatility, and user-friendliness, it has become a preferred choice for various cutting tasks.
Whether engaging in DIY projects or tackling professional woodworking endeavours, the Ryobi Table Saw proves to be a valuable asset in any workshop.
The Ryobi Table Saw incorporates various features that enhance its efficiency and reliability in woodcutting operations. The following points offer a closer look at its noteworthy aspects:
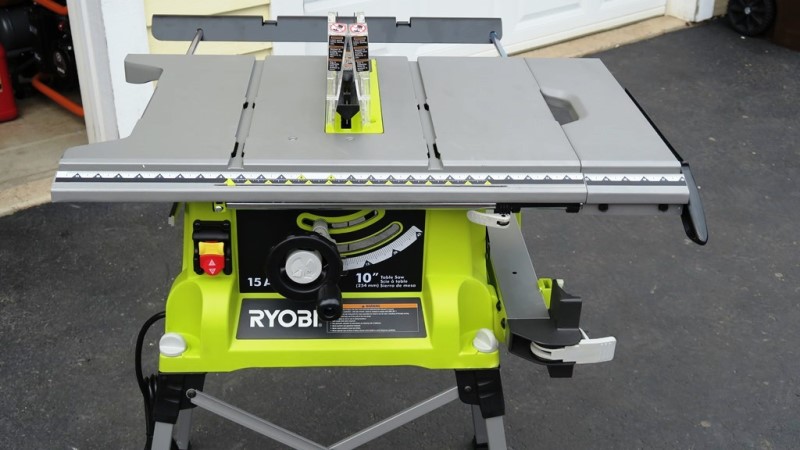
Design and Construction
The Ryobi Table Saw boasts a sturdy and compact design, rendering it suitable for workspaces of various sizes. Typically comprising a tabletop with an adjustable rip fence, a robust motor, a mitre gauge for angled cuts, and a blade guard for safety, this saw ensures stability and precision during cutting tasks.
Power and Performance
Equipped with a potent motor, the table saw delivers ample cutting power. The motor’s horsepower may vary across different models, with Ryobi offering a range of options to accommodate diverse cutting requirements. Opting for higher horsepower results in enhanced efficiency when working with tougher materials.
Cutting Capacity
The Ryobi Table Saw provides an extensive cutting capacity, enabling users to handle different sizes and types of wood. The adjustable rip fence guarantees accurate and consistent cuts, while the mitre gauge facilitates precise angled cuts, making it ideal for beveling, dado cuts, and more.
Safety Features
Emphasizing safety, Ryobi has incorporated various features into the table saw’s design. The blade guard is a protective barrier, preventing accidental contact with the spinning blade and reducing the risk of injuries. Additionally, certain models may include anti-kickback features and a riving knife to minimize the likelihood of kickbacks during cutting operations.
Ease of Use and Portability
Designed with user-friendliness, the Ryobi Table Saw proves accessible even to beginners. Assembly and usage instructions are typically provided clearly and concisely. Many models feature built-in handles, facilitating convenient transportation within your workshop or job site.
Additional Features
Depending on the specific model, the Ryobi Table Saw may offer additional features such as dust collection ports to maintain a clean workspace, onboard storage for accessories, and a push stick for enhanced operational safety.
The Ryobi Table Saw is a versatile and dependable tool that combines power, precision, and safety for various woodworking projects. Its user-friendly design, diverse features, and portability make it a favoured choice among woodworkers of all skill levels.
By familiarizing yourself with its features and adhering to proper safety guidelines, you can confidently utilize the Ryobi Table Saw to achieve accurate and professional-quality cuts.
1. Preparing the Workspace
Preparing your workspace for using the Ryobi Table Saw? This section will provide detailed instructions on effectively setting up your workspace to ensure a safe and efficient working environment.
Properly preparing your workspace before using the Ryobi Table Saw is crucial for a successful woodworking experience. This involves organizing the area, ensuring adequate lighting, and implementing safety measures. You can optimize your workflow and reduce potential hazards by dedicating time to preparing your workspace.
Follow these steps to effectively prepare your workspace for using the Ryobi Table Saw:
2. Clear the Area
Remove any clutter, debris, or unnecessary objects from your workspace. Clear the work surface and surrounding area of tools, materials, and other items that could impede your movement or interfere with the saw’s operation. A clean and organized workspace improves manoeuvrability and reduces the risk of accidents.
Ensure Sufficient Lighting: Adequate lighting is essential for optimal visibility while operating the table saw. Use natural light sources and supplement them with artificial lighting as needed. Position additional task lighting to eliminate shadows and enhance accuracy, particularly around the cutting area.
3. Ventilation and Dust Collection
If working indoors, ensure proper ventilation to maintain clean and fresh air. Connect a dust collection system or use a shop vacuum to effectively capture sawdust and maintain a clean working environment.
4. Stabilize the Work Surface
Place the Ryobi Table Saw on a stable, level work surface. A stable surface prevents the saw from tipping during operation and ensures accurate cuts. Use shims or adjustable levelling feet, if necessary, to level the table saw on uneven surfaces.
5. Clear the Work Area
Create a work area around the table saw, providing ample space for manoeuvring and handling materials. Remove any obstacles or trip hazards in the immediate vicinity. Keep the floor clean and free of sawdust, debris, or loose objects that could lead to slips or falls.
6. Implement Safety Measures
By clearing the area, providing adequate lighting, implementing ventilation and dust collection measures, stabilizing the work surface, and adhering to safety precautions, you can create an environment that promotes accurate cuts while minimizing the risk of accidents. Always prioritize safety, wear appropriate protective gear, and follow the manufacturer’s instructions for operating the table saw safely.
7. Clearing the area of clutter and obstacles
Preparing to use your Ryobi Table Saw and need to clear the area of clutter and obstacles? This section will provide detailed instructions on effectively clearing your workspace, ensuring a safe and efficient woodworking environment.
Clearing clutter and obstacles is crucial in preparing your workspace before using the Ryobi Table Saw. By removing unnecessary items and creating an organized and clean space, you can minimize the risk of accidents and optimize your woodworking experience.
Follow these steps to effectively clear the area of clutter and obstacles
Assess the Workspace: Begin by assessing the area surrounding your Ryobi Table Saw. Take a moment to evaluate the immediate vicinity and identify any clutter, debris, or objects that may impede your movement or interfere with the saw’s operation.
Remove Unnecessary Items
- Remove any tools, materials, or equipment not essential to the task.
- Clear the work surface of any items that could fall onto the saw or obstruct your movement.
- Store these items in designated storage areas or relocate them safely from the table saw.
Organize Tools and Accessories: Systematically organize your tools and accessories. Utilize toolboxes, shelves, or wall-mounted storage solutions to keep your tools within reach but out of the way. This helps prevent clutter and ensures each tool has its designated place, reducing the risk of accidental damage or injury.
Secure Cables and Cords: Ensure cables and cords are neatly organized and securely fastened. Use cable management solutions such as cord clips or cable ties to prevent tripping hazards and maintain a tidy workspace. Keep cords away from the cutting area to avoid accidentally cutting through them during operation.
Clear Pathways: Create clear and unobstructed pathways around the table saw. Remove any objects, such as furniture or equipment that may block your movement or pose a hazard. This allows for easy access to the saw and promotes safe navigation within the workspace.
Maintain a Clean Work Area: Regularly clean the area to free it from dust, debris, and sawdust. A clean work area improves safety and enhances the accuracy of your cuts by preventing debris from interfering with the saw’s operation.
Clearing clutter and obstacles is critical in preparing your workspace before using the Ryobi Table Saw. You can create a safe and efficient woodworking environment by removing unnecessary items, organizing tools and accessories, securing cables and cords, clearing pathways, and maintaining a clean work area.
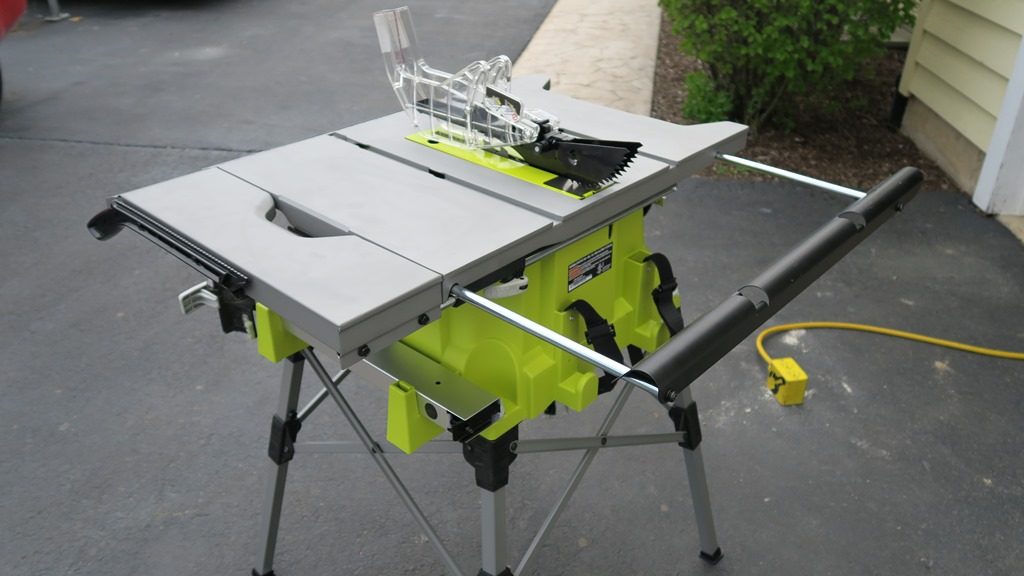
8. Rip fence and mitre gauge
The rip fence and mitre gauge are integral features of the Ryobi Table Saw that contribute to precise cutting and expanded cutting options. Understanding the purpose and proper utilization of these components is essential for optimizing the capabilities of your table saw.
Rip Fence
The rip fence is a guide that runs parallel to the saw blade, enabling accurate rip cuts along the length of a workpiece. Here’s a breakdown of its purpose and effective usage. The rip fence ensures consistent and precise cuts by maintaining a constant distance between the blade and the edge of the workpiece. It acts as a guide, keeping the workpiece aligned and preventing it from drifting during the cutting process.
Making Rip Cuts
For a rip cut, position the workpiece against the rip fence with the side to be cut facing the blade. Keep your hands safe from the blade and employ a push stick when necessary for added safety.
Miter Gauge
The mitre gauge is a versatile accessory that facilitates precise angled and crosscuts. It consists of a guide bar and a head that securely holds the workpiece at the desired angle. Here’s how to effectively utilize the mitre gauge
The mitre gauge enables accurate crosscuts at various angles, including bevel cuts or angled mitres. It ensures secure workpiece positioning and allows for precise angled cuts required for specific angles or intricate joinery.
Adjusting the Miter Gauge
Most Ryobi Table Saws come with an adjustable mitre gauge that allows you to set the desired angle for the cut. Loosen the locking mechanism, adjust the head to the desired angle, and tighten the lock to secure the mitre gauge in place.
Making Crosscuts
The mitre gauge enables precise angled and crosscuts, providing flexibility for various woodworking projects. By understanding their purpose and following proper techniques, you can fully utilize the rip fence and mitre gauge to achieve precise and professional-quality cuts with your Ryobi Table Saw.
9. Blade guard and anti-kickback pawls
Curious about the blade guard and anti-kickback pawls on your Ryobi Table Saw? In this section, we will explain these important safety features and their role in protecting you during operation.
The blade guard and anti-kickback pawls are essential safety components of the Ryobi Table Saw. Understanding how these features work and their significance in preventing accidents and ensuring your safety when using the table saw is crucial.
Blade Guard
The blade guard is designed to prevent accidental contact with the spinning blade, reducing the risk of injuries. It helps shield your hands and fingers from direct contact with the blade during cutting operations.
Installation and Adjustment
- Ensure the blade guard is properly installed and adjusted before operating the Ryobi Table Saw.
- Follow the manufacturer’s instructions to securely attach the guard to the saw’s housing.
- Adjust the guard’s position for smooth material feeding while providing adequate protection.
Maintaining Visibility
The blade guard is typically designed with a clear shield that allows you to see the cutting area while providing protection. Ensure the shield is clean and debris-free to maintain optimal visibility during operation.
Anti-Kickback Pawls
Anti-kickback pawls are small, toothed devices attached to the table saw’s rip fence. They help prevent kickback incidents when a workpiece is forcefully thrown back towards the operator. Here’s how anti-kickback pawls contribute to your safety
Anti-kickback pawls grip the workpiece as it is fed through the saw, preventing it from moving backwards and reducing the likelihood of kickback. They create resistance against the workpiece, allowing for smoother and more controlled cuts.
Proper Installation and Usage
- Ensure the anti-kickback pawls are securely attached to the rip fence before operating the table saw.
- Adjust their position to align with the direction of the cut.
- Ensure the pawls are engaged with the workpiece and have a firm grip while feeding the material through the blade.
Regular Maintenance
- Periodically inspect the anti-kickback pawls to ensure they are in good condition and functioning properly.
- Clean them of any sawdust or debris that may affect their gripping ability.
- Replace any damaged or worn pawls to maintain optimal safety.
The blade guard and anti-kickback pawls on your Ryobi Table Saw are vital in ensuring your safety during operation. The blade guard provides a physical barrier between you and the spinning blade, reducing the risk of accidental contact and injuries.
Anti-kickback pawls help prevent kickback incidents by gripping the workpiece and creating resistance during cutting. By properly installing, adjusting, and maintaining these safety features, you can confidently use your Ryobi Table Saw while minimizing the risk of accidents and prioritizing your well-being.
10. Understanding the purpose and usage of each component
Seeking to understand the purpose and usage of each component on your Ryobi Table Saw? In this section, we will comprehensively explain the purpose and proper usage of the key components, ensuring safe and accurate cuts.
Understanding the purpose and proper usage of each component on your Ryobi Table Saw is crucial for maximizing its capabilities and ensuring safe and accurate cuts.
Rip Fence
The rip fence serves as a guide for making parallel cuts along the length of the workpiece. It ensures consistent and accurate cuts by maintaining a specific distance between the saw blade and the edge of the workpiece.
To use the rip fence, align the workpiece against the fence, ensuring the desired width of the cut is achieved. Secure the rip fence, ensuring it remains parallel to the blade throughout the cutting process. This component is particularly useful for ripping boards to the desired width.
Miter Gauge
The mitre gauge allows for precise angled and crosscuts on the Ryobi Table Saw. It is essential to make accurate bevel cuts, angled mitres, or any other cuts requiring specific angles.
To use the mitre gauge, adjust the desired angle on the gauge and secure it in place. Position the workpiece against the mitre gauge head and hold it securely. Slide the mitre gauge along the guide bar while feeding the workpiece into the blade. This component enables you to create various angled cuts with precision.
Blade Guard
The blade guard is a safety feature that encloses the saw blade, providing a physical barrier between the operator and the blade. It helps prevent accidental contact with the spinning blade, reducing the risk of injuries.
- Ensure the blade guard is properly installed and adjusted before operating the table saw.
- Position it to allow for smooth material feeding while still providing adequate protection.
- Keep the blade guard clean and debris-free to maintain visibility during operation.
11. Disconnecting the power supply before making any adjustments
This simple yet essential step helps minimize the risk of electric shock and ensures safety during the adjustment process.
Follow these points to understand why disconnecting the power supply is necessary before making any adjustments to your Ryobi Table Saw:
Electrical Safety: Disconnecting the power supply eliminates the possibility of accidental contact with the saw’s moving parts or electrical components. Cutting off the power source significantly reduces the risk of electric shock or injury while adjusting.
Preventing Accidental Activation: When the power supply is disconnected, the saw’s motor cannot be accidentally activated during adjustment. This ensures the blade remains stationary, minimizing the risk of unintentional contact with the blade or other moving parts.
Personal Safety: You prioritize your safety and well-being by disconnecting the power supply. Taking the extra step of disconnecting the power supply adds a layer of protection for you.
Avoiding Damage to the Saw: Disconnecting the power supply before making adjustments also helps protect the saw itself. It prevents any accidental changes to settings or mechanisms that may cause damage to the saw or compromise its performance.
Additionally, it allows for smoother and more controlled adjustments without the risk of unintended movements. Disconnecting the power supply before adjusting your Ryobi Table Saw is a critical safety practice that should always be followed.
Doing so, you prioritize your safety, reduce the risk of accidents, and prevent damage to the saw. Remember to always take precautions when working with power tools and prioritize safety as you make any necessary adjustments to your table saw.
12. Positioning the workpiece correctly on the table
Interested in understanding the importance of positioning the workpiece correctly on the table of your Ryobi Table Saw? This section will explain why proper workpiece placement is crucial for accurate and safe cuts.
Positioning the workpiece correctly on your Ryobi Table Saw table is essential for achieving accurate cuts and ensuring your safety. This step involves properly aligning the workpiece to maintain control and prevent potential hazards during cutting.
Follow these points to understand the importance of positioning the workpiece correctly on the table of your Ryobi Table Saw:
Accuracy and Precision: Proper workpiece placement directly impacts the accuracy and precision of your cuts. Aligning the workpiece correctly on the table allows you to achieve the desired measurements and angles, resulting in precise cuts that meet your project requirements.
Material Stability: Placing the workpiece securely on the table helps maintain its stability during cutting. A stable workpiece reduces the risk of movement or shifting, minimizing the chances of uneven cuts or accidents caused by the workpiece getting caught or thrown off balance.
Safety Considerations: Correctly positioning the workpiece on the table promotes a safer working environment. When the workpiece is properly aligned, it reduces the likelihood of kickback or binding, which can lead to dangerous situations. Proper positioning also ensures that your hands and fingers are safe from the blade during cutting.
Fence Alignment: Aligning the workpiece with the table saw’s rip fence or mitre gauge is crucial for achieving straight and consistent cuts. The rip fence guides parallel cuts, while the mitre gauge allows precise angled cuts. Proper alignment with these components ensures accurate and repeatable results.
Clearing Obstacles: Remove loose objects, tools, or debris to maintain a clean and safe workspace.
Properly positioning the workpiece on the table of your Ryobi Table Saw is vital for achieving accurate cuts and ensuring your safety. By aligning the workpiece correctly, you enhance accuracy and precision, promote material stability, consider safety aspects, align with the rip fence or mitre gauge, and clear any potential obstacles. Always follow the manufacturer’s guidelines and prioritize safety when working with your table saw.
13. Utilizing the mitre gauge for angled cuts
The mitre gauge is a versatile accessory with your Ryobi Table Saw. It allows for angled cuts, such as bevel cuts or angled mitres, and expands the cutting capabilities of your table saw. Properly using the mitre gauge is essential for achieving accurate and high-quality angled cuts.
Adjusting the Miter Gauge
Loosen the locking mechanism: Begin by loosening the locking mechanism on the mitre gauge to allow for adjustments.
Set the desired angle: Determine the desired angle for your angled cut. Most mitre gauges have preset stops for common angles, or you can adjust it manually to the desired angle.
Align the gauge: Align the mitre gauge with the blade by positioning the gauge against the edge of the table and parallel to the blade.
Securing the Workpiece
Position the workpiece against the mitre gauge head, ensuring it is snugly but not tightly held.
Align the cut line: Align the cut line on the workpiece with the blade by adjusting the position of the workpiece along the mitre gauge.
Making the Angled Cut
Maintain control: Hold the workpiece firmly against the mitre gauge and ensure a secure grip throughout the cutting process.
Push the workpiece through the blade: Slowly and steadily push the workpiece through the blade, maintaining control and a consistent feeding speed.
Keep hands clear: Always keep your hands and fingers safe from the blade to avoid any potential injuries.
Practice and Adjustment
Test cuts: Perform test cuts on scrap pieces of wood to fine-tune your technique and achieve the desired angle and accuracy.
Adjust as needed: If the angle is not precisely achieved, make small adjustments to the mitre gauge to fine-tune the angle until the desired result is achieved
The mitre gauge on your Ryobi Table Saw is valuable for making angled cuts. Following the abovementioned steps, you can effectively utilize the mitre gauge to achieve accurate and precise angled cuts.
Remember to adjust the mitre gauge, secure the workpiece, maintain control during the cut, and practice to improve your technique. With proper usage, the mitre gauge expands the cutting possibilities of your table saw and allows you to create various angled cuts with precision.
Pushing the workpiece steadily and smoothly through the blade
Are you curious about the importance of steadily and smoothly pushing the workpiece through the blade on your Ryobi Table Saw? This section will explain why maintaining a steady and smooth feeding motion is crucial for achieving clean and accurate cuts.
When using your Ryobi Table Saw, pushing the workpiece steadily and smoothly through the blade is crucial. This technique ensures clean and precise cuts while reducing the risk of kickback and maintaining control over the cutting process.
Clean and Accurate Cuts
Pushing the workpiece steadily and smoothly through the blade helps achieve clean and accurate cuts. Maintaining a consistent feeding motion reduces the chances of blade deflection or wandering, resulting in cleaner and more precise cuts.
Minimizing Kickback
A steady and smooth feeding motion helps minimize the risk of kickback. Kickback occurs when the workpiece is forcefully thrown back towards the operator, potentially causing injuries.
Feeding the workpiece steadily and smoothly reduces the chances of it binding or catching on the blade, thereby minimizing the risk of kickback.
Maintaining Control
Pushing the workpiece steadily and smoothly through the blade allows you to control the cutting process. This control ensures the workpiece stays in contact with the fence or mitre gauge, enabling accurate and consistent cuts. It also helps you anticipate any potential issues or adjustments needed during cutting.
Feeding Speed
While pushing the workpiece steadily is essential, maintaining an appropriate feeding speed is equally important. Pushing too quickly can result in a loss of control and may compromise the quality and accuracy of the cut.
Pushing too slowly may cause burn marks or result in an uneven cut. Find a balance by feeding the workpiece at a steady and controlled pace.
Personal Safety
Pushing the workpiece steadily and smoothly through the blade is beneficial not only for the quality of the cut but also for your safety. Maintaining control and a consistent feeding motion reduces the risk of accidents, such as contact with the blade or sudden movements of the workpiece.
Pushing the workpiece steadily and smoothly through the blade on your Ryobi Table Saw is crucial for achieving clean, accurate cuts while ensuring your safety.
Maintaining a consistent feeding motion minimizes the risk of kickback, maintains control over the cutting process, and produces high-quality results. Remember to balance speed and control, and always prioritize safety when operating your table saw.