
Welcome to this informative guide on cutting aluminum gutters with a miter saw. If you’re a homeowner or a DIY enthusiast looking to tackle gutter installation or replacement, you’ve come to the right place.
Aluminum drains are a famous decision because of their strength and protection from rust, making them an excellent long-term investment for your home.
However, achieving precise and clean cuts in aluminum gutters can only be challenging with the right tools and techniques. In this guide, we’ll walk you through the step-by-step process of cutting aluminum gutters with a miter saw, ensuring your gutter project succeeds.
Whether you’re a seasoned handyman or a novice DIYer, by the end of this guide, you’ll have the knowledge and confidence to make accurate cuts in your aluminum gutters easily.
Tools and Materials required for Cutting Aluminum Gutters with a Miter Saw
Cutting aluminum gutters with a miter saw is straightforward, but you’ll need the right tools and materials to ensure clean and accurate cuts. Here’s what you’ll need:
Tools
Miter Saw: A compound miter saw with a carbide-tipped blade suitable for cutting aluminum is essential. Ensure the saw is in good working condition and the blade sharp.
Safety Gear: Safety glasses, hearing protection, and work gloves are essential to protect yourself from metal shavings and potential hazards.
Clamps: Use clamps to secure the gutter on your work surface securely. This prevents the gutter from moving during the cut.
Materials
Aluminum Gutter: Ensure the aluminum gutter section you need for your project is accurately measured and marked for cutting.
Markers: Use a pencil or marker to mark the specific points where you need to make cuts on the aluminum gutter. Clear and accurate markings are essential for precise cuts.
Support Surface: Set up a sturdy work surface or workbench where you can place the gutter for cutting. Make sure it’s at a comfortable working height.
Sawhorses: If your work surface is unsuitable, you can use sawhorses to elevate the gutter to a more comfortable level.
Measuring Tools: Have measuring tape or a combination square on hand to ensure your markings are accurate.
Coolant or Lubricant: For prolonged cutting sessions or when cutting thick aluminum, a coolant or lubricant can help prevent blade overheating and prolong the life of the saw blade. Ensure it’s compatible with aluminum.
Dust Collection: If your miter saw has a dust collection port, consider connecting it to a vacuum or dust collector to manage metal shavings and maintain a clean workspace.
Scrap Wood: Using a scrap piece of wood as a sacrificial backing behind the gutter while cutting can help minimize burring and reduce the risk of damage to the gutter.
Remember to work safely when cutting aluminum gutters, wear fitting well-being gear, and follow the maker’s recommendations for your miter saw and blade. Double-check your measurements and markings to ensure precise cuts, and always secure the gutter in place to prevent any movement during cutting.
Preparation for cutting aluminum gutters with a miter saw
Cutting aluminum gutters with a miter saw can be straightforward when done correctly. Here’s a step-by-step guide to help you prepare for cutting aluminum gutters with a miter saw safely and effectively:
Tools and Materials You’ll Need
- Miter saw with a carbide-tipped blade suitable for cutting aluminum.
- Safety gear: Safety glasses, hearing protection, and gloves.
- Aluminum gutters to be cut.
- Measuring tape and a pencil.
- Sawhorses or a sturdy work surface to support the gutters.
Preparation Steps
Safety First: Wear your safety glasses, hearing protection, and gloves. Aluminum can produce sharp edges and tiny metal fragments during cutting, so proper safety gear is essential.
Measuring and Marking
Please measure the length of the aluminum gutter section you need to cut and mark it with a pencil. Use a measuring tape to ensure accurate measurements. Make sure your measurements are precise to avoid any wastage.
Twofold looks at your estimations to guarantee they are right before proceeding.
Set Up the Miter Saw
Ensure that your miter saw has a carbide-tipped blade designed for cutting aluminum. A blade with fine teeth (e.g., 80 to 100) works well for clean cuts.
Change the miter saw to the ideal point for your cut if you make angled cuts. Otherwise, could you set it to 90 degrees for straight cuts?
Secure the Workpiece
Place the aluminum gutter section on sawhorses or a sturdy work surface to support it during the cut. Make sure it is stable and won’t move while cutting.
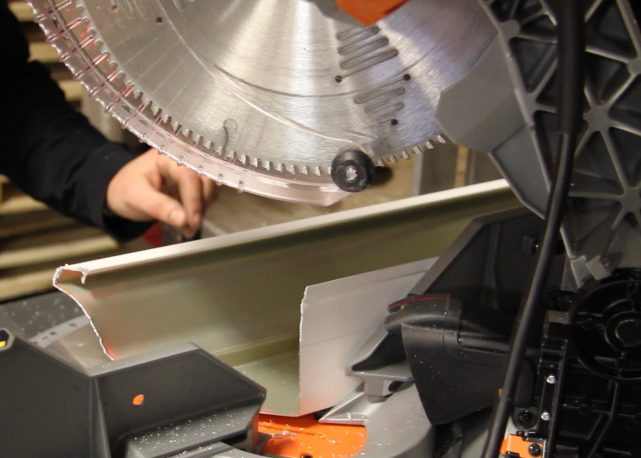
Cutting Technique
- Position the aluminum gutter section against the saw’s fence or cutting guide.
- Start the miter saw and let it reach full speed before beginning the cut.
- Slowly lower the saw blade onto the marked cutting line. Keep a steady hand and maintain a controlled cutting speed to avoid overheating the blade or creating jagged edges.
- If you make angled cuts, ensure the gutter is securely positioned against the saw’s fence and maintain a consistent cutting angle.
Cooling: To prevent overheating of the blade and aluminum, it’s a good practice to pause briefly during the cut to allow the aluminum to cool. This helps ensure cleaner and smoother cuts.
Collecting Debris: Aluminum can produce metal shavings and debris. Use a brush or vacuum to collect the debris as you cut to keep your work area clean and safe.
Inspect the Cut: After cutting, inspect the edges of the aluminum gutter to ensure they are clean and free from any burrs or sharp edges. You can use a file or deburring tool to smooth out any rough spots if needed.
Safety Gear Removal: Remove your safety gear only after you have completed the cut and cleaned up the work area.
Cutting Techniques for cutting aluminum gutters with a miter saw
Cutting aluminum gutters with a miter saw requires careful techniques to ensure clean and precise cuts while minimizing the risk of damaging the gutter material. Here are the steps and techniques for cutting aluminum gutters with a miter saw:
Tools and Materials Needed
- Miter saw with a fine-toothed carbide blade suitable for non-ferrous metals.
- Safety gear: Safety glasses and hearing protection
- Aluminum gutter
- Sawhorses or a stable work surface
- Measuring tape
- Pencil or marker
- Clamps (optional for securing the gutter)
Safety Precautions: Always prioritize safety. Wear well-being glasses and hearing assurance to shield yourself from flying debris, jetsam, or noise during cutting.
Measure and Mark: Measure the length you need to cut from the aluminum gutter and mark it with a pencil or marker. Ensure your measurements are accurate to avoid any waste or the need for additional cuts.
Set up the Miter Saw: Install a fine-toothed carbide blade suitable for cutting non-ferrous metals on your miter saw. Ensure the blade is securely tightened and positioned correctly.
Secure the Gutter (Optional): If your gutter is long and needs support, consider using clamps or other suitable methods to secure it on sawhorses or a stable work surface. This prevents the gutter from moving during the cut.
Adjust the Miter and Bevel Angles (if needed): Depending on your specific project, you may need to make miter or bevel cuts on the gutter. Adjust the miter and bevel angles on your miter saw accordingly. If it’s a straight cut, ensure the angles are set at 90 degrees.
Make the Cut: Start the miter saw and slowly lower the blade onto the marked line on the aluminum gutter. Ensure a steady and controlled motion as you cut through the material. Avoid applying excessive force, as this can lead to rough cuts or damage to the gutter.
Cutting Speed: Aluminum is a soft metal, so you don’t need to rush the cutting process. A slower cutting speed often results in cleaner and more precise cuts. Allow the blade to do the work.
Cooling Lubricant (Optional): If you’re making multiple cuts or working with thick aluminum gutters, you can use a cooling lubricant or cutting fluid to keep the blade and material cool and reduce friction.
Inspect the Cut: After completing the cut, carefully inspect the gutter’s edge to ensure it’s clean and free from burrs or sharp edges. If necessary, utilize a document or sandpaper to smooth any harsh edges.
Common Mistakes to avoid while cutting aluminum gutters with miter saw
Cutting aluminum gutters with a miter saw can be straightforward if done correctly. However, there are several common mistakes to avoid to ensure a safe and accurate cut:
Lack of Safety Gear: Always wear appropriate safety gear when working with power tools, including security glasses, to safeguard your eyes and hearing assurance. Avoid loose-fitting clothing and ensure long hair is tied back to prevent accidents.
Using the Wrong Blade: The wrong type of saw blade is a common mistake. It would help to use a carbide-tipped or specialized non-ferrous metal cutting blade to cut aluminum gutters. Using a wood-cutting blade can result in chipping, overheating, or even kickback.
Incorrect Blade Height: Ensure that the blade height is set correctly. The blade should protrude only slightly below the material to minimize the risk of accidents and improve cut quality.
Inadequate Support: Failing to support the gutter properly can result in a poor and unsafe cut. Use additional supports or stands to keep the gutter level and stable during cutting.
Not Securing the Gutter: Ensure it is securely clamped or in place to prevent it from moving during the cut. An unsecured gutter can lead to inaccurate cuts and dangerous kickbacks.
Excessive Blade Speed: Running the miter saw at too high a speed can generate excessive heat and cause the aluminum to melt or bind on the blade. Set the saw to an appropriate speed for cutting aluminum.
Forcing the Cut: Avoid pushing the gutter too quickly through the blade. Let the blade cut, and use a steady, controlled feed rate to prevent blade binding, overheating, and kickback.
Incorrect Angle Settings: Ensure your miter and bevel angle settings are accurate and appropriate for your desired cut. Double-check your measurements and settings before cutting.
Neglecting Safety Features: Miter saws often have safety features like blade guards and electric brakes. Ensure these features function correctly and do not remove or bypass them.
Ignoring Material Thickness: Be aware of the thickness of the aluminum gutter material you are cutting. Adjust the saw’s depth of cut accordingly to prevent overcutting.
Finishing Touches while cutting aluminum gutters with a miter saw
Several finishing touches are essential to achieve a polished finish when cutting aluminum gutters with a miter saw. Begin using the right blade, opting for a carbide-tipped saw blade designed for non-ferrous metals like aluminum, preferably with a high tooth count for cleaner cuts. Secure the gutter firmly before cutting, using clamps or a workbench to prevent movement.
Measure and mark the cutting line accurately for precision. Consider using a lubricant or cutting wax to reduce friction and heat, resulting in smoother cuts. Cut slowly and steadily, carefully feed the gutter through the blade, and use clamping blocks to minimize vibration and prevent bending. After cutting, deburr the edges with a metal file or sandpaper for safety and a finished appearance.
Clean the cuts to remove any metal shavings or debris and, if necessary, apply a protective coating or paint to the cut edges. Always prioritize safety by wearing appropriate gear, such as safety glasses and hearing protection, during cutting. When working with aluminum gutters using a miter saw, these finishing touches ensure clean, precise, and professionally finished cuts.
Maintenance and Longevity of aluminum gutters
Aluminum drains are a well-known decision for some mortgage holders due to their durability and resistance to rust and corrosion. Legitimate upkeep can assist with broadening the Life span of your aluminum gutters and keep them functioning effectively. Here are some tips for maintaining and ensuring the Longevity of your aluminum gutters:
Regular Cleaning: Clean your drains twice yearly, typically in the spring and fall, to eliminate leaves, debris, and dirt. Obstructed drains can prompt water flood and potential damage.
Inspect for Damage: Regularly inspect your gutters for signs of damage, including dents, cracks, or loose fasteners. Address any issues expeditiously to forestall further harm.
Secure Loose Fasteners: Check for loose gutter spikes or hangers and tighten them as needed. Replace any damaged or missing fasteners to ensure the gutter system’s stability.
Paint and Seal: If your aluminum gutters have chipped or peeling paint, consider repainting them with high-quality outdoor paint. This not only improves aesthetics but also adds a protective layer. Sealing any seams or joints with caulk can prevent leaks.
Trim Overhanging Branches: Trim overhanging tree branches to keep leaves and trash from falling into the gutters, reducing the risk of clogs.
Install Gutter Guards: Gutter guards or covers can help keep leaves and debris out of your gutters, reducing the frequency of cleaning and minimizing the risk of clogs.
Slope Adjustment: Ensure your gutters have the correct slope toward the downspouts. This allows water to flow correctly and prevents standing water, which can lead to corrosion.
Downspout Maintenance: Inspect and clean downspouts regularly to ensure water flows freely. Use a plumber’s snake or a pressure washer to remove clogs.
Gutter Flushing: After cleaning, flush the gutters and downspouts with a hose to ensure unobstructed water flow. This also helps identify any remaining clogs or issues.
Rust Prevention: While aluminum is naturally rust-resistant, it can develop oxidation over time. To prevent this, consider applying a clear-coat sealant to the gutters to protect the surface from oxidation and UV damage.
Winter Precautions: In harsh winters, be cautious when using de-icing salts on nearby walkways or driveways, as runoff can corrode aluminum gutters. Clear snow and ice from gutters to prevent ice dams and excess weight.
Professional Inspection: Periodically have your gutters professionally inspected and maintained. Experts can distinguish possible issues and address them before they become significant problems.
Repairs and Replacements: If your aluminum gutters have significant damage or show signs of aging, consider repairing or replacing them to maintain the integrity of your home’s drainage system.
Legitimate upkeep is essential to guaranteeing aluminum gutters’ Life span and functionality. By following these guidelines and addressing issues promptly, you can enjoy durable and reliable gutter systems that protect your home from water damage for many years.
Conclusion
Cutting aluminum gutters with a miter saw can effectively and efficiently achieve precise and clean cuts for gutter installation or repair projects. However, it’s crucial to prioritize safety by wearing appropriate protective gear and taking necessary precautions to minimize the risk of injury.
Additionally, using the right blade, such as a carbide-tipped or non-ferrous metal blade, is essential for achieving smooth and accurate cuts in aluminum gutters.
Regularly maintaining and calibrating your miter saw and adhering to manufacturer guidelines will help ensure the Longevity of both your equipment and the quality of your gutter cuts.
With proper techniques, equipment, and safety measures, cutting aluminum gutters with a miter saw can be reliable and effective for achieving professional-looking results in your gutter projects.