
Welcome to this beginner-friendly guide on how to put a drill bit in a drill. If you’ve ever found yourself staring at a routine and a handful of drill bits, wondering how to make them work together effectively, you’re in the right place.
Putting a drill bit in a drill might appear basic, but doing it correctly ensures safe and efficient drilling. In this bit-by-bit instructional exercise, we will walk you through the easy process of putting a drill bit in a drill so you can confidently tackle your DIY projects.
Safety Precautions
Working with power tools can be highly productive but also has inherent risks. Emphasizing safety is paramount to prevent accidents and injuries. Always follow these safety guidelines:
- Training: Guarantee you have gotten appropriate preparation in using the specific power tool you intend to use. Only operate a device you are familiar with.
- Read the Manual: Read and understand the manufacturer’s instructions and safety guidelines for the power tool. These guidelines provide essential information on safe operation.
- Inspect Tools: Before each use, inspect the power tool for any damage, wear, or defects. Do not use a device that is damaged or malfunctioning.
- Personal Protective Equipment (PPE): Always wear appropriate PPE to protect yourself, including safety glasses, ear protection, and work gloves, as listed below.
- Work Environment: Maintain a clean, well-lit, and clutter-free work area. Ensure proper ventilation when working with materials that produce dust or fumes.
- Secure Workpiece: Secure the workpiece firmly using clamps or a vise to prevent it from moving while you work.
- No Distractions: Avoid distractions, such as talking on the phone, when operating power tools. Stay focused on the task at hand.
- Disconnect Power: Before changing accessories or performing maintenance, disconnect the power source and wait for the tool to come to a complete stop.
- Follow Proper Procedures: Use the tool only for its intended purpose and follow recommended operating procedures.
- Emergency Preparedness: Know the location of emergency shut-offs and first-aid kits in your workspace. Have a plan for what to do in case of an accident.
Essential safety gear and precautions
Safety Glasses: Shield your eyes from flying garbage, dust, and potential splinters. Safety glasses should meet the ANSI Z87.1 standard for impact resistance.
Ear Protection: Continuous exposure to noise from power tool can damage hearing noise from power tool can damage hearing. Use ear insurance, like ear covers or earplugs, to reduce noise levels.
Work Gloves: Wear gloves to protect your hands from sharp edges, splinters, and hot surfaces. Choose gloves appropriate for the specific task and provide a good grip.
Importance of a stable work surface:
A stable work surface is crucial for several reasons:
- Safety: A shaky or unstable work surface can cause accidents and injuries. It may lead to losing control over the power tool or workpiece, resulting in cuts, abrasions, or more severe injuries.
- Accuracy: When using power tools, precision is often necessary. An unstable surface can lead to inaccurate cuts or measurements, affecting the quality of your work.
- Tool Performance: Power tools work most effectively on a stable base. An unstable work surface can cause excessive vibrations, reducing the tool’s efficiency and potentially causing premature wear and tear.
To ensure a stable work surface:
- Use a workbench or table designed for the task at hand.
- Ensure that the work surface is level and free from any obstructions.
- Secure the workpiece firmly in place using clamps or a vise.
- Use shims or leveling tools to create stability if working on an uneven surface.
By emphasizing safety, using appropriate safety gear, and working on a stable surface, you can significantly reduce the risks of using power tools and create a safer and more productive workspace. Always prioritize safety to enjoy the benefits of power tools without compromising your well-being.
Gather the Necessary Tools and Materials
- Drill: A power drill is the primary tool for creating holes or driving screws. Ensure it works well with a charged or properly connected power source (battery or cord).
- Drill Bit: Select the fitting bore for your specific task. Drill bits come in various sizes and types, such as twist bits for general drilling or specialized bits for materials like wood, metal, or masonry.
- Chuck Key (if applicable): If your drill has a keyless chuck, you won’t need a chuck key. However, if your training has a keyed chuck (requiring a key to tighten and loosen), ensure you have the chuck key on hand. This is essential for securing the drill bit in the chuck.
- Essential safety gear and precautions:
- Safety Glasses: Shield your eyes from flying garbage and debris.
- Hearing Protection: Ear protection, such as earmuffs or earplugs, is crucial to safeguard your hearing from the noise the drill generates.
- Work Gloves: Depending on the task, wear appropriate work gloves to protect your hands from sharp edges, splinters, or hot surfaces.
- Dust Mask or Respirator: If you work with materials that produce dust or fumes, wear a dust mask or respirator to protect your respiratory system.
- Appropriate Clothing: Avoid loose-fitting clothing that can get caught in the drill or other machinery. Wear clothing suitable for the task, including long sleeves and pants to protect your skin.
Identifying Drill Types and Chucks
Identifying drill types and chucks is essential for selecting the right tools for your specific task and understanding how to use them safely and effectively. Here’s a brief guide to help you identify common drill types and chucks:
Drill Types:
- Corded Drills: These drills are powered by electricity through a cord. They provide consistent power but require access to an electrical outlet.
- Cordless Drills: Cordless drills are fueled by battery-powered batteries, offering portability and convenience. They come in various voltage ratings, with higher voltage models providing more power.
- Drill/Driver: A versatile tool that combines drilling and screwdriving functions. It’s commonly used for both creating holes and driving screws.
- Hammer Drill: This kind of drill has a pounding activity that permits it to bore into hard materials like masonry and concrete. It’s ideal for tasks like installing anchors or drilling into stone.
- Impact Driver: Although not a traditional drill, an effect driver is utilized for driving screws and fasteners. It delivers powerful rotational and downward forces, making it efficient for fastening tasks.
- Angle Drill: Angle drills have a compact design with a right-angle drive, making them suitable for tight spaces or drilling at an angle.
Chucks:
- Keyless Chuck: Keyless chucks allow you to change drill bits without needing a chuck key. They have a mechanism you can hand-tighten to secure the bit. To loosen the chuck, you turn it in the opposite direction.
- Keyed Chuck: Keyed chucks require a chuck key to tighten and loosen the chuck. The key fits into holes or slots on the chuck, allowing you to grip or release the drill bit securely.
- SDS Chuck: SDS chucks are commonly found on rotary hammer drills designed for drilling into concrete and masonry. Their unique mechanism allows the bit to move back and forth while rotating, providing more efficient drilling in hard materials.
- Hex Chuck: Hex chucks are often used in impact drivers and accept hex-shank bits. They have a quick-change design, allowing you to insert and release bits with one hand.
When identifying drill types and chucks, it’s essential to think about the particular prerequisites of your undertaking and match them with the appropriate tool. Additionally, always follow the manufacturer’s instructions and safety guidelines for your drill and chuck type to ensure safe and effective use.
Preparing the Drill
Following essential steps to prepare the drill for safe and effective use is crucial. Firstly, ensure that the training is turned off and unplugged from the electrical outlet for corded drills. This precautionary measure prevents accidental activations and guarantees safety while handling the tool.
Always disconnect or remove the battery when the training is not used for cordless drills to avoid unintentional starts. Inspect the chuck, which holds the drill or screwdriver bit in place. Look inside the chuck to ensure it is clean and free from any debris or foreign objects that could hinder the proper seating of the drill bit.
If any debris is found, promptly remove it to ensure a secure grip on the bit. Also, check for any indications of harm or wear on the chuck, ensuring it opens and closes smoothly without any sticking or resistance.
Lastly, if your drill features a keyed chuck that requires a chuck key for tightening or loosening, locate the chuck key and keep it readily accessible. The chuck key must be within easy reach, as you will need it to secure the drill bit in the chuck or to change bits during your work.
By diligently following these preparatory steps, you will ensure your drill is in optimal condition and ready for the task, promoting safety and efficient performance.
Choosing the Right Drill Bit
Choosing the right drill bit is a crucial step in ensuring the success of your drilling project. The decision of boring apparatus relies upon the material you’re drilling into and your specific task. Here’s a guide on how to choose the right drill bit:
Determine the Material:
Identify the material you’ll be drilling into. Common materials include wood, metal, concrete, masonry, tile, and plastic.
Consider the Task:
Decide whether you need to create a hole or drive a screw. Different tasks require different types of bits.
Understand Bit Types:
- Twist Drill Bits: These are the most common and versatile drill bits used for general-purpose wood, metal, and plastic drilling. They have a spiral shape with cutting edges for efficient drilling.
- Brad Point Bits: These bits are ideal for drilling clean and precise holes in wood. They have a sharp point that helps prevent splintering.
- Masonry Bits: Utilized for boring into concrete, block, or stone. They have a carbide tip for added durability and are designed to withstand the hardness of masonry materials.
- Spade Bits: These flat, paddle-shaped bits are excellent for quickly drilling large holes in wood. They are commonly used for rough carpentry work.
- Forstner Bits: Ideal for drilling flat-bottomed holes with clean edges in wood. They are often used for making holes for dowels or concealed hinges.
- Hole Saw Bits: Used for cutting larger-diameter holes in wood, plastic, or metal. They are commonly employed for tasks like installing doorknobs or creating pipe openings.
- Step Bits: These bits have multiple stepped diameters and are excellent for drilling holes of different sizes in sheet metal and thin materials.
- Countersink Bits: Used to create a conical recess for screw heads to sit flush with the material’s surface. They are often used for woodworking and metalworking.
- Auger Bits: Designed for drilling deep holes in wood and are commonly used in construction and woodworking for tasks like creating holes for pipes.
Select the Right Size:
Choose a bit size that matches the diameter of the hole you need. The size is typically indicated in inches or millimeters.
Check Compatibility:
Ensure the chosen drill bit is compatible with your drill’s chuck type (keyless, keyed, hex, etc.).
Quality Matters:
Invest in high-quality drill bits for better performance and durability. Cheaper bits may wear out quickly or produce less precise results.
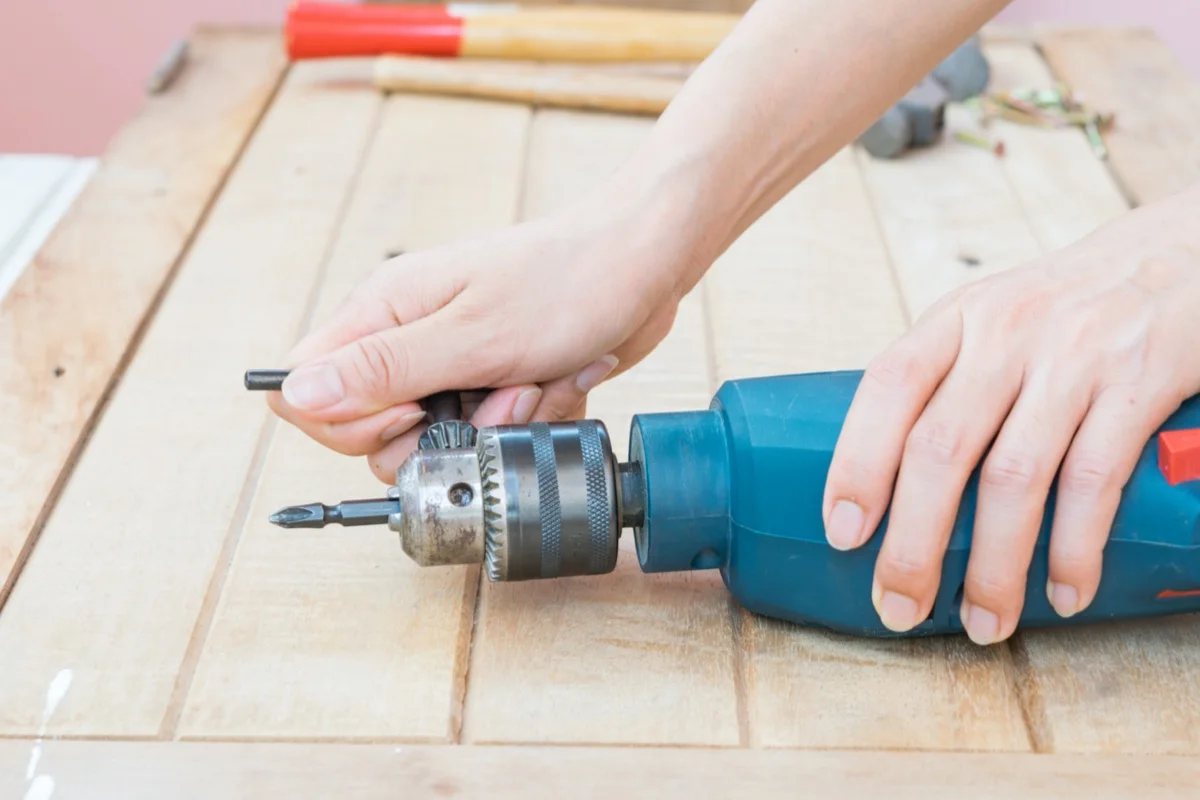
Inserting the Drill Bit
Inserting a drill bit correctly is a fundamental step in preparing your drill for use. First and foremost, ensure that the training is powered off and, if applicable, disconnected from the power source, prioritizing safety above all else. Next, locate the chuck, the component responsible for holding the drill bit, usually positioned at the front end of the drill.
Depending on your drill’s chuck type, proceed accordingly. For a keyless chuck, rotate it counterclockwise to open the jaws, while for a keyed chuck, insert the chuck key and turn it clockwise to loosen the jaws. Once the chuck is open, insert the drill bit by holding it at the smooth shank end and align it with the chuck’s jaws.
Ensure it’s fully inserted, leaving only the smooth shank visible and the cutting end extending. For keyless chucks, tighten by turning it clockwise, and for keyed chucks, use the chuck key to secure the bit. Always double-check the tightness and give the bit a slight tug to ensure it’s securely held. Finally, close the chuck and power on the drill, ready to proceed with your drilling or driving task.
Testing the Installation
A. Ensure the drill bit is securely in place:
Before proceeding with your drilling or driving task, confirming that the drill bit is firmly and securely held in the chuck is essential. Ensure the chuck is tightened around the bit without visible play or movement. A loose drill bit can result in inaccuracies, wobbling, and potential safety hazards during operation.
B. Rotate the chuck by hand to check for any wobbling or loose bits:
To further verify the integrity of the drill bit installation, rotate the chuck by hand. Turn it gently in clockwise and counterclockwise directions to detect wobbling or loose bits. An adequately installed drill bit should remain stable and not shift within the chuck during this rotation. Stop immediately and re-tighten the chuck to secure the bit if you notice any movement or instability.
C. Verify that the bit is centered and aligned with the drill’s body:
Inspect the alignment of the drill bit with the drill’s body. The bit should be centered and aligned straight with the training axis. Misalignment can lead to drilling inaccuracies and potential damage to the workpiece. Adjust the bit within the chuck to ensure proper alignment if it appears off-center or misaligned.
Final Safety Checks
Performing final safety checks is crucial before commencing any work with power tools. First, it’s imperative to remind readers of the necessity of wearing appropriate safety gear.
This includes safety glasses to shield the eyes from debris, ear protection to counteract excessive noise, work gloves for hand protection, and any additional specialized gear required for specific tasks, such as dust masks or respirators. Safety gear is non-negotiable for your well-being.
In addition to personal protective equipment, underscore the significance of keeping the workspace clean and devoid of clutter. A messiness-free work area decreases the gamble of mishaps and injuries.
Stress the need to remove extraneous items, debris, or materials that might impede your work or create safety hazards. A tidy environment enhances concentration and allows for better organization and maneuverability, resulting in safer and more efficient work practices.
Lastly, as a final precaution, stress the necessity of checking the drill’s power source and confirming that it’s in the off position or unplugged. This step is especially crucial for corded drills; they must be powered off and disconnected from electrical outlets to prevent accidental starts and protect against unexpected power surges.
For cordless drills, emphasize the importance of disconnecting or removing the battery when the tool is not in use to eliminate the risk of unintended activation. By reinforcing these final safety checks, you underscore the paramount importance of safety throughout the work process, promoting a secure and productive work environment.
Conclusion
Learning how to put a drill bit in a drill is a fundamental skill for anybody hoping to handle Do-It-Yourself projects or engage in woodworking, construction, or any task that requires making holes. While the cycle might appear overwhelming initially, following the means framed in this guide can make it straightforward and hassle-free.
Remember to prioritize safety by wearing appropriate protective gear, ensuring the drill is powered off when changing bits, and double-checking that the bit is securely in place before use.
With practice, you’ll become more proficient in changing drill bits efficiently and confidently, enabling you to complete your projects precisely and efficiently. So, whether you’re a seasoned DIY enthusiast or a beginner, mastering this skill is essential to becoming a more capable and resourceful handy person.