
Many people use the table saw, but the question “What is the Table Saw used for?” arises. When it comes to woodworking and carpentry, one tool that stands out for its versatility and efficiency is the table saw.
Basic Uses of a Table Saw
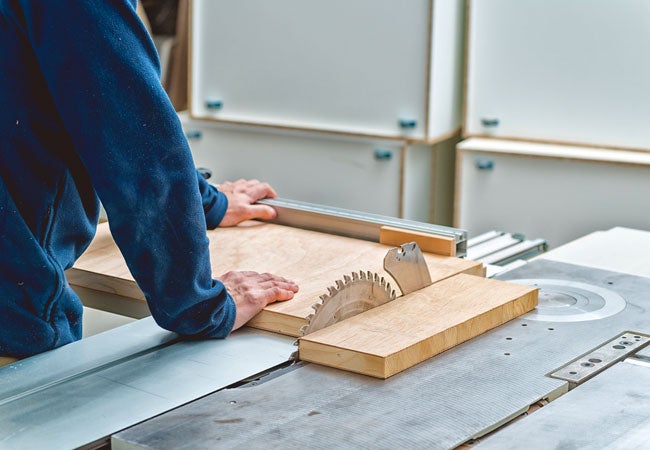
1. Cross-Cutting
Cross-cutting is a fundamental function of a table saw and involves cutting a workpiece across its grain or width. This technique is widely used in woodworking to achieve precise and accurate cuts.
By employing proper techniques and adhering to safety guidelines, woodworkers can effectively perform cross-cuts with a table saw, resulting in clean and perpendicular cuts.
Setting up the table saw
Before commencing the cross-cutting process, it is crucial to ensure the table saw is appropriately set up. This involves adjusting the blade height to the desired cutting depth and aligning the fence parallel to the blade. Ensuring the accuracy of these settings is vital for achieving accurate and safe cuts.
Marking the cut
To begin cross-cutting, it is necessary to mark the cut on the workpiece. Using a measuring tape and a pencil, woodworkers should carefully measure and mark the desired length or width of the cross-cut. Taking the time to accurately mark the workpiece facilitates precise results.
Positioning the workpiece
Place the workpiece on the table saw’s surface, ensuring the marked line aligns with the blade. Securely press the workpiece against the fence to maintain stability during the cut.
Keeping hands clear of the blade and employing a push stick or push block to guide the workpiece through the cut is crucial.
Performing the cut
The table saw can be powered on once everything is properly aligned and positioned. Gradually push the workpiece towards the blade, maintaining a consistent and steady feed rate.
Throughout the cut, ensure the workpiece remains in contact with the fence. Avoid forcing the workpiece through the blade and allow the saw to perform the cutting. Always maintain focus on the cutting process to prevent accidents.
Safety precautions
Cross-cutting with a table saw requires adherence to specific safety precautions. Wear appropriate safety equipment, including safety glasses and hearing protection, is essential.
Keep hands and fingers away from the blade, utilizing push sticks or blocks to maintain a safe distance. Furthermore, it is advisable to refrain from performing cross-cutting operations while tired or distracted.

Cross-cutting is a fundamental use of a table saw that enables woodworkers to achieve accurate and precise cuts across the grain or width of a workpiece.
Woodworkers can achieve clean and straight cross-cuts by following proper setup procedures, accurately marking the cut, correctly positioning the workpiece correctly, and adhering to safety precautions.
2. Ripping
Ripping is a primary function of a table saw, which involves cutting a workpiece parallel to the grain to create narrower boards or strips.
This technique is widely utilized in woodworking to produce precise and straight cuts. Woodworkers can effectively perform ripping cuts using a table saw by understanding the proper techniques and safety measures.
Setting up the table saw
Before initiating the ripping process, it is essential to ensure the table saw is set up correctly. This includes adjusting the blade height to the desired cutting depth and aligning the fence parallel to the blade. Checking the accuracy of these settings is crucial for achieving accurate and safe cuts.
Selecting the appropriate blade
Choosing the right blade for Ripping is vital for achieving optimal results. A rip-cut blade is designed with fewer teeth, larger gullets, and a flat-top tooth design.
These features efficiently remove material during Ripping, resulting in smoother cuts and reduced strain on the saw.
Marking the cut
To begin the ripping process, accurately mark the desired width of the workpiece on the surface. Utilize a measuring tape and a pencil to ensure precise measurements.
Additionally, if the workpiece has a rough or uneven edge, mark the reference edge that will be placed against the fence for consistent cuts.
Positioning the workpiece
Place the workpiece on the table saw, aligning the marked line with the blade. Keep the reference edge firmly pressed against the fence to maintain accuracy and consistency throughout the cut.
Ensure the workpiece is stable and secure, using push sticks or blocks to guide it through the cut. Keeping your hands clear of the blade and maintaining a secure grip on the workpiece is crucial.
Executing the cut
Once the workpiece is properly aligned and positioned, activate the table saw and slowly push the workpiece through the blade.
Maintaining a steady feed rate ensures continuous contact between the workpiece and the fence. Allow the saw to perform the cutting without applying excessive force. Always remain vigilant and focused during the process to prevent accidents.
Safety precautions
Ripping with a table saw requires adherence to specific safety precautions. Wear appropriate safety equipment, including safety glasses and hearing protection. Keep hands and fingers away from the blade, utilizing push sticks or blocks to maintain a safe distance.
Ripping is a primary use of a table saw, enabling woodworkers to cut workpieces parallel to the grain to create narrower boards or strips.
Woodworkers can achieve clean and precise ripping cuts by following proper setup procedures, selecting the appropriate blade, accurately marking the cut, positioning the workpiece correctly, and adhering to safety precautions.
Things to remember doing Ripping
1. Blade Height
Blade height is a critical aspect of ripping on a table saw. Ensuring the correct adjustment of blade height is vital for achieving precise and safe cuts while optimizing the table saw’s overall performance.
Significance of Blade Height
Blade height directly influences the depth of the cut made by the table sawAdjusting the blade height correctly is paramount to achieve accurate cuts and prevent potential accidents.
Factors to Consider
a) Material Thickness: The blade height should be slightly higher than the material’s thickness to ensure a clean and complete cut.
b) Safety: Keeping the blade height as low as possible while maintaining efficiency helps minimize the risk of kickbacks. Kickbacks occur when the blade catches the material and forcefully propels it back toward the operator.

c) Fence Clearance: Adjusting the blade height appropriately allows the material to pass through smoothly while maintaining proper contact with the fence. This ensures accurate and controlled Ripping.
Adjusting Blade Height
Adjusting the blade height may vary slightly depending on the specific table saw model. However, original content can be created by following these general steps:
a) Power Off: Before making any adjustments, it is crucial to ensure the table saw is powered off and unplugged. This prevents accidental starting and guarantees safety.
b) Blade Elevation Wheel or Crank: Most table saws feature an elevation mechanism controlled by a wheel or crank. Rotating the wheel or crank enables raising or lowering the blade height.
c) Test Cuts: After adjusting the blade height, it is recommended to perform test cuts on scrap material. This ensures the desired results before proceeding with the actual Ripping while maintaining originality.
Safety Precautions
Original content can be generated by emphasizing safety precautions when adjusting blade height and ripping on a table saw. These precautions include
a) Use Safety Equipment: This minimizes the risk of injuries during table saw operations.
b) Keep Hands Clear: Ensure that hands are positioned well away from the blade, and utilize push sticks or blocks to guide the material through the saw.
c) Maintain a Stable Workspace: Placing the table saw on a stable surface and securely locking it into position is crucial. This prevents any movement or vibration that could affect the accuracy of the cuts and helps maintain originality.
Adjusting the blade height correctly on a table saw is vital for achieving precise, clean, and safe ripping operations. Considering factors such as material thickness, safety, and fence clearance enables the creation of original content. By following the recommended steps and safety precautions outlined in this section, users can optimize the performance of their table saw while minimizing the risk of accidents during ripping operations.
2. Blade Angle
Blade angle is crucial when using a table saw for ripping operations. It refers to the tilt or slope angle of the saw blade about the table surface. Accurately adjusting the blade angle is essential to achieve precise and clean cuts while ensuring optimal performance and safety.
Importance of Blade Angle
Blade angle plays a vital role in determining the quality and appearance of the cut made by the table saw. It can affect factors such as tear-out, smoothness of the cut, and overall aesthetics. Adjusting the blade angle correctly is crucial to obtain the desired results and avoiding potential issues during ripping operations.
Factors to Consider
a) Cutting Technique: Different cutting techniques require specific blade angles.
b) Material Characteristics: The type and thickness of the ripped material can influence the optimal blade angle. Certain materials may require a specific bevel angle to minimize tear-out or achieve a desired aesthetic finish.
c) Safety: While blade angle primarily affects the cut’s quality, it is also essential to consider safety implications. Some angles may increase the risk of kickback or other safety hazards. Thus, striking a balance between desired results and safe operation is essential.
Adjusting Blade Angle
The process of adjusting the blade angle may vary depending on the table saw model. However, original content can be created by following these general steps
a) Power Off: Before making any adjustments, ensure the table saw is powered off and unplugged to prevent accidental activation.
b) Blade Tilt Mechanism: Most table saws are equipped with a mechanism to tilt the blade. This can be a handwheel, lever, or adjustment knob near the blade. Follow the manufacturer’s instructions to adjust the blade angle accordingly.
c) Angle Measurements: Some table saws have built-in angle indicators or protractors to help set the desired angle accurately.
Safety Precautions
Original content can be generated by emphasizing safety precautions when adjusting the blade angle and ripping on a table saw. These precautions include:
a) Follow Manufacturer’s Guidelines: Adhere to the manufacturer’s instructions and safety guidelines provided in the user manual specific to your table saw model.
b) Maintain Control and Proper Technique: Ensure a firm grip on the ripped material, use push sticks or blocks to guide it through the blade, and maintain a stable stance and control over the workpiece.
Adjusting the blade angle correctly on a table saw is crucial for achieving precise and clean cuts during ripping operations. Considering factors such as cutting technique, material characteristics, and safety enables the creation of original content.
By following the recommended steps and adhering to safety precautions, users can optimize the performance of their table saw while achieving accurate ripping cuts.
3. Rip Fence Accuracy
The accuracy of the rip fence is crucial for achieving precise and consistent ripping cuts on a table saw. The rip fence serves as a guide to ensure that the workpiece remains parallel to the blade during the ripping process.
Importance of Rip Fence Accuracy
The rip fence is vital in maintaining consistent and accurate cuts on a table saw. It ensures the workpiece stays parallel to the blade, resulting in straight and uniform rip cuts. The accuracy of the rip fence directly affects the quality, precision, and safety of the ripping operation.
Factors Affecting Rip Fence Accuracy:
a) Alignment: Proper rip fence alignment parallel to the saw blade is crucial. Any misalignment can lead to the workpiece veering off course during the cut, resulting in inaccurate and potentially unsafe cuts.
b) Stability: The rip fence should be securely locked into position to prevent any movement or deflection while feeding the workpiece through the blade.
c) Calibration: Regular calibration of the rip fence is vital to ensure ongoing accuracy. Over time, the fence may become misaligned or develop play, requiring adjustments to maintain consistent accuracy.
Ensuring Rip Fence Accuracy
To ensure the accuracy of the rip fence, follow these initial steps
a) Initial Alignment: Begin by checking the initial alignment of the rip fence. Use a measuring tape or a reliable straight edge to measure the distance between the fence and the blade at both the front and rear positions. The measurements should be identical, indicating proper alignment. Make adjustments if necessary.
b) Parallel Alignment: Make a test cut on a scrap piece of material to verify parallel alignment. Measure the width of the resulting cut at both the front and rear portions. If the measurements are consistent, the fence is parallel to the blade. If not, adjust the fence until the cut width is uniform.
c) Locking Mechanism: Ensure the rip fence is securely locked into position after adjusting. The locking mechanism should hold the fence firmly, preventing movement during cutting.
Safety Considerations
Safety is paramount when using the rip fence on a table saw
a) Clearances: Maintain appropriate clearances between the rip fence and the blade to prevent the workpiece from getting trapped or binding.
b) Featherboards: Consider using feather boards to provide additional support and prevent the workpiece from shifting during the cut, enhancing safety and precision.
c) Push Sticks: Use push sticks or blocks to feed the workpiece through the blade. This helps maintain a safe distance from the blade and ensures proper control over the material.
Ensuring the accuracy of the rip fence on a table saw is essential for achieving precise and consistent ripping cuts. Proper alignment, stability, and regular calibration contribute to accurate and safe ripping operations. By following the recommended steps and adhering to safety considerations, users can optimize the performance of their table saw and achieve high-quality rip cuts.
Do’s and Don’ts of Ripping
Ripping on a table saw requires a keen focus on safety and proper technique to ensure accurate and successful cuts. Understanding the dos and don’ts of ripping can help prevent accidents, maintain efficiency, and achieve desired results.
Do’s:
Do Use Push Sticks or Push Blocks
Utilize push sticks or push blocks to guide the workpiece through the blade. These tools maintain a safe distance from the blade and provide better control over the material.
Do Keep Hands Clear
Ensure that your hands are positioned well away from the blade during Ripping. Avoid reaching over the blade or placing your hands in a dangerous position that could result in an accident.
Do Check and Adjust the Rip Fence
Before ripping, verify that the rip fence is aligned correctly and securely locked into position. Ensure it is parallel to the blade for accurate and consistent cuts.

Do Make Test Cuts
Before commencing a whole ripping operation, it is advisable to make test cuts on scrap material. This allows you to assess the setup, identify potential issues, and ensure desired results.
Don’ts
Don’t Use a Dull or Damaged Blade
Avoid using a dull or damaged blade, as it can lead to poor-quality cuts, increase the risk of kickback, and strain the motor. Always use a sharp and properly maintained blade.
Don’t Force the Material
Resist the temptation to push the material forcefully through the blade. Allow the saw’s cutting action to do the work, and maintain a steady and controlled feed rate to prevent binding or kickback.
Don’t Stand Directly Behind the Workpiece
Position yourself to the side of the blade rather than directly behind the workpiece. This reduces the risk of injury in case of kickback and provides a better view of the cutting action.
Don’t Remove the Blade Guard or Riving Knife
The blade guard and riving knife are essential safety features on a table saw. Do not remove or disable them, as they help prevent accidents and protect against kickbacks.
Don’t Overload the Saw
Avoid feeding material that exceeds the capacity of the table saw. Overloading the saw can strain the motor, compromise control, and potentially damage the workpiece or the saw itself.
Don’t Rush or Take Shortcuts
Take the necessary time to set up the table saw correctly, follow proper techniques, and prioritize safety. Rushing or taking shortcuts can lead to mistakes, accidents, and compromised results.
Understanding and implementing the dos and don’ts of ripping on a table saw are essential for safe and successful operations. Adhering to proper safety practices, using appropriate techniques, and following manufacturer guidelines ensure accurate cuts, prevent accidents, and maintain the efficiency and longevity of the table saw.
1. Bevel Cuts
Bevel cuts are an essential woodworking technique that involves tilting the table saw blade to create angled cuts on a workpiece. This versatile cutting method allows woodworkers to add decorative elements, create precise joints, or shape the edges of their projects.
Woodworkers can achieve accurate and clean bevel cuts using a table saw by understanding the proper setup, alignment, and safety precautions.
Setting up the table saw
Before performing bevel cuts, setting up the table correctly saw is crucial. Adjust the blade height to the desired cutting depth and tilt the blade to the desired angle for the bevel cut.
Ensure the bevel angle is securely locked according to the manufacturer’s instructions. Checking the accuracy of these settings is essential for achieving precise bevel cuts.
Marking the cut
To ensure accuracy and alignment
- Mark the desired location of the angle cut on the workpiece using a measuring tape and a pencil.
- Double-check the markings before proceeding with the cut.
Positioning the workpiece
Place the workpiece on the table saw, aligning the marked line with the blade. Ensure that the workpiece is securely held in place and remains stable throughout the cut.
Keeping your hands clear of the blade and using push sticks or push blocks to guide the workpiece through the cut is crucial. Maintain a firm grip and be cautious of any potential kickback.
Cutting
A steady and controlled feed rate, allowing the saw to cut. Keep your focus on the cut, ensuring the workpiece stays in contact with the fence and the blade. Avoid forcing the workpiece and let the blade cut smoothly through the material.
Safety precautions
Performing bevel cuts with a table saw requires strict adherence to safety precautions. Wear appropriate safety gear, including safety glasses, hearing protection, and a dust mask.
Bevel cuts are a versatile woodworking technique that allows for angled cuts on a workpiece using a table saw. Woodworkers can achieve accurate and clean bevel cuts by following proper setup procedures, accurately marking the cut, positioning the workpiece correctly, and adhering to safety precautions.
2. Miter Cuts
Miter cuts are a fundamental woodworking technique that involves cutting a workpiece at a specific angle to create precise joints or angled corners. This versatile cutting method is commonly used in projects like constructing picture frames, molding, and furniture.
Woodworkers can achieve accurate and clean miter cuts using a table saw by understanding the proper setup, measurement, and cutting techniques.
Setting up the table saw
Before performing miter cuts, setting up the table correctly saw is essential. Adjust the blade height to the desired cutting depth and set the miter gauge or the angle of the table saw blade to the desired angle for the miter cut.

Ensure the angle is securely locked according to the manufacturer’s instructions. Checking the accuracy of these settings is crucial for achieving precise miter cuts.
Marking the cut
To ensure accuracy and alignment
- Mark the desired location of the miter cut on the workpiece using a measuring tape and a pencil.
- Use a miter square or a bevel gauge to measure and mark the desired angle on the workpiece accurately.
- Double-check the markings before proceeding with the cut.
Positioning the workpiece
Place the workpiece on the table saw, aligning the marked line with the blade or miter gauge. Ensure that the workpiece is securely held in place and remains stable throughout the cut.
Keeping your hands clear of the blade and using push sticks or push blocks to guide the workpiece through the cut is crucial. Maintain a firm grip and be cautious of any potential kickback.
Cutting
Maintain a steady and controlled feed rate, allowing the saw to cut. Keep your focus on the cut, ensuring that the workpiece stays in contact with the blade or the miter gauge. Avoid forcing the workpiece and let the saw cut smoothly through the material.
Safety precautions
Performing miter cuts with a table saw requires strict adherence to safety precautions. Wear appropriate safety gear, including safety glasses, hearing protection, and a dust mask.
Miter cuts are a versatile woodworking technique that creates precise joints and angled corners. By following proper setup procedures, accurately marking the cut, positioning the workpiece correctly, and adhering to safety precautions, woodworkers can achieve accurate and clean miter cuts using a table saw.
3. Rabbets and Grooves
Rabbets and grooves are essential woodworking techniques to create joints and channels in a workpiece. These versatile methods, such as cabinets, drawers, and frames, are commonly employed in various woodworking projects.
Woodworkers can achieve precise and sturdy rabbets and grooves using a table saw by understanding the proper setup, measurements, and cutting techniques.
Setting up the table saw
Before performing rabbets and grooves, setting up the table properly is crucial. Adjust the blade height to the desired cutting depth, matching the joint or channel required for the project. Checking the accuracy of these settings is vital for achieving precise cuts.
Marking the rabbet or groove
To ensure accuracy and alignment
- Mark the location and dimensions of the rabbet or groove on the workpiece using a measuring tape and a pencil.
- Utilize a marking gauge or a combination square to transfer the measurements and create precise lines on the workpiece.
- Double-check the markings before proceeding with the cut.
Positioning the workpiece
Place the workpiece on the table saw, aligning the marked lines with the blade. Ensure that the workpiece is securely held in place and remains stable throughout the cut. Keeping your hands clear of the blade and using push sticks or push blocks to guide the workpiece through the cut is essential. Maintain a firm grip and exercise caution to prevent potential kickback.
Cutting
Once correctly aligned and positioned, activate the table saw and gradually feed the workpiece into the blade. Maintain a steady and controlled feed rate, allowing the saw to cut the rabbet or groove. Stay focused on the cut, ensuring the workpiece maintains contact with the blade. Avoid excessive force and allow the saw to cut through the material smoothly.
Safety precautions
Performing rabbets and grooves with a table saw requires adherence to safety precautions. Refrain from wearing loose clothing or jewelry that may become entangled in the saw. Remain vigilant and attentive throughout the cutting process.
Rabbets and grooves are versatile woodworking techniques utilized to create joints and channels in a workpiece. By following proper setup procedures, accurately marking the cut, positioning the workpiece correctly, and adhering to safety precautions, woodworkers can achieve precise and sturdy rabbets and grooves using a table saw.
Prioritizing safety and taking necessary precautions when using a table saw is crucial. These techniques enhance the strength and functionality of woodworking projects while adding aesthetic appeal.