
Unlocking your Dewalt impact driver’s potential is mastering the art of precision and efficiency. But there comes a moment in every DIY project or professional task when you must seamlessly transition from one drill bit to another. That’s when the essential knowledge of “How to remove drill bit from dewalt impact driver” becomes your trusted ally.
In power tools, this maneuver is akin to changing gears in a high-performance vehicle; it’s where precision meets productivity.
Whether you’re a seasoned handyman or just starting your DIY journey, this guide will walk you through the steps in plain, straightforward language. So, let’s dive into the world of Dewalt impact drivers and unravel the secret to effortless drill bit swaps.
How to Remove Drill Bit from Dewalt Impact Driver?
You can follow these steps
- Safety First: Before starting any work, ensure that the impact driver is powered off and the battery is removed to prevent accidental activation and ensure your safety.
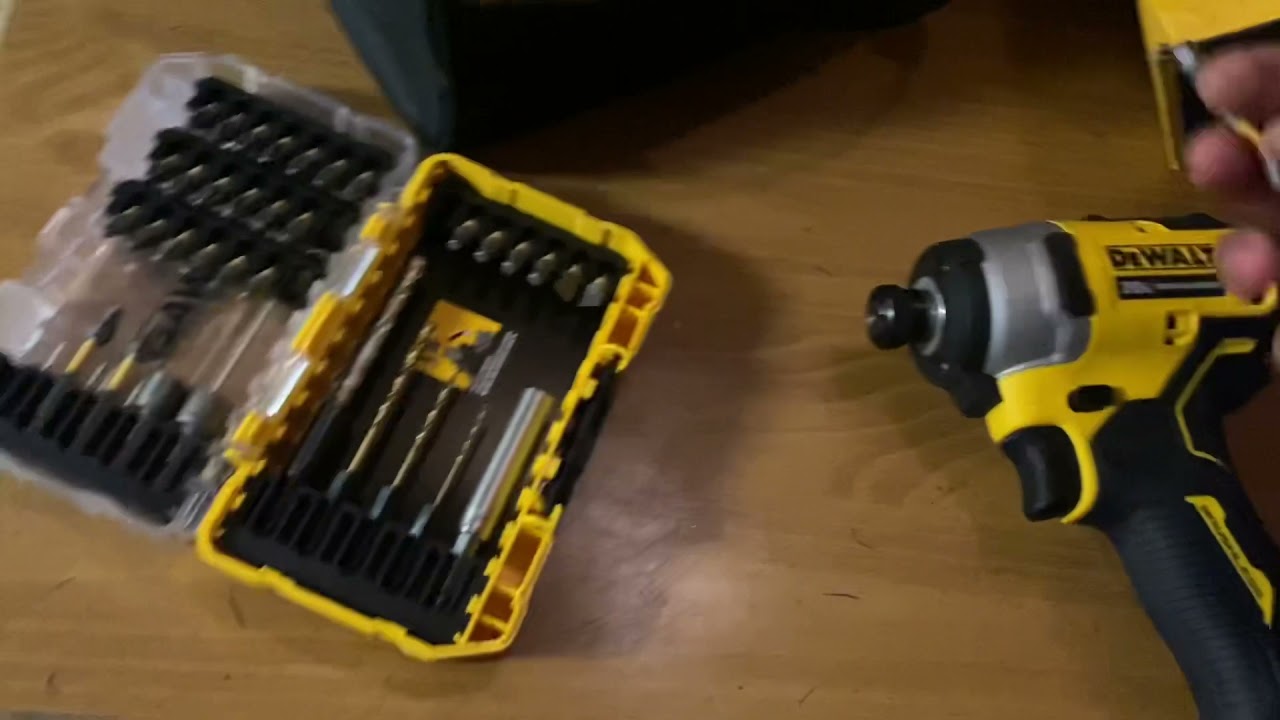
- Release the Chuck: The chuck is the part of the impact driver that holds the drill bit. Most DeWalt impact drivers have a keyless chuck, which means you can release the bit without using a chuck key. To release the chuck, follow these steps:
- Hold the drill firmly with one hand, and grasp the chuck sleeve (the part that rotates) with your other hand. While holding the chuck sleeve, rotate it counterclockwise (lefty-loosey). This action will open the chuck jaws and release the drill bit. Keep turning until the chuck is fully open and the drill bit can be easily removed.
- Remove the Drill Bit: Once the chuck is open, you can pull the drill bit out of the chuck by hand. If the bit is stuck or difficult to remove, tap it lightly with a rubber mallet to help release it.
- Inspect and Clean: After removing the drill bit, inspecting both the bit and the chuck for any damage or debris is a good practice. If there’s dirt or debris in the chuck, clean it out to ensure proper functioning in the future.
- Reassemble and Secure: If you plan to use the impact driver again, insert a new drill bit or the same one if it’s still in good condition.
- Reattach the Battery: If you removed the battery initially for safety, reattach it to the impact driver.
Importance of Knowing How to remove chucks from Dewalt impact driver
Understanding how to remove chucks from your Dewalt impact driver is not just a mere technicality; it’s a skill that can significantly enhance your efficiency, safety, and overall user experience. Here’s why it’s essential:
Versatility: Dewalt impact drivers are versatile tools capable of handling various tasks. Removing chucks allows you to switch between different accessories like drill bits, screwdriver bits, and hole saws, expanding the range of tasks you can tackle with a single tool.
Efficiency: Swapping out chucks swiftly means less downtime on your project. You can seamlessly transition between tasks, keeping your workflow smooth and efficient. This is especially crucial in professional settings where time is money.
Precision: Different tasks require different accessories, each with specific requirements for torque and speed. Knowing how to remove chucks ensures you can match the right tool to the job, increasing precision and minimizing the risk of damaging materials or fasteners.
Safety: Using the wrong chuck for a task can lead to accidents and injuries. Properly removing and replacing chucks ensures that your Dewalt impact driver operates safely, reducing the chances of accidents on the job site or in your workshop.
Longevity: Mishandling the chuck removal process can lead to wear and tear on your tool. Knowing the correct procedure can extend the lifespan of your Dewalt impact driver, saving you money on replacements or repairs.
Cost Savings: Instead of investing in multiple specialized tools, a Dewalt impact driver with interchangeable chucks can cover many applications. Learning how to remove chucks means maximizing the utility of your existing tool collection, saving you money in the long run.
Flexibility: DIY enthusiasts and professionals alike appreciate the flexibility of a Dewalt impact driver. Whether for construction, woodworking, automotive work, or household repairs, being proficient in chuck removal makes your impact driver adaptable to various tasks.
Releasing the Chuck
The chuck is the component of your DeWalt Impact Driver responsible for holding the drill bit securely in place. To remove the drill bit, you’ll need to release the chuck. Follow these steps:
A. Understand the Chuck
Briefly explain the purpose of the chuck in holding the drill bit. Mention that DeWalt impact drivers typically come with keyless chucks, which means you don’t need a chuck key to release the bit.
B. Firm Grip and Positioning
Emphasize the importance of holding the impact driver securely with one hand. Instruct users to position their other hand to grasp the chuck sleeve.
C. Rotate Counterclockwise
Explain that to release the chuck; you’ll need to rotate it counterclockwise (lefty-loosey). Describe how turning it counterclockwise opens the jaws of the chuck.
D. Fully Open the Chuck
Instruct users to continue turning the chuck sleeve until it is fully open. Emphasize the importance of ensuring the chuck is fully open for easy bit removal.
E. Remove the Drill Bit
Explain that with the chuck fully open, the drill bit can be easily removed by hand. If the bit is stuck or difficult to remove, users can tap it lightly with a rubber mallet to help release it.
Replace or Store the Drill Bit
After successfully removing the drill bit from your DeWalt Impact Driver, you have two options: You can either replace it with a new one or store it properly for future use. Here’s what to do for each option:
A. Replacing the Drill Bit
- Select a New Bit: If you plan to continue your project or use a different bit, select the appropriate replacement for your task. Make sure it matches the required size and type.
- Insert the New Bit: With the chuck still open (as explained in section III), insert the new drill bit into the chuck. Ensure it’s seated firmly and securely.
- Secure the Chuck: Rotate the chuck sleeve clockwise (righty-tighty) to tighten it around the new drill bit. Make sure it’s snug and secure. You may need to hold the chuck sleeve with one hand while tightening it to prevent the bit from slipping.
B. Properly Storing the Drill Bit
- Inspect the Removed Bit: Before storing the removed drill bit, It can be used for future projects if it’s still in good condition.
- Clean the Bit: If there’s any dirt, debris, or material residue on the removed bit, clean it thoroughly. A wire brush or a cloth can be used to remove any buildup. Ensure the bit is immaculate and free from contaminants.
- Storage Container: To prevent damage and maintain the sharpness of the drill bit, consider using a dedicated storage container. Many hardware stores sell drill bit storage cases to keep your bits organized and protected.
- Labeling: For easy identification, label the storage container with the type and size of the drill bit. This will save you time when searching for the right bit.
- Store in a Dry Place: Store the drill bit container in a cool, dry place away from moisture and direct sunlight. Moisture can cause rust and reduce the lifespan of the bits.
- Regular Inspection: Periodically inspect your stored drill bits to ensure they remain in good condition. Replace any damaged or worn bits as needed.
Reassembling and Securing
Once you have removed the drill bit and either replaced it or stored it properly, it’s essential to reassemble the DeWalt Impact Driver correctly to ensure safe and efficient operation. Follow these steps to reassemble and securely fasten the drill bit:
A. Insert a New Drill Bit (if applicable)
- Choose the Right Bit: Select the appropriate drill bit for your project, ensuring it matches the required size and type.
- Open the Chuck: If the chuck is not already open, hold the impact driver securely and rotate the chuck sleeve counterclockwise (lefty-loosey) to fully open the chuck jaws.
- Insert the Bit: Carefully insert the new drill bit into the chuck, ensuring it fits snugly and is fully seated.
B. Secure the Chuck
- Rotate Clockwise: With the drill bit in place, rotate the chuck sleeve clockwise (righty-tighty) while holding onto the chuck sleeve with one hand. Continue tightening until the chuck is securely fastened around the drill bit.
- Check for Secure Fit: Ensure that the chuck is tightly gripping the drill bit and there’s no play or wobbling when you try to move the bit by hand.
- Final Check: Confirm that the chuck is securely closed to prevent the bit from coming loose during operation. Double-check that the chuck is tightened correctly to avoid any accidents.
C. Reattach the Battery
Insert the Battery: If you previously removed the battery for safety, reattach it to the DeWalt Impact Driver. Ensure the battery is seated correctly and securely connected.
D. Test for Proper Bit Security
- Briefly Test: Before using the impact driver for your project, give it a brief test run to ensure the drill bit is securely held in the chuck. Look for any signs of wobbling or slippage.
- Adjust if Necessary: If you notice any issues with the bit’s security or alignment, stop immediately and double-check the chuck’s tightness and the proper seating of the bit.
Reasons Why Removing the Bit from an Impact Driver is Hard
Tight Fit: Impact drivers are designed to hold bits securely in place during high-torque operations. This tight fit ensures that the bit doesn’t slip or become loose during use, but it also means that removing the bit can be a struggle.
Chuck Design: The chuck (the part that holds the bit) in an impact driver is designed to grip the bit tightly. Depending on the design of the chuck, it may require a specific method or tool to release the bit.
Magnetic Attraction: Many impact drivers feature a magnetic bit holder, which is excellent for keeping bits in place during use. However, this magnetic force can also make it harder to pull the bit out because it clings to the bit.
Dust and Debris: Over time, dust, debris, and even rust can accumulate in the chuck, making it more challenging to release the bit. This buildup can lock the bit in place.
Inexperience: For those unfamiliar with the process, removing a bit from an impact driver might seem tricky simply because they have yet to do it often. It can take some practice to get the technique right.
Lack of Proper Tools: Some impact drivers require a unique chuck key or tool for bit removal. If you need the right tool, it can make the process seem much more challenging.
User Error: Incorrect technique or not applying the necessary force correctly can also make removing a bit from an impact driver difficult.
Stuck Bits: In some cases, a bit can get stuck due to excessive force or damage. This can make removal extremely difficult.
Worn or Damaged Chuck: Over time, the chuck itself can wear out or become damaged, making it less effective at releasing bits. If this is the case, you might need to replace the chuck or the impact driver.
What Types Of Bits Usually Get Stuck From An Impact Driver?
Bits can get stuck in an impact driver for various reasons, and the types of bits that are more prone to getting stuck often depend on the specific circumstances and usage. However, some common types of bits that may be more likely to get stuck include:
Standard Drill Bits: Regular twist drill bits with round shanks can sometimes get stuck, primarily if they have been used for drilling into rigid materials or if there’s excessive heat buildup.
Hex Shank Bits: Impact drivers commonly use bits with hexagonal shanks. While these are designed for quick and secure insertion, they can still get stuck due to factors like debris buildup or overtightening.
Phillips and Torx Bits: Screwdriver bits, especially those used for fastening screws with Phillips or Torx heads, can get stuck if lodged in a tight or hard-to-reach spot.
Nut Drivers: Hex nut drivers for driving nuts and bolts can occasionally get stuck, primarily if used at high torque settings and encounter resistance.
Spade Bits: Spade or paddle bits, often used for drilling larger holes in wood, can get stuck if they encounter knots, nails, or other obstructions in the wood.
Socket Adapters: If you’re using socket adapters with your impact driver, they can sometimes get stuck due to the added length and leverage they provide.
Impact-rated Bits: Even though these bits are designed to withstand the forces generated by an impact driver, they are not immune to getting stuck, mainly if used in challenging applications.
Safety precautions
Safety precautions are crucial when working with power tools like a DeWalt Impact Driver.
Wear Personal Protective Equipment (PPE)
- Hearing protection, especially if the impact driver is loud.
- Work gloves to protect your hands from sharp edges and splinters.
- Dust mask or respirator if the work generates dust or particles.
- A well-fitted outfit to avoid loose clothing that can get caught in the tool.
Inspect the Impact Driver
Before use, inspect the tool for any visible damage, loose parts, or frayed cords. Do not use a damaged tool.
Power Off and Disconnect
Ensure the impact driver is powered off before adjusting or changing bits.
Stable Work Surface
Use a stable and secure work surface or workbench to prevent the risk of tripping or falling.
Secure Workpiece
Secure the workpiece firmly with clamps or other appropriate methods to prevent it from moving while drilling or driving.
Proper Bit Selection
Choose the right type and size of drill or driver bit for the task. Using the wrong bit can lead to accidents and damage.
Maintain Balance
Maintain a balanced stance and a firm grip on the tool to ensure better control and reduce the risk of accidents.
Mind Your Surroundings
Be aware of your surroundings and the people around you. Ensure no one is standing too close while you’re working.
Avoid Overreach
Don’t overreach while using the impact driver. Maintain a stable position and move the tool or workpiece if necessary
Use Two Hands
Whenever possible, use both hands to control the impact driver. This provides better stability and control.
Follow the User Manual
Always read and follow the manufacturer’s instructions in the user manual for your specific DeWalt Impact Driver model.
Emergency Procedures
Familiarize yourself with the location of the emergency shut-off switch or button if you need to stop the tool quickly.
First Aid Kit
Have a basic first aid kit nearby in case of minor injuries.
Conclusion
This guide covers the essential steps for safely and effectively removing a drill bit from your DeWalt Impact Driver. Remember that safety should always be your top priority, so ensure the impact driver is powered off and the battery is removed before you start.
We’ve walked you through releasing the chuck, removing the drill bit, inspecting and cleaning both the bit and the chuck, and guided whether to replace the bit with a new one or store it properly for future use.