
Welcome to this step-by-step guide on how to put a drill bit in a Ryobi drill. You’re in the right place if you’ve just purchased a Ryobi drill and are eager to start your DIY projects or home repairs. Learning to insert a drill bit into your Ryobi drill correctly is a fundamental skill that will make drilling tasks more accessible and safer.
In this tutorial, we’ll walk you through the simple yet crucial process of putting a drill bit in a Ryobi drill, ensuring you can confidently tackle your projects. So, let’s dive in and prepare your Ryobi drill for action.
Tools and Materials to Put a Drill Bit in the Ryobi Drill
To put a drill bit in a Ryobi drill, you’ll need the following tools and materials:
- Ryobi Drill: Ensure you have a Ryobi drill compatible with the type of drill bits you intend to use. Different Ryobi drill models may have varying chuck sizes and styles, so ensure your drill can accommodate your chosen drill bit.
- Drill Bit: Select the fitting bore for your specific task. The type and size of the bit will depend on the material you are drilling into and the hole size you need.
- Safety Gear: Always prioritize safety when working with power tools. Wear security glasses to safeguard your eyes from trash, and consider using hearing protection, especially for extended use of the drill.
With these tools and materials, you can safely and effectively install a drill bit in your Ryobi drill to tackle your drilling or driving tasks.
Understanding Your Ryobi Drill
Understanding your Ryobi drill is essential to operate it safely and effectively. Ryobi offers a range of drill models, each with features and specifications. Here’s a general guide to understanding your Ryobi drill:
Drill Type
Determine the type of Ryobi drill you have. Ryobi offers various types, including cordless drills, corded drills, impact drivers, and hammer drills. Each class is designed for specific tasks and has unique features.
Power Source
- Corded Drill: If you have a corded Ryobi drill, it requires a constant electrical power source through a power cord.
- Cordless Drill: Cordless Ryobi drills are powered by rechargeable batteries. Be aware of the type of battery and its voltage, as this affects the drill’s power and runtime.
Chuck Type
Identify the chuck type on your Ryobi drill:
- Keyless Chuck: Many Ryobi drills feature keyless chucks, which allow you to tighten and loosen the chuck without using a chuck key.
- Keyed Chuck: Some models have keyed chucks that require a chuck key to secure the drill bit.
Drill Bit Compatibility
Check the drill’s chuck capacity to determine the range of drill bit sizes it can accommodate. Ensure your drill bits are compatible with the chuck size.
Speed Settings
Most Ryobi drills offer variable speed settings. Understand how to adjust the speed according to your task. Lower rates are suitable for driving screws, while higher speeds are used for drilling.
Torque Settings (if applicable)
Some Ryobi drills have adjustable torque settings. These are useful for controlling the force applied when driving screws to prevent over-tightening or stripping.
Direction Switch
Locate the direction switch near the trigger. It allows you to change forward (drilling or driving) and reverse (removing screws or backing out drill bits) motions.
Select the Right Drill Bit
Choosing the appropriate drill bit for your specific project is paramount for successful and efficient drilling. The correct drill bit ensures a clean and precise hole, safety, and longevity of your tools. Using an incompatible or incorrect drill bit can result in subpar results, damage your workpiece, and even pose safety hazards.
By selecting the right drill bit, you ensure that it is designed to handle the material you are working with, whether it’s wood, metal, concrete, or something else. It also accounts for the type of hole you need, whether a standard spot, a large-diameter hole, a countersink, or a pilot hole for screws.
Additionally, the right drill bit minimizes the risk of overheating, reduced tool life, and unnecessary wear and tear on your drill. Therefore, choosing the right drill bit for your project is an essential step toward achieving the best possible results and preserving the integrity of your tools.
A wide range of drill bit types are available, each designed for specific materials and drilling tasks. Understanding the different types and when to use them is crucial for selecting the right drill bit:
- Twist Drill Bits: These versatile bits are suitable for drilling into wood, metal, and plastic. They have a spiral design and can create standard holes.
- Spade Bits: Ideal for drilling large-diameter holes in wood quickly, spade bits have a flat, paddle-like shape. They are commonly used for tasks like drilling holes for pipes or wiring.
- Masonry Bits: Designed for drilling into concrete, brick, and stone, masonry bits typically have a carbide tip for increased durability and efficiency.
- Auger Bits: These bits are excellent for drilling deep holes in wood and are commonly used in woodworking tasks. They have a spiral shape for efficient chip removal.
- Hole Saw Bits: Used for cutting larger-diameter holes in wood, plastic, and metal. Hole saws are available in various sizes and are often used for tasks like installing doorknobs.
- Forstner Bits: These specialized bits create clean, flat-bottomed holes in wood. They are ideal for tasks like drilling holes in cabinet hinges.
- Countersink Bits: Countersink bits create conical recesses for screw heads, ensuring a flush finish when fastening materials together.
- Step Drill Bits: These bits have multiple stepped diameters and are commonly used for drilling holes of varying sizes in sheet metal and thin materials.
- Tile and Glass Bits: These bits have a carbide or diamond tip and are designed for drilling into ceramic tile, glass, and porcelain.
- Pilot Bits: Often combined with other bits, pilot bits create a starting point for more significant drill bits and are commonly used when drilling into wood or metal.
Picking the right drill tool for your project ensures precision, efficiency, and safety. Always match the drill bit to the material and task to achieve the best results.
Step-by-Step Guide to Putting a Drill Bit in a Ryobi Drill
Putting a drill bit in a Ryobi drill is a straightforward process. Here’s a step-by-step guide to help you do it:
Power Off
Ensure that the Ryobi drill is turned off, and if it’s corded, unplug it from the power source. Remove the battery if it’s a cordless drill to prevent accidental starts.
Locate the Chuck
The chuck is the drill part that holds the drill bit. It’s usually located at the front end of the drill.
Open the Chuck
For Keyless Chuck:
- Grasp the chuck firmly with one hand and rotate it counterclockwise (left) to open the jaws. Keep turning until the jaws are wide enough to accommodate the drill bit.
For Keyed Chuck:
- If your Ryobi drill has a keyed chuck (requiring a chuck key to tighten and loosen), insert the chuck key into one of the holes on the side of the chuck.
- Turn the key counterclockwise (left) to open the jaws.
- Continue turning until the chuck opens wide enough to fit the drill bit.
Select the Drill Bit
Choose the appropriate drill bit for your task. Ensure it’s compatible with your Ryobi drill model and the type of chuck you have.
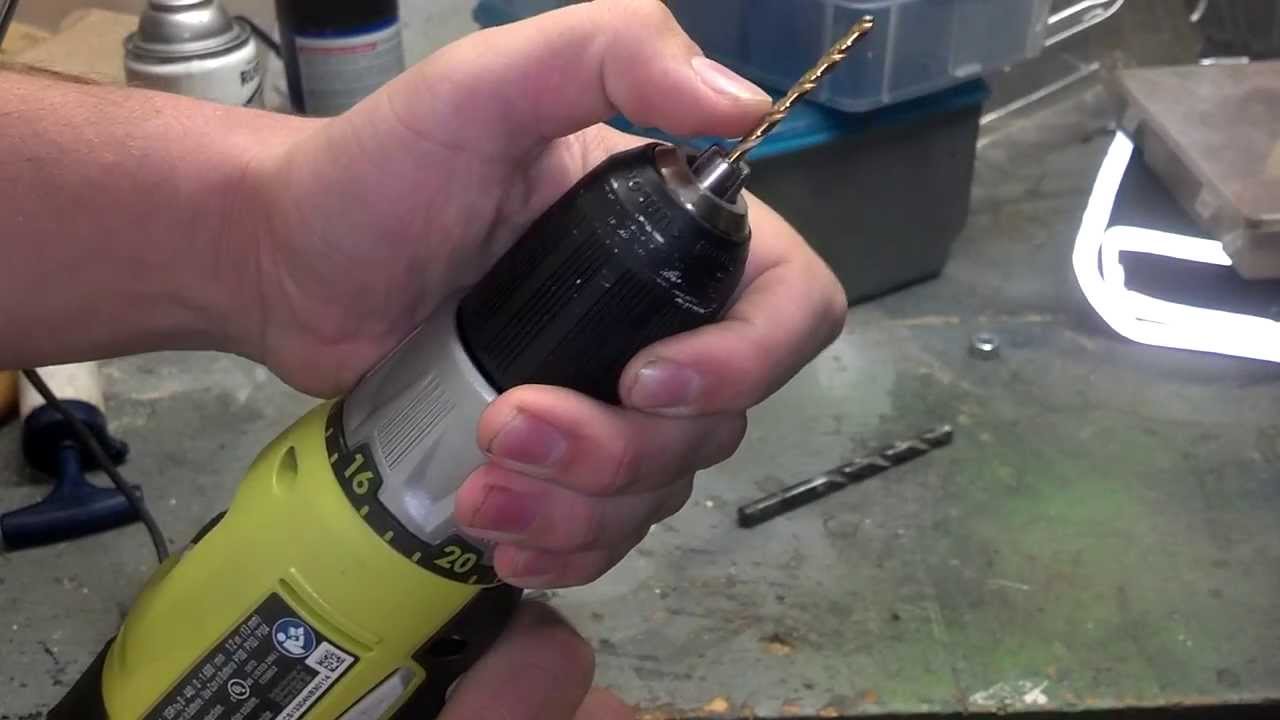
Insert the Drill Bit
- Hold the drill bit by the smooth shank end (the end without cutting edges).
- Align the bit with the jaws of the open chuck.
- Insert the drill bit into the chuck, ensuring it goes as far as possible while keeping the smooth shank outside.
Tighten the Chuck
For Keyless Chuck:
- Hold the chuck with one hand while gripping the drill’s handle with the other.
- Rotate the chuck clockwise (right) to tighten it.
- Continue turning until the chuck is securely tightened around the drill bit. You should feel resistance when it’s appropriately drawn.
For Keyed Chuck: Use the chuck key to tighten the chuck. Insert the key into one of the holes on the side of the chuck and turn it clockwise (right) until the jaws firmly grip the drill bit.
Check Tightness
After tightening, give the drill bit a slight tug to ensure the chuck securely holds it. It should not wobble or come loose.
Close the Chuck
If you have a keyless chuck, close it by turning it clockwise (right) until it’s snug.
Power On the Drill
When the drill tool is safely set up, you can power the Ryobi drill and proceed with your drilling or driving task.
By following these steps meticulously, you can ensure that the drill bit is correctly and securely installed in your Ryobi drill, allowing you to work safely and efficiently. Always prioritize safety and proper tool handling when using power tools.
Testing the Drill Bit
Before you commence your drilling or driving task, it’s essential to ensure that the drill bit is securely in place within the chuck. To do this, double-check the tightness of the bit in the chuck.
Give the drill bit a gentle tug to verify it’s firmly held and does not wobble. Any movement or play indicates that the bit may not be adequately secured. Addressing this issue before proceeding with your work is crucial to prevent accidents and ensure accurate drilling or fastening.
Performing a quick test to ensure the drill bit is securely held in place is equally important. Start by powering on the drill and allowing it to run at a low speed. During this test, observe the drill bit for any signs of wobbling, shifting, or instability. If the bit remains steady and the drill operates smoothly, you can have confidence that your setup is secure.
However, if you notice any issues during the test, such as the bit coming loose or the drill bit exhibiting wobbling, stop immediately, power off the drill, and recheck the bit’s installation in the chuck. Ensuring a secure drill bit is essential for the safety and precision of your drilling or driving tasks.
Troubleshooting Common Issues
Drill Bit Not Fitting
If you encounter the issue of a drill bit not fitting into the chuck of your Ryobi drill, the first thing to check is whether you are using the right sort and size of boring apparatus for your specific drill model.
Different exercises have varying chuck capacities, so ensure the bit falls within the acceptable size range. Assuming the boring machine is the right size and type, inspect it for any deformities or damage that might prevent it from fitting correctly. If the bit is damaged, replace it with a new one.
Additionally, ensure you have opened the chuck sufficiently to accommodate the bit by turning it counterclockwise for keyless chucks or using the chuck key for keyed chucks. Ensure the bit is inserted straight and fully into the chuck before tightening it securely.
Chuck Not Tightening Properly
If you’re having trouble with the chuck not tightening properly around the drill bit, there are a few steps to take. For keyless chucks, ensure that you’re gripping the chuck firmly with one hand while turning the drill’s handle with the other when tightening it.
This extra pressure can help the chuck grip a bit more securely. If the issue persists, inspect the chuck jaws for debris or damage, which can hinder their grip.
Clean the jaws and make sure they are in good condition. For keyed chucks, ensure that you use the chuck key correctly by inserting it fully into one of the holes on the side of the chuck and turning it clockwise (right) until the jaws hold the bit firmly. Over-tightening can also cause issues, so tighten the chuck firmly but without excessive force.
Chuck Key Difficulties
If you’re experiencing difficulties with the chuck key in a Ryobi drill with a keyed chuck, first make sure you use the correct key for your drill model. Different Ryobi drills may have slightly different chuck key designs, so they may not be interchangeable.
Insert the chuck key fully into one of the holes on the side of the chuck and turn it clockwise to tighten the chuck jaws securely around the bit. If the key is not turning smoothly or feels stuck, check for any debris or obstructions in the key or chuck mechanism.
Clean and lubricate the key and chuck threads if necessary. Avoid excessive force when using the key to prevent damage. If the chuck key is damaged or worn, consider replacing it with a new one to ensure proper functioning.
Maintenance and Care
To keep your Ryobi drill and drill bits in optimal condition, regular maintenance is essential. Inspecting it periodically for loose screws, damaged cords, or worn parts is crucial for your training. Address any issues expeditiously to forestall further harm. Clean the exterior regularly to remove dust and debris, and ensure the air vents are free from obstructions to avoid overheating.
When it comes to your drill bits, clean them after each use to remove any material buildup, which can affect their cutting ability. Inspect your drill bits for signs of wear, damage, or dullness, and replace any worn or damaged bits promptly to maintain efficient drilling performance.
Additionally, if your drill bits are designed for lubrication, apply a small amount of lubricating oil to keep them operating smoothly. Proper storage of your drill bits in a dedicated container or organizer is essential to prevent them from getting lost or damaged. By following these upkeep tips, you can draw out the lifespan of your Ryobi drill and ensure that your drill bits remain in excellent working condition.
Regular cleaning and lubrication are vital to maintaining your Ryobi drill and ensuring its longevity. Clean the exterior of the training regularly to remove dust and debris, which can accumulate over time and affect its performance. Ensure the air vents are clear to prevent overheating during extended use. Lubrication is essential if your drill has moving parts that require it.
Consult your drill’s user manual for specific lubrication points and use the recommended lubricating oil. Proper cleaning and lubrication not only extend the life of your training but also ensure it operates smoothly and efficiently. This routine maintenance will save you time and money by preventing premature wear and potential breakdowns.
Conclusion
Learning to put a drill bit in a Ryobi drill is fundamental for anyone looking to tackle DIY projects or professional tasks requiring drilling. Following the step-by-step instructions, you can confidently and safely attach a drill bit to your Ryobi drill.
Remember to prioritize safety by wearing appropriate personal protective equipment and always refer to your drill’s user manual for specific guidance.
With practice and patience, you’ll become adept at changing drill bits and be well-equipped to take on a wide range of drilling tasks with your Ryobi drill. So, whether you’re a novice or an experienced DIY enthusiast, mastering this essential skill will undoubtedly enhance your capabilities and make your projects more efficient and successful.